Jump to content


Photo

Hub Carrier Removal - Advice Needed


  • Please log in to reply
11 replies to this topic

#1 RC220

RC220

    Member

  • 61 posts
  • Location:Northern Ireland

Posted 09 February 2019 - 12:54 PM

Hi all,


I am stripping and refurbishing my running gear, part of which involves removing all wishbones and hub carriers for shot blasting and (probably) hot galvanic dip.

I am trying to remove the 20mm driveshaft nut. I have the split pin out but can't stop the driveshaft from turning when trying to turn the nut. The car is off the ground on axle stands and the calipers are off. 

Is the simple solution to put the car in gear or is that likely to damage the driveshaft or other drive components?

Thanks in advance,

Roy  


#2 Spitfire Engineering

Spitfire Engineering

    Need to get Out More

  • PipPipPipPip
  • 752 posts
  • Gender:Male
  • Location:North Yorkshire

Posted 09 February 2019 - 01:07 PM

Easier to pre-loosen with the car on the ground and the brakes on, they also respond well to impact tools.

Just check for handing to make sure you are not tightening it up!


:)


#3 martinroger

martinroger

    Super Member

  • PipPip
  • 459 posts
  • Gender:Male
  • Location:Munich

Posted 09 February 2019 - 01:38 PM

Impact tools, or quickly putting the calipers on if you can (and there is still the handbrake cable/hydraulic lines/discs obviously).

#4 jonnyboy

jonnyboy

    The hardtop guy

  • PipPipPipPipPipPipPip
  • 8,288 posts
  • Gender:Male
  • Interests:Lightweight sportscars, Brunettes, Petrol & Beer.

Posted 09 February 2019 - 02:02 PM

You can use something to jam the hub against the hub carrier like a thick screwdriver or allan key you'll bend it so don't use your best snap on gear. It's 220nm I think so it will be tight. As mentioned impact gun is the most efficient way to get it off though. 


#5 RC220

RC220

    Member

  • 61 posts
  • Location:Northern Ireland

Posted 09 February 2019 - 03:11 PM

Thanks guys,


just on the thread handing point Gaz made - are these threaded differently and, if so, does anyone know which way per side? 

I'll have to go Jonnyboy's route.  Have made progress on the front in the interim...

Kind regards

Roy


#6 Ormes

Ormes

    Scary Internerd

  • PipPipPipPipPipPip
  • 4,612 posts
  • Gender:Male
  • Location:Corsham (nr. Chippenham)

Posted 09 February 2019 - 05:48 PM

Screw driver in the vent of the disc or impact tools

#7 RC220

RC220

    Member

  • 61 posts
  • Location:Northern Ireland

Posted 09 February 2019 - 10:36 PM

In the absence of impact tools plan Z...

Can't attach photo

Will share results when I try tomorrow  


#8 ukcat

ukcat

    Super Member

  • PipPip
  • 390 posts

Posted 10 February 2019 - 10:08 AM

Hi all,


I am stripping and refurbishing my running gear, part of which involves removing all wishbones and hub carriers for shot blasting and (probably) hot galvanic dip.

I am trying to remove the 20mm driveshaft nut. I have the split pin out but can't stop the driveshaft from turning when trying to turn the nut. The car is off the ground on axle stands and the calipers are off. 

Is the simple solution to put the car in gear or is that likely to damage the driveshaft or other drive components?

Thanks in advance,

Roy  


Hi Roy

Regarding coating of your components - Just be careful if you choose to galvanize (hot dipping) - Although it is a very good method of preventing corrosion it is more suited to certain products - The process produces a much thicker coating than the likes of electroplating and this can cause certain problems on certain components - My concerns would be on areas such as the bush and ball joint eyes on the wishbones and the bores off the uprights as these would definitely need further machining afterwards as would any threads i.e on the hub carriers.

Going this route is not impossible but you would definitely need to be aware of the extra requirements

Cheers

Tony


#9 martinroger

martinroger

    Super Member

  • PipPip
  • 459 posts
  • Gender:Male
  • Location:Munich

Posted 10 February 2019 - 10:10 AM

I can second that. You are better off with an electroplating and then if you fancy it, a powder coating on top.

#10 Spitfire Engineering

Spitfire Engineering

    Need to get Out More

  • PipPipPipPip
  • 752 posts
  • Gender:Male
  • Location:North Yorkshire

Posted 10 February 2019 - 12:26 PM

Thanks guys,


just on the thread handing point Gaz made - are these threaded differently and, if so, does anyone know which way per side? 

I'll have to go Jonnyboy's route.  Have made progress on the front in the interim...

Kind regards

Roy


Well once you get into aftermarket parts then anything can happen! so easy to check it's hardly worth the debate, just look at the exposed thread and see which direction the nut  needs to be rotated to remove it.


The theory is any rotational motion which may interfere with the friction lock should be handed as to apply a locking rotational force.

Only when accelerating do you see these forces unless you use massive engine braking all the time (normal braking is between the tyre and the calipers/upright and does not affect the CV)

Traditionally the left side of the car war RH and visa versa but most stuff is all RH threads now as the nut has a locking method, splining is so much better etc, it used to be a big issue with components such as knock-on wheels i.e high mass/no locking etc.


#11 RC220

RC220

    Member

  • 61 posts
  • Location:Northern Ireland

Posted 10 February 2019 - 04:24 PM

Thanks for the feedback guys. 

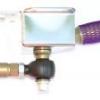
Both nuts off (and both bolts clockwise threaded for future reference).  I used several old bolts to jam the hub and stop it turning - after breaking a drill bit, an alan key, the 6in nail that has never let me down and 2 screwdrivers.  And the best breaker bar ever - a 4 ft scaffold bar with a really heavy base welded on.  I think it is a 'tamper', used to flatten the surface before laying paving stones.  It was in the garage when I bought the house 12 yrs ago.  Unused til I bought the VX and now the ultimate tool!


I am very interested in the points made by Tony and Martin.  I will go the electroplating and powder coating route instead as I don't have the skill or tools to re-engineer the wishbones after treatment.  And, I have brand new bushes, ball joints and nuts and bolts to try and fit in this process, all of which will have their own challenges.


I am also fitting the Spitfire engineering toe link (and brace kit - I still haven't measured this Gaz, its on the 'to do' list) and VRSAS kits.  This assumes I can get the track rod ends off the steering arm - I have the tie rods off but I had to use an angle grinder to cut both the tie and track rod bolts at the uprights - so the track rod ends are still on the steering rack at the moment. 


The calipers are being sent for refurbishment and car will go in for a full service (including timing belt change) and a geo set up.


I am thinking about increasing the power too.  I will leave this until next winter and just enjoy the car this summer when I have it properly set up.  However, to add to the general debate on this I was reading recently that Cosworth built a triple that generated 250 bhp as part of the proof of concept for the Valkyrie (V12 - 1,000bhp and 206kg).  That is the engine (with a 6 speed g/box) that the VX needs as it will presumably weigh a lot less than 206kg, as it has 9 fewer cylinders.  We just need to persuade them to build it.


Kind regards

Roy


#12 martinroger

martinroger

    Super Member

  • PipPip
  • 459 posts
  • Gender:Male
  • Location:Munich

Posted 10 February 2019 - 05:55 PM

I ended up doing the combined "gold yellow" electroplating and then a powder coating after much discussion on the forum. The key to success was careful masking for the powder coating, and in my case a vigorous soda blasting in the first place.


0 user(s) are reading this topic

0 members, 0 guests, 0 anonymous users