Also very smear grease thinly on the outside protruding lip on the larger end of the boot that fits within the caliper body and place both on a clean surface. Smear surface of slider thinly with grease and stand on end on a clean surface ready for use.

Rear Brake Caliper Service Kit
Started by
oblomov
, May 11 2005 10:45 PM
41 replies to this topic
#21

oblomov
-
-

- 3,758 posts
Scary Internerd
- Gender:Male
- Location:Sitting in front of my computer
- Interests:None
Posted 11 May 2005 - 11:22 PM
#22
oblomov
-
-
- 3,758 posts
Scary Internerd
- Gender:Male
- Location:Sitting in front of my computer
- Interests:None
Posted 11 May 2005 - 11:23 PM
Fit in place one rubber boot, on the (inside) caliper aperture furthest away from you. Placing the boot squarely in the aperture and pressing gently and evenly, with two fingers covering the whole of the circumference as in the picture best accomplish this.
#23
oblomov
-
-
- 3,758 posts
Scary Internerd
- Gender:Male
- Location:Sitting in front of my computer
- Interests:None
Posted 11 May 2005 - 11:26 PM
When boot is in place, cock and insert (not insert ….. er, we won’t go there, …. where was I)  insert little finger into boot and feel for the inside edge. Apply pressure all around to ensure the outer lip is correctly seated inside the groove within in the caliper body. This is a delicate procedure and it’s easy to dislodge the boot instead of actually securing it as you are trying to do. It may take a couple of attempts. Just keep searching for that ‘G’ (groove) spot.
Take the slider and insert into the caliper body from the end nearest yourself.
insert little finger into boot and feel for the inside edge. Apply pressure all around to ensure the outer lip is correctly seated inside the groove within in the caliper body. This is a delicate procedure and it’s easy to dislodge the boot instead of actually securing it as you are trying to do. It may take a couple of attempts. Just keep searching for that ‘G’ (groove) spot.
Take the slider and insert into the caliper body from the end nearest yourself.
#24
oblomov
-
-
- 3,758 posts
Scary Internerd
- Gender:Male
- Location:Sitting in front of my computer
- Interests:None
Posted 11 May 2005 - 11:27 PM
As you slide it in, when the piston end reaches the boot edge on the opposite side of the caliper body, resistance will be felt. Twisting and turning the piston gently in similar manner to when the piston was withdrawn should overcome this. If this resistance cannot be overcome by gentle persuasion, the rubber boot is not correctly seated in the retaining groove, and force should NOT be used as it will pinch/damage the boot. If this is the case, remove slider, remove and reseat boot, reinsert slider and try again.
When the slider has passed through the caliper body and into the rubber boot, place finger in caliper body to hold slider in place and use two fingers to slide outer boot lips onto caliper and then over and beyond the retaining groove on the slider. Use the piece of wood if necessary to help with this. The slider should protrude about 1/3 way out of the end of the boot, leaving the opposite end of the piston aperture clear for fitting the second boot, as in the picture below.
#25
oblomov
-
-
- 3,758 posts
Scary Internerd
- Gender:Male
- Location:Sitting in front of my computer
- Interests:None
Posted 11 May 2005 - 11:28 PM
It is likely that excess grease from the piston will have gathered in the remaining rubber boot retaining groove in the caliper body.
#26
oblomov
-
-
- 3,758 posts
Scary Internerd
- Gender:Male
- Location:Sitting in front of my computer
- Interests:None
Posted 11 May 2005 - 11:31 PM
Care must be taken to remove ALL this grease from the groove, as it will prevent the second rubber boot from seating properly. Fit second boot in same manner as first except that as the boot is facing you, the little finger can be inserted without cocking.
#27
oblomov
-
-
- 3,758 posts
Scary Internerd
- Gender:Male
- Location:Sitting in front of my computer
- Interests:None
Posted 11 May 2005 - 11:32 PM
When second boot is correctly seated push piston back in through the caliper and seat both boot outer lips in corresponding grove in slider body.
Wipe off any excess grease from both boots boot and the exposed slider ends that might accumulate brake dust.
Re-fit brake disc and retaining screw.
Re-fit brake pads and re-fit top slider retaining bolt with Threadlock and torque to specified setting. Replace brake cylinder reservoir cap.
IMPORTANT. Pump brake pedal gently to take up any slack between piston and brake pads, BEFORE moving the vehicle.
A COUPLE OF POINTS TO CONSIDER
With a fine paintbrush paint top slider exposed ends with thin layer of Waxoyl to protect against rust. Similarly, the brake piston face, (you can see in the pictures mine has started to rust slightly) Also the head of lower slider retaining bolt, and the head of top sliding bolt. Leave for 24 hours to dry before refitting pads and top retaining bolt.
Apply LM grease or similar to handbrake cable end.
Ferky Nell, is that the time  G'night
G'night
Edited by oblomov, 11 May 2005 - 11:35 PM.
#28
Joe-Turbo
-
-
- 4,176 posts
Scary Internerd
- Gender:Male
- Location:Rayleigh, Essex.
Posted 12 May 2005 - 12:55 AM
nice gloves 
#29
AmazingMonkey
-
-
- 578 posts
Super Duper Member
- Gender:Male
- Location:here
Posted 12 May 2005 - 07:06 AM
nice guide 
#30
Mutt & Jeff
-

-
- 1,772 posts
Billy No Mates
- Gender:Male
- Location:Herts.
- Interests:Music, F1, Cars, Keeping Fit, Skateboarding with my boys & Red Wine
Posted 12 May 2005 - 08:39 AM
Great guide, can this be added to the DIY car-care section please?
Thanks kind moderator
Nice marigolds! 
Nice marigolds!
#31
oblomov
-
-
- 3,758 posts
Scary Internerd
- Gender:Male
- Location:Sitting in front of my computer
- Interests:None
Posted 12 May 2005 - 12:00 PM
That's nothin mate, I've got the full body glove and matching head mask to with itnice gloves

Yoo see, boyo, I' m the onlee gaaay in the vil-age.

#32
cyberman
-

-
- 652 posts
Super Duper Member
Posted 16 May 2005 - 04:19 PM
Nice guide Oblomov. Well done. Now if each of us takes one procedure and documents it so well, in no time we will have the entire car down. Really, well done.
Ian
#33
Duncan VXR
-

-
- 5,273 posts
Scary Internerd
- Gender:Male
- Location:Lincolnshire
- Interests:Anything to do with making cars faster and better than the original
Posted 20 September 2008 - 03:37 PM
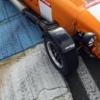
Push inner white sleeve insert fully home. The rubber sleeve outer lip mentioned earlier can be clearly seen in this picture
Having a real game trying to get the metal rod back in with the white plastic in place
 kit did not come with a new one and the old one is now slightly bent trying to get the rod in. Is the plastic part required? What does it do?????????
Anyone got a spare caliper I can use for a week or buy LOL
#34
oblomov
-
-
- 3,758 posts
Scary Internerd
- Gender:Male
- Location:Sitting in front of my computer
- Interests:None
Posted 20 September 2008 - 09:55 PM
Push inner white sleeve insert fully home. The rubber sleeve outer lip mentioned earlier can be clearly seen in this picture
Having a real game trying to get the metal rod back in with the white plastic in place
Anyone got a spare caliper I can use for a week or buy LOL
IIRC the white sleeve works as a low friction barrier between the bar and the rubber sleeve holding it, giving the brake itself more firm support as it moves on the bar. Rubber alone is probably too soft to withstand the wear.
Unless someone has a better explanation?
#35
Duncan VXR
-
-
- 5,273 posts
Scary Internerd
- Gender:Male
- Location:Lincolnshire
- Interests:Anything to do with making cars faster and better than the original
Posted 21 September 2008 - 07:42 AM
Makes sense  so guess it should be fine for a few days of driving and a track day until I get a replacement? Well it is my only option lol
Thanks for the reply
so guess it should be fine for a few days of driving and a track day until I get a replacement? Well it is my only option lol
Thanks for the reply
so guess it should be fine for a few days of driving and a track day until I get a replacement? Well it is my only option lol
Thanks for the reply
#36
LY_Scott
-
-
- 9,220 posts
Formerly LY055SCO
- Gender:Male
- Location:Burntisland, Fife
- Interests:Stock Car Racing. Sailing, Good Food and Drink! Celtic, Scottish National Team. Bands
Posted 04 February 2013 - 05:20 PM
Had pondered doing this and the fronts plus discs and pads to just give the system a bit of a refresh. Read the seloc wiki guide for it. Looks a nightmare, screws snapping inside etc. God sake.
#37
LazyDonkey
-

-
- 7,748 posts
Lotus imposter
- Gender:Male
- Location:Glasgow, Scotland
Posted 04 February 2013 - 07:27 PM
I've got old rears you can experiment on if you want Scott.
#38
JamesC
-
-
- 991 posts
Need to get Out More
- Gender:Male
- Location:Shropshire
- Interests:Cars, Beer, Diving, not necessarily in that order....
Posted 04 February 2013 - 10:48 PM
I looked at the exact same thing, and decided that by the time I had spent £60 on refurb kits for the rears might be able to find someone to overhaul them for me for a little more. I used a company near Nottingham. They rebuilt the rear calipers, painted them and replaces all the seals/nipples etc and 3 year warranty for £160 which I didn't think was too bad.Had pondered doing this and the fronts plus discs and pads to just give the system a bit of a refresh. Read the seloc wiki guide for it. Looks a nightmare, screws snapping inside etc. God sake.
http://www.brake-cal...ml#.URA52WtYCK0
#39
LY_Scott
-
-
- 9,220 posts
Formerly LY055SCO
- Gender:Male
- Location:Burntisland, Fife
- Interests:Stock Car Racing. Sailing, Good Food and Drink! Celtic, Scottish National Team. Bands
Posted 05 February 2013 - 11:39 AM
That's a good link James, cheers. Probably the way I may go as I don't fancy sheering bits off etc and being left with the car in the air and no caliper. Martin, I may take you up o that. Much you want for them? I'll probably send yours away then swap them over.
Won't be doing this anytime soon (unless it comes up as a gotcha on my MOT today) as I've lots of other shizzle to pay and save for. But couple of months from now maybe.
#40
LazyDonkey
-
-
- 7,748 posts
Lotus imposter
- Gender:Male
- Location:Glasgow, Scotland
Posted 06 February 2013 - 08:39 AM
That's a good link James, cheers. Probably the way I may go as I don't fancy sheering bits off etc and being left with the car in the air and no caliper. Martin, I may take you up o that. Much you want for them? I'll probably send yours away then swap them over.
They are just taking up space in my cupboard so you're welcome to them for nowt. Craig said they were pretty fcuked but you're welcome to have a shot at refurbing them.
Think i've got oem brembo pads for the rear too.......not that they're much use to anyone though
Edited by LazyDonkey, 06 February 2013 - 08:39 AM.


0 user(s) are reading this topic
0 members, 0 guests, 0 anonymous users

