

Removing Side Engine Vents On An NA
Started by
ChazUwe
, Nov 15 2006 01:04 PM
23 replies to this topic
#1

ChazUwe
-
-

- 2,450 posts
Scary Internerd
- Gender:Male
- Location:Bristol
- Interests:Cars, Computers, Drinking and travelling about.
Posted 15 November 2006 - 01:04 PM
Mine are looking a little tatty now where they have been pepper sprayed with stones. I know you can spray them in situ but I was wondering how difficult they are to remove as it would make them easier to spray...
I see that there is just a normal rivet holding this in place. If you drill this out can you just tilt and slide the vent out? Or do you need to get to the rear of the vent too by removing the wheel arch liner?
Thanks in advance people
#2
JawZ
-

-
- 2,571 posts
Scary Internerd
- Gender:Male
- Location:Sweden, Gothenburg
- Interests:Bodybuilding, 3D/2D Gfx, Web design, Sportscars, Electronic Music.
Posted 15 November 2006 - 01:07 PM
Mine are looking a little tatty now where they have been pepper sprayed with stones. I know you can spray them in situ but I was wondering how difficult they are to remove as it would make them easier to spray...
I see that there is just a normal rivet holding this in place. If you drill this out can you just tilt and slide the vent out? Or do you need to get to the rear of the vent too by removing the wheel arch liner?
Thanks in advance people
I know that it's been suggested before to remove the wheel arch liner to do this
#3
mainline
-

-
- 1,356 posts
Billy No Mates
Posted 15 November 2006 - 01:58 PM
I sprayed mine with them in situ, just used plenty of masking tape, wet and dry paper and patience. It was a fairly easy job TBH and they look really really good, makes a huge difference.
#4
skidsharples
-

-
- 394 posts
Super Member
- Gender:Male
- Location:Wigan!!!!
Posted 15 November 2006 - 02:03 PM
From memory didn't smiler do this? Maybe drop him a pm.
#5
ChazUwe
-
-
- 2,450 posts
Scary Internerd
- Gender:Male
- Location:Bristol
- Interests:Cars, Computers, Drinking and travelling about.
Posted 17 November 2006 - 09:38 PM
Thanks guys, think I will take the wheel liner out to check it out
#6
ChazUwe
-
-
- 2,450 posts
Scary Internerd
- Gender:Male
- Location:Bristol
- Interests:Cars, Computers, Drinking and travelling about.
Posted 14 January 2007 - 04:20 PM
Didn't hear anything from Smiler, surely someone must have taken them off before!! 
#7
cheshirevx
-

-
- 609 posts
Super Duper Member
- Location:where its at
Posted 14 January 2007 - 04:52 PM
did mine today - plenty of masking tape and newspaper - looks loads better now.  contemplated doing my v - but gonna do it with some tape first , cos im not sure if it will look right against dolphin grey
contemplated doing my v - but gonna do it with some tape first , cos im not sure if it will look right against dolphin grey
#8
error
-
-
- 372 posts
Super Member
- Gender:Male
- Location:Fagersta, Sweden
Posted 14 January 2007 - 05:05 PM
Rivet at the top and dubble sided tape along the sides holds it in place. Verry easy to bent it so be careful.
#9
s20vxl
-
-
- 76 posts
Member
Posted 14 January 2007 - 08:07 PM
Rivet at the top and dubble sided tape along the sides holds it in place. Verry easy to bent it so be careful.
yep when i changed mine for turbo vents it was a plastic rivet at the top double sided , i wanted to save them but the got too bent. id say paint them in situe or fit turbo ones, easier to do than it looks. bout half hour each side
#10
meo
-
-
- 651 posts
Super Duper Member
- Gender:Male
- Location:lake district
- Interests:cars bikes going out drinking
Posted 14 January 2007 - 08:20 PM
How easy is it to fit the turbo vents to the n/a?
#11
RichH
-

-
- 2,263 posts
Scary Internerd
- Location:South Hampshire
Posted 14 January 2007 - 08:33 PM
No idea about hte vent/grill part, but the intake/ear parts are not straight forward. As I understand it you have to cut into the clamHow easy is it to fit the turbo vents to the n/a?


 Probably something that most people wouldn't want to do at home.
#12
meo
-
-
- 651 posts
Super Duper Member
- Gender:Male
- Location:lake district
- Interests:cars bikes going out drinking
Posted 14 January 2007 - 08:38 PM
has anyone changed them to turbo vents thow. s20vxl said something bowt these.
#13
s20vxl
-
-
- 76 posts
Member
Posted 14 January 2007 - 08:52 PM
has anyone changed them to turbo vents thow. s20vxl said something bowt these.
i don't know how to post pics
but you basically remove the arch liners, drill the rivets out of the meshed part and pull them off. then you will see where the blanking plate is put in, offer up the new vent. the blanking plate is glued on quite well so a long prybar is needed but dn't puncture the clam behind. a bit scary. you then have to trim the back edge of the clam a little bit at a time till the vent sits in nicely. no paintwork is needed if you are carefull. only painting the vents ofcourse. ill email the pics to meo and see if he can post them.
#14
meo
-
-
- 651 posts
Super Duper Member
- Gender:Male
- Location:lake district
- Interests:cars bikes going out drinking
Posted 14 January 2007 - 09:02 PM
had my turbo vents for a while now. cost me £550 from vauhall. where did you get yours from?
#15
s20vxl
-
-
- 76 posts
Member
Posted 14 January 2007 - 09:23 PM
ebay for one i waited about 5 months for them to come up and missed out on one so had to get it from vauxhall. got some carbon front spoilers from germany through ebay and the rear spoiler from vauxhall.
im a painter by trade so get a bit of discount
#16
mandarinvx
-

-
- 12,621 posts
King of First Replies
- Gender:Male
- Location:West Mids / Oxfordshire
Posted 14 January 2007 - 11:18 PM
I've seen the carbon front splitters on ebay - but the lack of quality of the pictures put me off!ebay for one i waited about 5 months for them to come up and missed out on one so had to get it from vauxhall. got some carbon front spoilers from germany through ebay and the rear spoiler from vauxhall.
im a painter by trade so get a bit of discount
Can you see the carbon twill, or do they just look flat black

#17
ChazUwe
-
-
- 2,450 posts
Scary Internerd
- Gender:Male
- Location:Bristol
- Interests:Cars, Computers, Drinking and travelling about.
Posted 14 January 2007 - 11:53 PM
Thanks for the flurry of replies!  Don't want to risk damaging them so think I will do them in situ. Slightly more of a pain but sure they will still come out nice.
Cheers again
Don't want to risk damaging them so think I will do them in situ. Slightly more of a pain but sure they will still come out nice.
Cheers again 
Don't want to risk damaging them so think I will do them in situ. Slightly more of a pain but sure they will still come out nice.
Cheers again
#18
s20vxl
-
-
- 76 posts
Member
Posted 15 January 2007 - 06:43 PM
I've seen the carbon front splitters on ebay - but the lack of quality of the pictures put me off!
ebay for one i waited about 5 months for them to come up and missed out on one so had to get it from vauxhall. got some carbon front spoilers from germany through ebay and the rear spoiler from vauxhall.
im a painter by trade so get a bit of discount
Can you see the carbon twill, or do they just look flat black
the carbon splitters are flat black but fit properly and are cheaper than vauxhall
#19
mandarinvx
-
-
- 12,621 posts
King of First Replies
- Gender:Male
- Location:West Mids / Oxfordshire
Posted 15 January 2007 - 10:06 PM
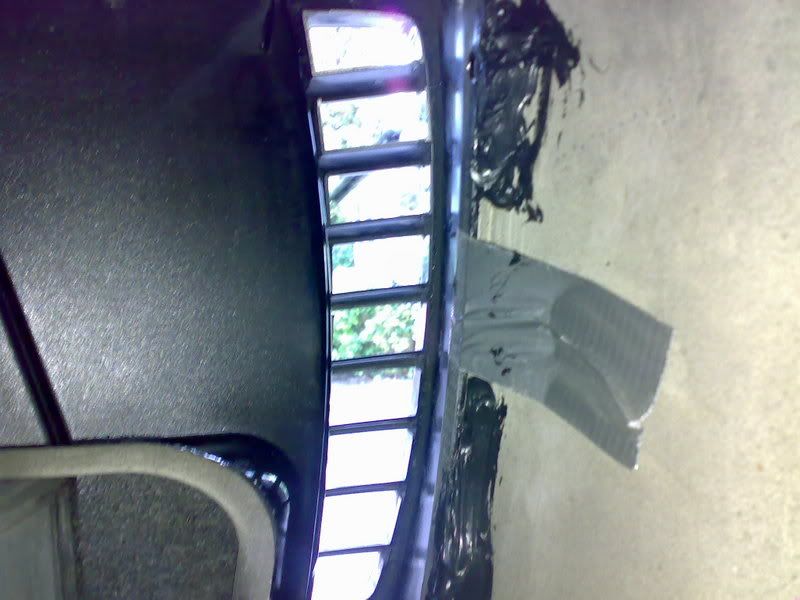
Guide to retro-fitting tubby vents courtesy of s20vxl,
He's made a great job of it, and doesn't look quite as complex as first imagined:-
"here is how to do it
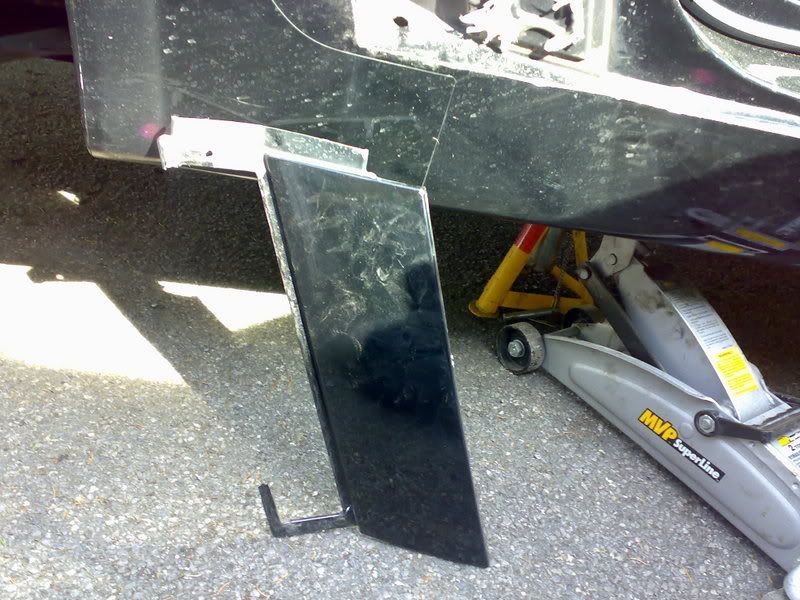
once you have jacked the car up and taken the rear wheels off, you need to
remove the wheel archliners.
Then drill out the plastic rivets on the old grills and pull them off, they
are stuck with double sided tape so take a bit of pulling.
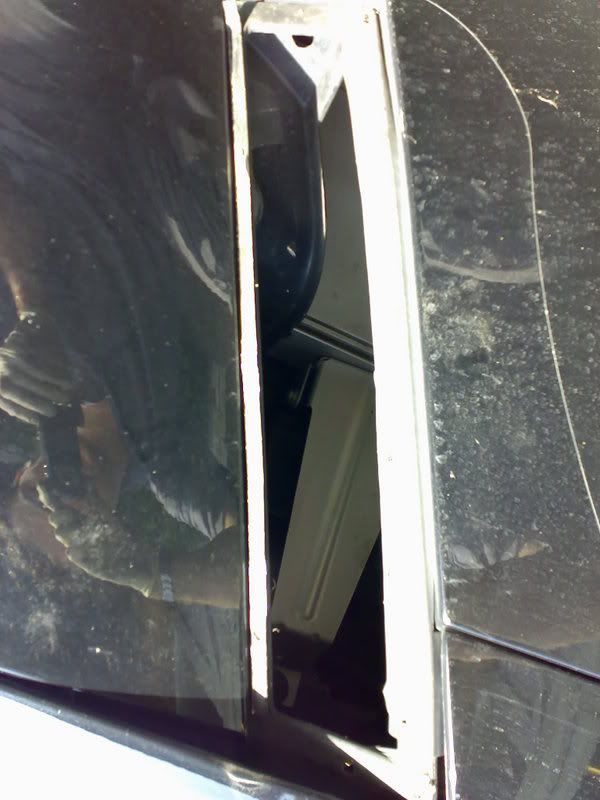
now offer the turbo vent up and see how it fits, the flat panel behind the
door is just bonded in place and if you look round the edges you can see it
comes away. working from inside the wheelarch jam a pry bar down the back of
the cover levering it off but be carfull not to puncture the clam. keep
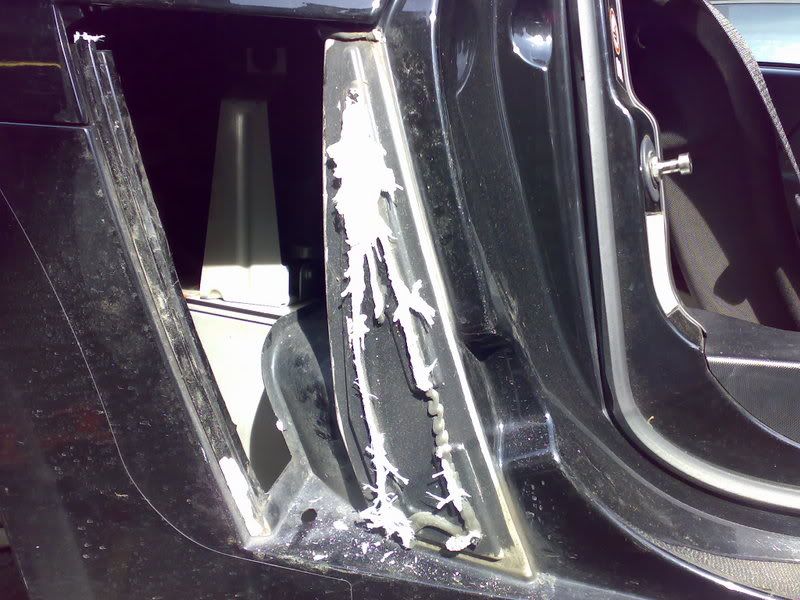
doing this till the larger section can be taken off. now offer the vent up
again and see how much has to be taken off the back of the clam section to
allow the vent to sit nicely. i trimmed it away using and air saw but a
coping saw could be used, but make sure you only take away a small amount at
a time offering the vent up all the time till it fits nicely. once done sand
away any bonder left where you pulled the blanking plate off and spray it
black as you will see it throught the vent.
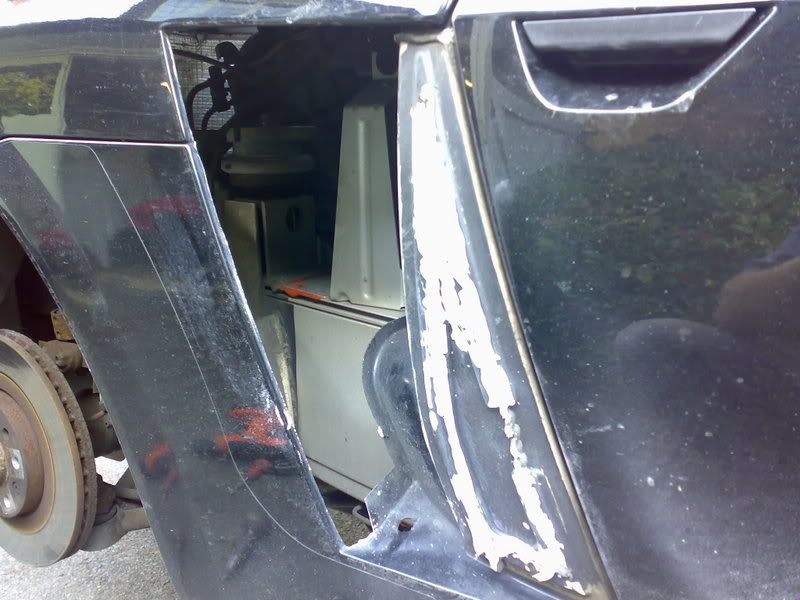
now fit the vent in place and drill two holes for plastic push rivets to go
through (one in the door shut and one at the top of the vent inside the
grill). now tape the back of the vent tight to the clam so there is no gap
and bond it in with a strong bonder like windscreen bonder, they are bolted
in at the back edge on the turbo but the studs are not present on the n/a.
you won't need to do any paintwork if you are carefull other than the vents
themselves.
hope it all makes sense and good luck."
And the pics...
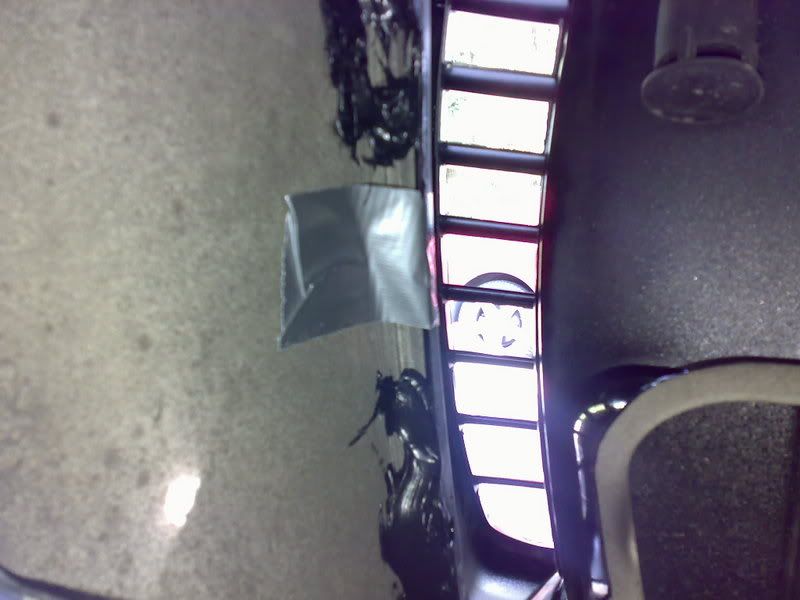
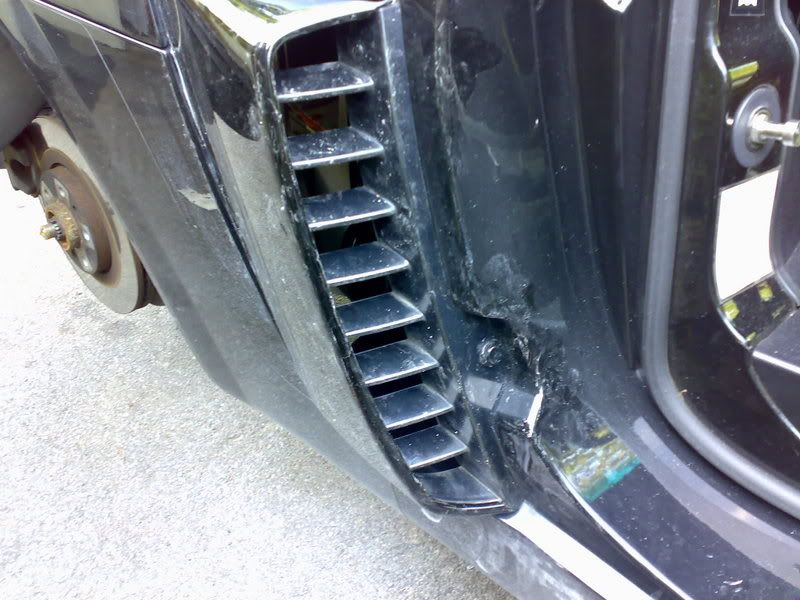

Looks
He's made a great job of it, and doesn't look quite as complex as first imagined:-
"here is how to do it
once you have jacked the car up and taken the rear wheels off, you need to
remove the wheel archliners.
Then drill out the plastic rivets on the old grills and pull them off, they
are stuck with double sided tape so take a bit of pulling.
now offer the turbo vent up and see how it fits, the flat panel behind the
door is just bonded in place and if you look round the edges you can see it
comes away. working from inside the wheelarch jam a pry bar down the back of
the cover levering it off but be carfull not to puncture the clam. keep
doing this till the larger section can be taken off. now offer the vent up
again and see how much has to be taken off the back of the clam section to
allow the vent to sit nicely. i trimmed it away using and air saw but a
coping saw could be used, but make sure you only take away a small amount at
a time offering the vent up all the time till it fits nicely. once done sand
away any bonder left where you pulled the blanking plate off and spray it
black as you will see it throught the vent.
now fit the vent in place and drill two holes for plastic push rivets to go
through (one in the door shut and one at the top of the vent inside the
grill). now tape the back of the vent tight to the clam so there is no gap
and bond it in with a strong bonder like windscreen bonder, they are bolted
in at the back edge on the turbo but the studs are not present on the n/a.
you won't need to do any paintwork if you are carefull other than the vents
themselves.
hope it all makes sense and good luck."
And the pics...
Looks
#20
meo
-
-
- 651 posts
Super Duper Member
- Gender:Male
- Location:lake district
- Interests:cars bikes going out drinking
Posted 15 January 2007 - 10:44 PM
got these pics off him last nite done a good job hasnt he. how do ya post pics? going to do my tuby vents this weekend if it stays dry!


0 user(s) are reading this topic
0 members, 0 guests, 0 anonymous users

