Jump to content


Photo

Near Side Engine Mount Replacement Guide


  • Please log in to reply
42 replies to this topic

#1 RWinstanley

RWinstanley

    Super Member

  • PipPip
  • 482 posts
  • Location:Leeds

Posted 04 July 2006 - 06:37 PM

Seeing as the engine mounts keep failing and mine needed replacing I thought I’d take a few pictures and write a guide. The basics are laid out in the TIS, clicky, but it’s never quite as simple as they make out.

First thing to do is to remove the undertray, jack the passenger side up remove the rear wheel and the wheel arch liner. This should then give you access the engine mount. While you’ve got the wheel arch liner off it’s a god idea to replace the bolt with stainless steel allen key heads. The TIS says to loosen the expansion tank but it can be done with it in place.

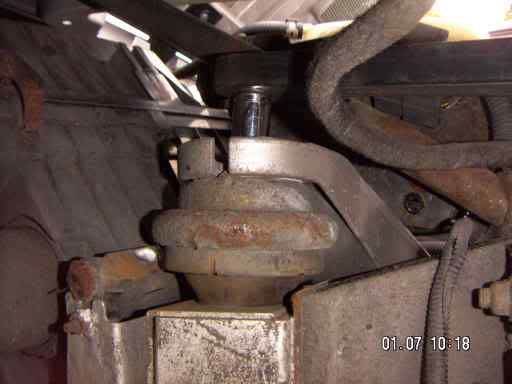
The order in which you unbolt the mount doesn’t mater but the easiest is to start with the bolts either side of the mount so that the bracket holds it in place. The top bolt is shown in the picture with the socket on.

Posted Image

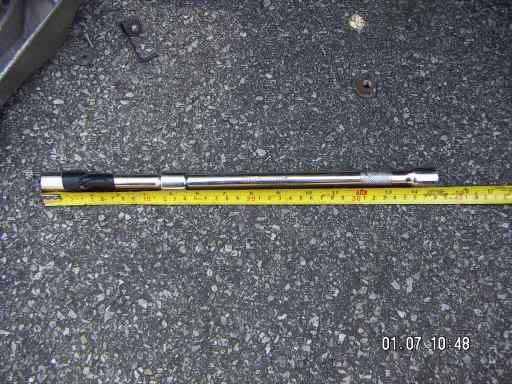
The bolt at the bottom of the mount needs to be accessed from underneath by using ideally a 40 cm extension bar. The one I used is shown below and was not quite long enough to clear the wishbone.

Posted Image

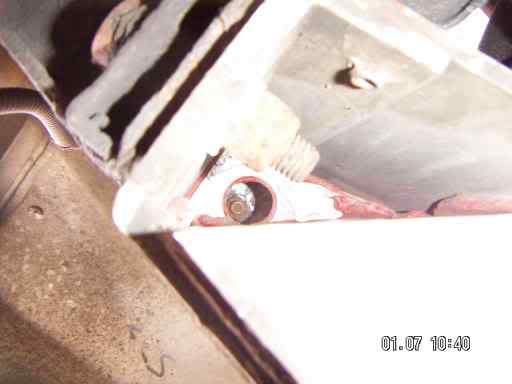
You’ll notice the tape on the socket this is because the access hole to the nut (shown below) is in a box section and it’s quite easy to knock the socket off getting it stuck. Which then requires taking the airbox off to get it back out. :beat:

Posted Image

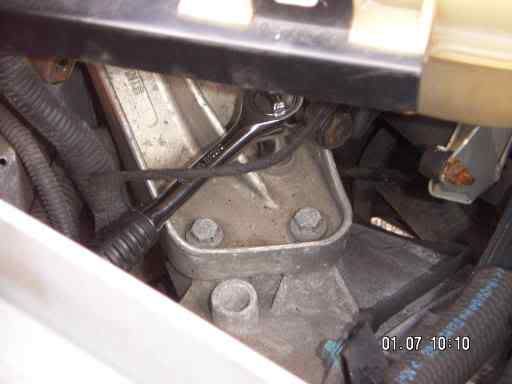
The last thing to remove is the bracket that attaches to the engine, simply remove the three bolts on the top then the bracket.

Posted Image

Now all that is left to do is to remove the old mount, replace with the new one and reassemble everything tightening the nuts and bolts to 45 Nm as specified in the TIS.

Disclaimer

This is offered as a guide to an experienced person only. Don't attempt this if you are not sure!!

Hope this helps,

Rob

PS I'll convert and post the PDF version later in the week

oops their a bit big!

Edited by RWinstanley, 04 July 2006 - 06:52 PM.


#2 XXX

XXX

    Invisible ex-VX owner

  • PipPipPipPipPipPip
  • 4,471 posts
  • Gender:Male
  • Location:South Croydon, Surrey

Posted 04 July 2006 - 06:48 PM

I will bear this post in mind when my mounts go - 26,000 miles so any time now! There must be a thread on photo-resizing somewhere!!!!! :P thats better....!

Edited by XXX, 04 July 2006 - 06:49 PM.


#3 RWinstanley

RWinstanley

    Super Member

  • PipPip
  • 482 posts
  • Location:Leeds

Posted 04 July 2006 - 06:50 PM

I will bear this post in mind when my mounts go - 26,000 miles so any time now!

There must be a thread on photo-resizing somewhere!!!!! :P


thats better....!


Give me chance :P

#4 ChazUwe

ChazUwe

    Scary Internerd

  • PipPipPipPipPipPip
  • 2,450 posts
  • Gender:Male
  • Location:Bristol
  • Interests:Cars, Computers, Drinking and travelling about.

Posted 04 July 2006 - 06:55 PM

Excellent guide Rob, next time mine go I will probably attempt it myself now chinky chinky

#5 CupidKnewRap

CupidKnewRap

    Billy No Mates

  • PipPipPipPipPip
  • 1,783 posts
  • Location:wherever work needs me to be

Posted 04 July 2006 - 07:32 PM

Did you replace the drivers side as well :unsure: ? it's a little more awkward :rolleyes: (although in my case the damn thing was sheared cleanly apart and I couldn't get the mount off without removing the arm) ;) I don't really have a problem with the engine mount failures if it happens every 27-50K miles. the pair cost about as much as good brake pads and are as easy to fit.

#6 snoopstah

snoopstah

    Scary Internerd

  • PipPipPipPipPipPip
  • 3,056 posts
  • Gender:Male
  • Location:Vancouver, BC

Posted 28 July 2006 - 07:33 PM

Superb guide - don't know how I missed it! To confirm, TIS says to support the engine, but you make no mention of this. Was it possible, in your case, to replace the mount without supporting the engine?

#7 tomcoombs

tomcoombs

    Member

  • Pip
  • 238 posts

Posted 19 September 2006 - 06:33 PM

Great guide - I will be trying soon. 2 Questions though: 1) How do you support the engine? 2) Is it exactly the same on a tubby? Thanks! T

#8 tomcoombs

tomcoombs

    Member

  • Pip
  • 238 posts

Posted 20 September 2006 - 09:27 AM

So - nobody out there has done this on the VXT???! T

#9 RWinstanley

RWinstanley

    Super Member

  • PipPip
  • 482 posts
  • Location:Leeds

Posted 20 September 2006 - 11:54 AM

I can't see why it would be much different for a vxt, possibly a different design bracket attached to the engine. But i'd expect them to keep the same design of mount to the chassis to minimise cost. As for supporting the engine that's required for the off side mount that supports the underside of the engine.

#10 clarky

clarky

    Newbie

  • 7 posts
  • Location:Southport

Posted 20 September 2006 - 12:05 PM

Really useful - thanks RW

#11 tomcoombs

tomcoombs

    Member

  • Pip
  • 238 posts

Posted 20 September 2006 - 12:47 PM

Cool So how do you support the engine? Another trolley jack applying force on the sump of the engine? What I am asking is the technique for actually supporting the engine. (Something thing is always assumed in the guides... T

#12 RWinstanley

RWinstanley

    Super Member

  • PipPip
  • 482 posts
  • Location:Leeds

Posted 20 September 2006 - 03:45 PM

Cool

So how do you support the engine? Another trolley jack applying force on the sump of the engine?
What I am asking is the technique for actually supporting the engine. (Something thing is always assumed in the guides...

T


If I was doing it i'd jack the car and use axel stands front and back on one side then use the trolly jack to support the engine, somewhere that look solid using some wood to distribute the load

Edited by RWinstanley, 20 September 2006 - 03:46 PM.


#13 tomcoombs

tomcoombs

    Member

  • Pip
  • 238 posts

Posted 22 September 2006 - 10:03 AM

Trying to buy all the tools I need for this, so far got : Ratchet Torque Wrench 1/2 Drive - Do I need 1/2 , 3/4 drive? What size are the nuts on the VX? 1 ton Axle-Stands (Pair) Trolley Jack ( Already got ) Extension Bar 400mm 1/2 Drive Sealey - Again, do I need 1/2 drive? Tom

#14 RWinstanley

RWinstanley

    Super Member

  • PipPip
  • 482 posts
  • Location:Leeds

Posted 22 September 2006 - 11:27 AM

most of the nuts i've undone on a vx are 13, 15 and 17 mm. The drive size doesn't matter, but it's easier to get an adapter to go down in size from 1/2 to 3/8.

#15 Winstar

Winstar

    Scary Internerd

  • PipPipPipPipPipPip
  • 4,264 posts
  • Gender:Male
  • Location:Chesterfield

Posted 29 April 2007 - 10:18 PM

Right having just finished doing the engine mounts on Racing 182's car, I thought I add a few extra notes

Problem bolt
Firstly who ever tightened the three bolts that hold the bracket to the block had done them up so tight one started to round off when removing and another did round off. This way a bit of a nightmare luckily my mate was at his workshop so we took it down there and after trying various methods to remove it what finally worked was. Weld a large washer with a 14mm hole on top of the nut, then build up some weld on top of the washer and nut, finally weld a large nut on top of this, allowing you to put a lot more torque through the bolt.

Offside Engine Mount

Changing the off side mount is very similar to the near side but there are a couple of differences.

1. As this side hold the engine up you must remove the undertray and support the engine with either a second jack or some blocks

2. The bracket bolts to the side of the engine with 2 bolts on the left as you look at it and 1 on the right. The one on the right and the bottom one on the left are accessible with a 15mm socket working from beneath the car to undo them although you'll need to finish them off with a spanner as there’s not much room.
The top one on the left is too close to the sub-frame to get a socket on to it so need to be done with a spanner working from inside the wheel arch. To undo this if it's tight put the spanner on the nut at about a 10 o'clock position then place a large spanner at 90 degrees to the one on the nut and along the back of the engine block and use this as a lever to turn the nut.

Edited by Winstar, 29 April 2007 - 10:25 PM.


#16 GunnerGibson

GunnerGibson

    Super Member

  • PipPip
  • 367 posts
  • Location:Orkneys

Posted 05 September 2007 - 12:45 AM

i'd like to add that to do the n/s mount all i did was the following: removed arch liner, used locking extension bars with 6 sided deep 15mm socket on.. removed nut ..then pulled the clip off the coolant bottle, and move it and undid the 3 bracket bolts... pulled mount out and hey presto. you dont need to support the engine whatsoever when doing the n/s mount...and that quote isnt mine its froma reputable lotus specialist... I can confirm you dont need to remove undertray or need engine supporting. 15-20 mins work/\

#17 Winstar

Winstar

    Scary Internerd

  • PipPipPipPipPipPip
  • 4,264 posts
  • Gender:Male
  • Location:Chesterfield

Posted 05 September 2007 - 07:27 AM

i'd like to add that to do the n/s mount all i did was the following:

removed arch liner, used locking extension bars with 6 sided deep 15mm socket on.. removed nut ..then pulled the clip off the coolant bottle, and move it and undid the 3 bracket bolts... pulled mount out and hey presto.

you dont need to support the engine whatsoever when doing the n/s mount...and that quote isnt mine its froma reputable lotus specialist... I can confirm you dont need to remove undertray or need engine supporting.
15-20 mins work/\


Agreed you don't need to remove the undertray for the nearside I did in the first guide as I was doing other jobs as well, but engine must be supported for the offside

One thing I'll add is to loosen the 3 bolts that hold the bracket to the gearbox it's best to use the long extension bar and work from above the engine bay rather than through the wheel arch as shown in pictures. Thia allows you to get more force on the bolt and less chance of the bot head rounding off.

#18 Jase_MK

Jase_MK

    Whipping Boy

  • PipPipPipPipPipPipPip
  • 6,277 posts
  • Gender:Male
  • Location:Milton Keynes

Posted 05 September 2007 - 08:13 AM

Need to do my drivers side one this weekend. Just searched and found lots of guides and chat about the nearside. Anyone got any pics of doing the offside?

#19 slindborg

slindborg

    The Bishop of Stortford

  • PipPipPipPipPipPipPipPip
  • 22,602 posts
  • Gender:Not Telling
  • Location:.

Posted 05 September 2007 - 08:19 AM

No pics im affraid, but the turbo drivers side mount is mildly easier than the N/A as the bolts are ontop of the bracket (which is made from lead or soemthign as its so fecking heavy) The N/A bracket is bolted onto the vertical face of the engine with 15mm bolts, one is too long to get out without tilting the bracket so undo the others first. its a do by feel setup rather than looking. Other than that its identicle to changing the pax one (bar needing to support the engine)

#20 Jase_MK

Jase_MK

    Whipping Boy

  • PipPipPipPipPipPipPip
  • 6,277 posts
  • Gender:Male
  • Location:Milton Keynes

Posted 05 September 2007 - 08:22 AM

OK, should be fine (I've got an NA) - thanks! Had the car up on axle stands and undertrays off last weekend so I've got that routine sorted nicely now :rolleyes:


0 user(s) are reading this topic

0 members, 0 guests, 0 anonymous users