Jump to content


Photo

New Heater Pipe


  • Please log in to reply
21 replies to this topic

#1 TTony

TTony

    Member

  • Pip
  • 76 posts
  • Gender:Male
  • Location:Biggin Hill Kent

Posted 12 March 2011 - 07:19 PM

When I bought my car Heath Robinson or his apprentice had been at work on my heater pipe it was cut in 2 pieces and joined by Tumble Dryer hose then had abit of insulation shoved in any gaps and then some gaffer tape on it a right Pigs Ear. Needless to say I could blow harder than the heater and a bit of warm air came out but think I must have been heating the Front bay more than anything. Spoke to Paulus H he sent me an email Heater Pipe for peanuts which got me thinking so did a trawl on ebay came back with this. Cold Air Feed with Ram Ends Flexible Ducting Item No 350369342804 It was from 800Bhp. cost £11.99 + £3.99 post. Fitted it today the alloy Ram ends are a push fit for the Heater outlet and for the Dash inlet.
To Fit
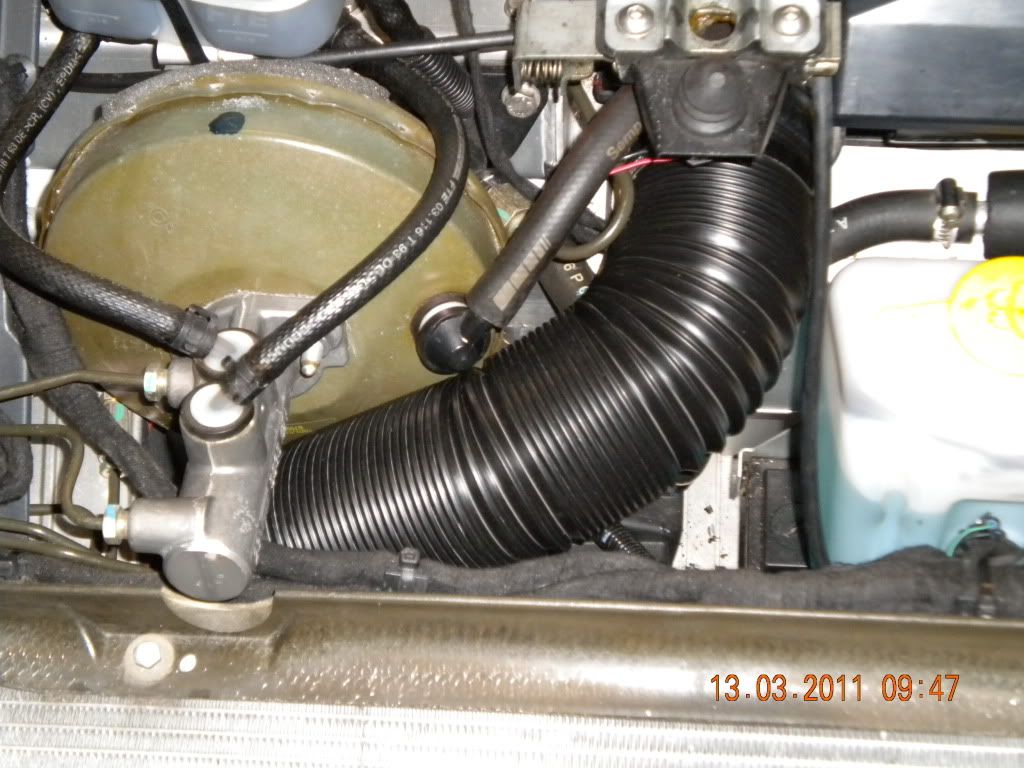
Take off your old pipe work when its off make sure you have full movement of the Heater flap and lubricate it.
Take one Ram End and cut a flat on the largest diameter then cut 2 flats at 90degrees this will allow the Ram End to fit over the Heater outlet as it is very close to the Front chassis member allso the side of the Heater box and the Side Chassis Rail so the Ram end has 3 sides of a square.
Fix the flexible hose onto this modified Ram end and secure with the jubilee clip provided position the screw of the jubilee clip at about 1 oclock so as not to fowl the brake servo when you put it on the outlet now comes the time for patience.Wiggle the Ram endpast the Brake lines and position over the outlet push into place with a pin hammer handle cut off the extra pipe not needed secure the other Ram end with the other jubilee clip position filter mod back over dash inlet and then push on the new pipe work then test. WOW heater that blows allso hot air JOB's a Goodun.
After that got the bug made a Stainless Header cover and covered it with Carbon Fibre then took off the dash covered that with Carbon Fibre. Replaced the Speakers as well because under base they kept farting in my ear think the cones had gone all in all good day.
T :groupjump:


#2 jameso

jameso

    Scary Internerd

  • PipPipPipPipPipPip
  • 2,336 posts
  • Gender:Male
  • Location:West Midlands

Posted 12 March 2011 - 07:51 PM

pics?

#3 TTony

TTony

    Member

  • Pip
  • 76 posts
  • Gender:Male
  • Location:Biggin Hill Kent

Posted 12 March 2011 - 07:59 PM

pics?


Will get some pic's tomorrow should be fun trying to upload them us OAP's are not used to these new fangled gadgets like Computers.
T :groupjump:

#4 TTony

TTony

    Member

  • Pip
  • 76 posts
  • Gender:Male
  • Location:Biggin Hill Kent

Posted 13 March 2011 - 02:06 PM

Here are some pics of the heater pipework.

Posted Image


Posted Image


Posted Image


T :groupjump:

#5 jonnyboy

jonnyboy

    The hardtop guy

  • PipPipPipPipPipPipPip
  • 8,290 posts
  • Gender:Male
  • Interests:Lightweight sportscars, Brunettes, Petrol & Beer.

Posted 13 March 2011 - 02:12 PM

Looks good this is on my to do list

#6 Ben NA

Ben NA

    Super Member

  • PipPip
  • 480 posts
  • Gender:Male

Posted 15 March 2011 - 07:31 AM

Looks like great quality ducting. I'll have to buy myself some! Good job btw. Looks very oem.

#7 H1 HWK

H1 HWK

    Need to get Out More

  • PipPipPipPip
  • 1,009 posts
  • Gender:Male
  • Location:Bridgend or Haverfordwest, Wales

Posted 15 March 2011 - 05:51 PM

Hey TT, nice find....looks a really good replacement for the regular "butted" contact points. I've got the standard pipe nicely linked up with the squash bottle method and it's working fine at the moment, so I'm going to leave it as is until performance drops off. If you're getting good air/heat from the unit at the moment, next time you have the dash off, inspect the foam rectangle that bridges the feed pipe to the dashtop. I beefed mine up with some thicker foam (for a more compressed fit) recently and that made as much of an improvement as getting a good bond between the ducting pipe to the bulkhead -i.e. a lot! The frost on Monday morning was quickly dispatched with my heater now working to about 60% of a normal car, and heated seats kept my ass warm while I was waiting to see where I was going :blush:

#8 TTony

TTony

    Member

  • Pip
  • 76 posts
  • Gender:Male
  • Location:Biggin Hill Kent

Posted 15 March 2011 - 06:35 PM

Hey TT, nice find....looks a really good replacement for the regular "butted" contact points. I've got the standard pipe nicely linked up with the squash bottle method and it's working fine at the moment, so I'm going to leave it as is until performance drops off.

If you're getting good air/heat from the unit at the moment, next time you have the dash off, inspect the foam rectangle that bridges the feed pipe to the dashtop. I beefed mine up with some thicker foam (for a more compressed fit) recently and that made as much of an improvement as getting a good bond between the ducting pipe to the bulkhead -i.e. a lot!

The frost on Monday morning was quickly dispatched with my heater now working to about 60% of a normal car, and heated seats kept my ass warm while I was waiting to see where I was going :blush:


Thanks for the Dash info H1 HWK will have to check when its off with the new pipe on you can hear the difference in the heater bay it sounds like a normal heater blower with no sound of air leaks. Don't want to get too hot won't want to get out.
T :grouphug:

#9 NA Jimbo

NA Jimbo

    Super Member

  • PipPip
  • 365 posts
  • Gender:Male
  • Location:Blackburn

Posted 15 March 2011 - 07:16 PM

Hey TT, nice find....looks a really good replacement for the regular "butted" contact points. I've got the standard pipe nicely linked up with the squash bottle method and it's working fine at the moment, so I'm going to leave it as is until performance drops off.

If you're getting good air/heat from the unit at the moment, next time you have the dash off, inspect the foam rectangle that bridges the feed pipe to the dashtop. I beefed mine up with some thicker foam (for a more compressed fit) recently and that made as much of an improvement as getting a good bond between the ducting pipe to the bulkhead -i.e. a lot!

The frost on Monday morning was quickly dispatched with my heater now working to about 60% of a normal car, and heated seats kept my ass warm while I was waiting to see where I was going :blush:


The foam on mine is knackered. Where did you get the foam and how did you attach it?

#10 H1 HWK

H1 HWK

    Need to get Out More

  • PipPipPipPip
  • 1,009 posts
  • Gender:Male
  • Location:Bridgend or Haverfordwest, Wales

Posted 15 March 2011 - 08:39 PM


Hey TT, nice find....looks a really good replacement for the regular "butted" contact points. I've got the standard pipe nicely linked up with the squash bottle method and it's working fine at the moment, so I'm going to leave it as is until performance drops off.

If you're getting good air/heat from the unit at the moment, next time you have the dash off, inspect the foam rectangle that bridges the feed pipe to the dashtop. I beefed mine up with some thicker foam (for a more compressed fit) recently and that made as much of an improvement as getting a good bond between the ducting pipe to the bulkhead -i.e. a lot!

The frost on Monday morning was quickly dispatched with my heater now working to about 60% of a normal car, and heated seats kept my ass warm while I was waiting to see where I was going :blush:


The foam on mine is knackered. Where did you get the foam and how did you attach it?


Hi Jimbo,

I just cut a suitable size rectangle (use the old seal for template) from some packing foam I had in the garage...about 30mm thick I used and seemed to fit/work well. Stuck it to the vent with carpet tape, then when you re-fix the dash it compresses to form a decent air tight seal. The original stuff fitted looks more like (10mm) draft excluder tape.

Definately worth doing if you have the dash off for any reason. If you haven't had the dash off before, have a read through the various guides as they helped me -

1. find out where the screws are
2. not snap the starter switch wire.
3. gave me confidence to give it a bit of brute force to wiggle it free from the stack binnacle.
4. probably swear a bit less than I would if I'd had to work it out from scratch.:happy:

Cheers

#11 Paulus H

Paulus H

    Evil Triumphs When Good Men Do Nothing

  • PipPipPipPipPipPip
  • 2,063 posts
  • Gender:Male
  • Location:DE65 5NX
  • Interests:I really appreciate my car. I have piled on 100,000 miles in 8 years of ownership. I still love every day I get in it

Posted 15 March 2011 - 10:57 PM

My version... Blue silicon is push fit over heater outlet. Steel sleeve fits in tube and then is pushed into dashboard inlet.

PM me for details of where to get parts/sizes etc

Version above is far nicer execution.

Paul

Posted Image

#12 d4nnyk

d4nnyk

    Need to get Out More

  • PipPipPipPip
  • 769 posts
  • Gender:Male
  • Location:Kent

Posted 17 March 2011 - 09:01 AM

Great work, I have ordered the same pipe and will give it a go at the weekend, I have tried different piping and always had trouble fitting the pipe on the actually heater box, the ram parts look like a great idea. Imnotworthy Imnotworthy Imnotworthy Imnotworthy Imnotworthy Imnotworthy great find

#13 moospeed

moospeed

    Billy No Mates

  • PipPipPipPipPip
  • 1,401 posts
  • Gender:Male
  • Location:Wigmore, Kent

Posted 18 March 2011 - 01:59 PM

Looks good stuttering Tony, will give this a bash myself. Ironically I've been waiting for it to warm up a bit before getting out to the garage to start on jobs like this ;)

Edited by moospeed, 18 March 2011 - 01:59 PM.


#14 TTony

TTony

    Member

  • Pip
  • 76 posts
  • Gender:Male
  • Location:Biggin Hill Kent

Posted 18 March 2011 - 04:57 PM

Looks good stuttering Tony, will give this a bash myself. Ironically I've been waiting for it to warm up a bit before getting out to the garage to start on jobs like this ;)


MoMoMoMoospeed
Good job I don't st st st stutter otherwise might get up up up uptight.
TTT thumbsup

#15 Paulus H

Paulus H

    Evil Triumphs When Good Men Do Nothing

  • PipPipPipPipPipPip
  • 2,063 posts
  • Gender:Male
  • Location:DE65 5NX
  • Interests:I really appreciate my car. I have piled on 100,000 miles in 8 years of ownership. I still love every day I get in it

Posted 18 March 2011 - 05:04 PM

Foam is not a problem. PM me your address and I'll send it FOC Paul

#16 moospeed

moospeed

    Billy No Mates

  • PipPipPipPipPip
  • 1,401 posts
  • Gender:Male
  • Location:Wigmore, Kent

Posted 16 May 2011 - 09:46 PM


Looks good stuttering Tony, will give this a bash myself. Ironically I've been waiting for it to warm up a bit before getting out to the garage to start on jobs like this ;)


MoMoMoMoospeed
Good job I don't st st st stutter otherwise might get up up up uptight.
TTT thumbsup

Well, it's been a while but I dusted off the pipe I bought for this and finally got around to fitting it. Essentially, fitting instructions aren't required as it's so simple but TTony's notes above are perfect. The alloy bits are an absolute perfect fit thumbsup

Only slight difference on mine was to put in a piece of mesh rather than the manky old tights which will block airflow after a short while. OK I'll get some more dust and little flies, maybe the odd skinny wasp but bees and leaves shouldn't get in.

Anyhow, pics of mine.

Posted Image

Posted Image

Posted Image

Posted Image

Forgot to mention, I also sealed the top of the heater box along the moulding lines, can't imagine much being lost there but figured I may as well whilst I'm in there.

Thanks again TTony, appears to be puffing out at least 3-4 times what it had before. Lo and behold, it even seems hot !! :D

Edited by moospeed, 16 May 2011 - 09:47 PM.


#17 H1 HWK

H1 HWK

    Need to get Out More

  • PipPipPipPip
  • 1,009 posts
  • Gender:Male
  • Location:Bridgend or Haverfordwest, Wales

Posted 16 May 2011 - 10:34 PM

thumbsup Looks neat, better than factory original,... smaller mesh filter though, mice will still get in :closedeyes:

#18 moospeed

moospeed

    Billy No Mates

  • PipPipPipPipPip
  • 1,401 posts
  • Gender:Male
  • Location:Wigmore, Kent

Posted 17 May 2011 - 07:14 AM

thumbsup Looks neat, better than factory original,... smaller mesh filter though, mice will still get in :closedeyes:

Mice?
Rice - yes
Lice - yes
Mice - no


I've got some finer mesh should any rogue dwarf-mice make their way through the fan and get into the pipe but considering there wasn't a filter at all on the original install I should be safe.

#19 garyk220

garyk220

    VX parts all sold, saving for replacement

  • PipPipPipPipPipPip
  • 3,035 posts
  • Gender:Male
  • Location:Scottish Borders

Posted 17 May 2011 - 07:29 AM

Lokks great mate. A really neat install and the alloy bits look to have made it an easy fit. I fitted induction pipe on mine, but it was such a tight fit over the heater box outlet, I had to remove the battery and washer bottle, disconnect the heater box and slide it about 6 inches to the right to get enough access to fit the pipe securely. This would have saved a load of hassle. PS. Did you remove the alarm bonnet switch to fit it, as it is missing in your photos?

#20 simsy

simsy

    Need to get Out More

  • PipPipPipPip
  • 957 posts
  • Gender:Male
  • Location:Woodford, Cheshire
  • Interests:Working on sports cars. Motocross bike riding. Power boating in small rib

    DOB is not real...

Posted 17 May 2011 - 12:26 PM

I would prefer taking the engine out than trying to refit the original heater pipe..... The 1st post is the best job I have seen yet on the heater pipe.... and not too over engineered or expensive... I have bright silver domestic dryer hose on my vx, some think its a bit shite, I think its perfect... (£0.75)


1 user(s) are reading this topic

0 members, 1 guests, 0 anonymous users