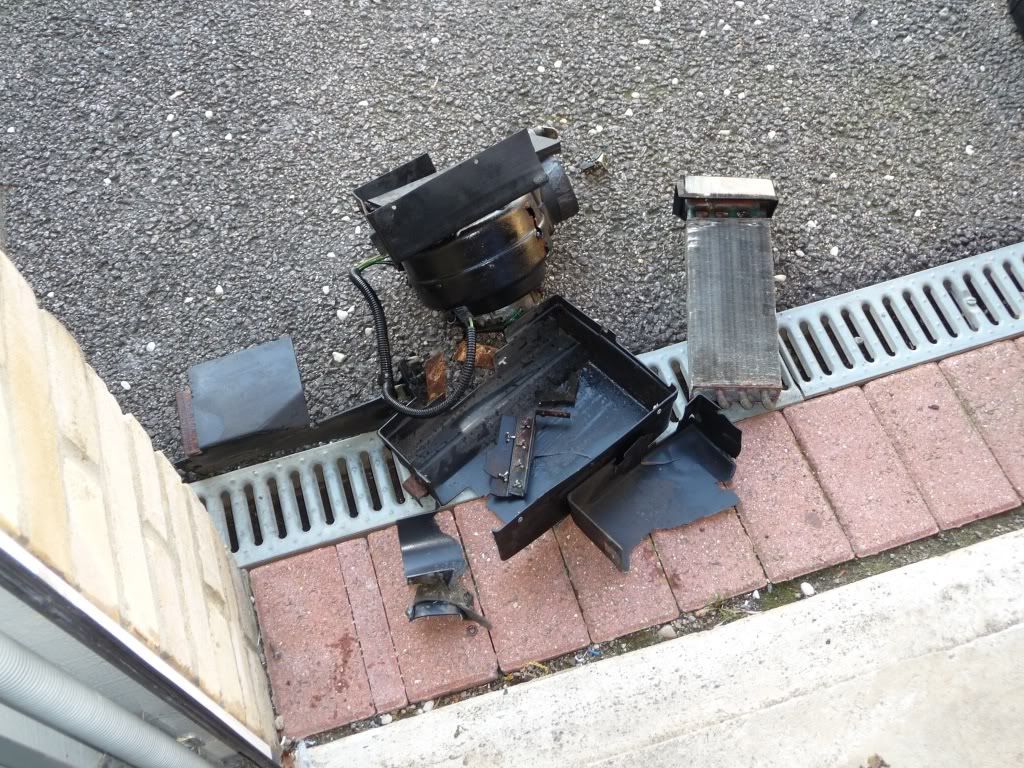
Jump to content


Photo

Uprated Heater Installation

fezzasus heater

  • Please log in to reply
31 replies to this topic

#1 fezzasus

fezzasus

    Whipping Boy

  • PipPipPipPipPipPipPip
  • 7,689 posts
  • Gender:Male
  • Location:Oxford

Posted 31 January 2012 - 08:47 PM

The following is intended to be a guide on fitting the uprated heater I am providing. The first section may also be used to remove the OEM heater for the various modifications that already exist.

OEM heater removal.

DO NOT ATTEMPT THIS WHILE THE CAR IS STILL HOT; THE COOLANT CAN CAUSE BURNS

1. Remove the aluminium ducting running from the heater box to the cabin inlet

2. Remove the washer bottle by pulling it upwards, there is a small black hose and wired connection connected to the black pump. Remove the hose by pulling it and the wired connection by removing the metal retaining clip and then pulling.

Posted Image

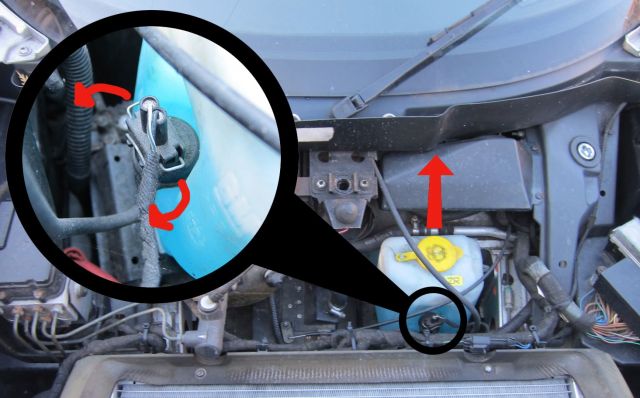
3. The washer bottle sat above the battery, unplug the battery by first undoing the negative (black) using a 10 mm spanner and lifting off, then repeating for the positive (red).

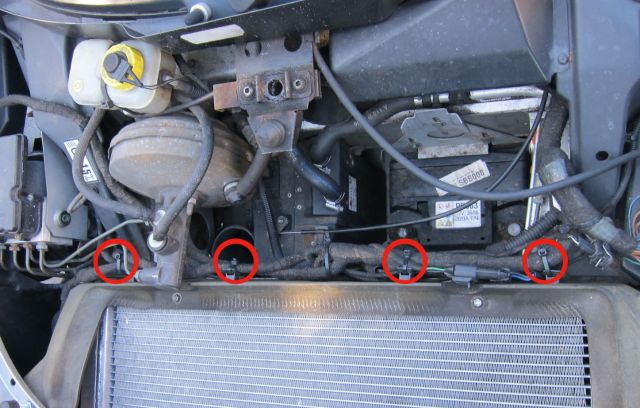
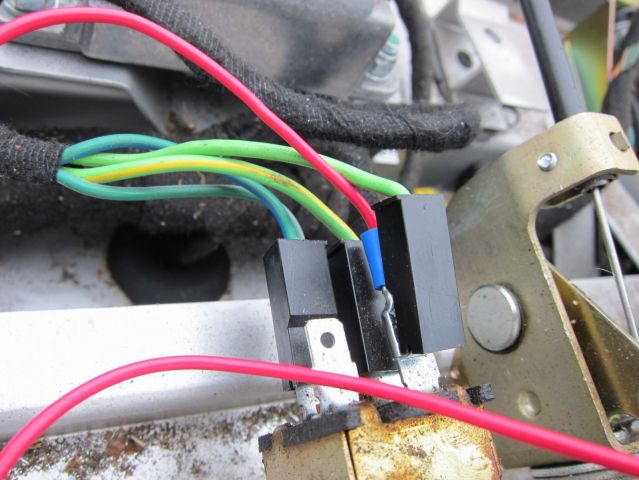
4. Cut the four cable ties holding the wiring loom to the back of the radiator surround and move the wiring so it sits on top of the surround. The connector to the heater will need to be disconnected.

Posted Image


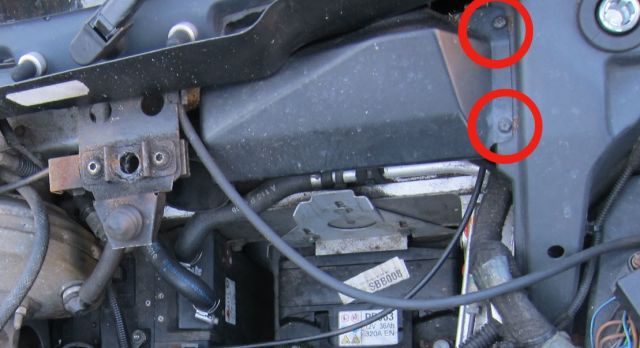
5. Undo the two philips head screws holding the cover over the wiper motor and remove.

Posted Image

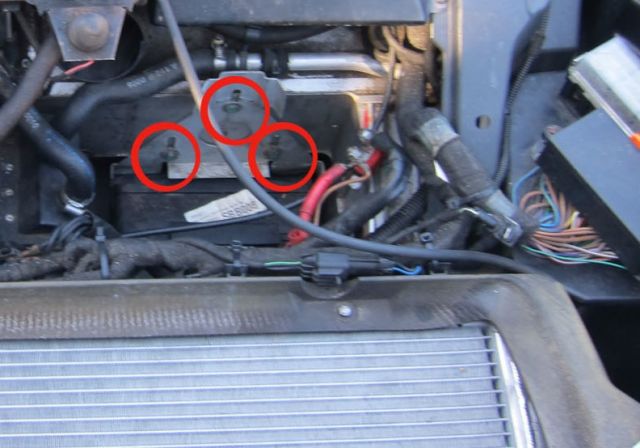
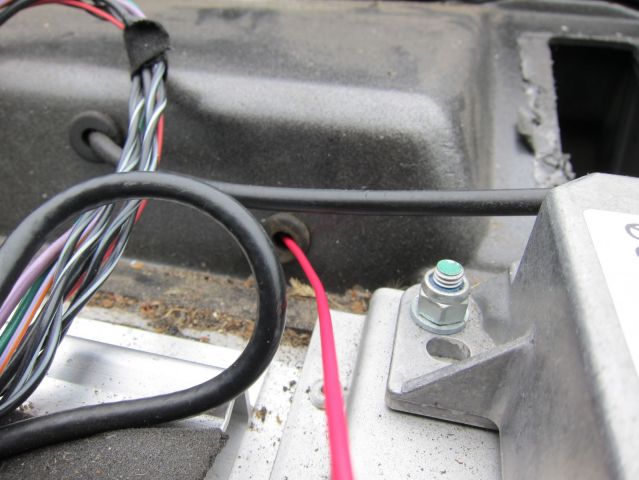
6. Using a 10 mm socket, remove the three bolts on the battery holder and remove.

Posted Image

7. Remove the cable operating the heater flap by placing a flat head screwdriver between the clamp and prising off. The cable should then come off when wiggled (technical term).

Posted Image

8. Lift the battery out.

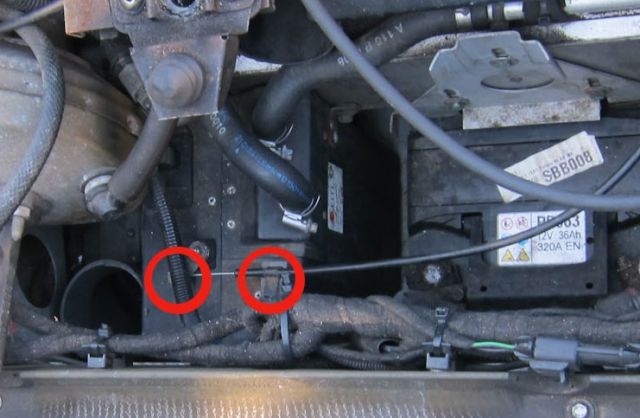
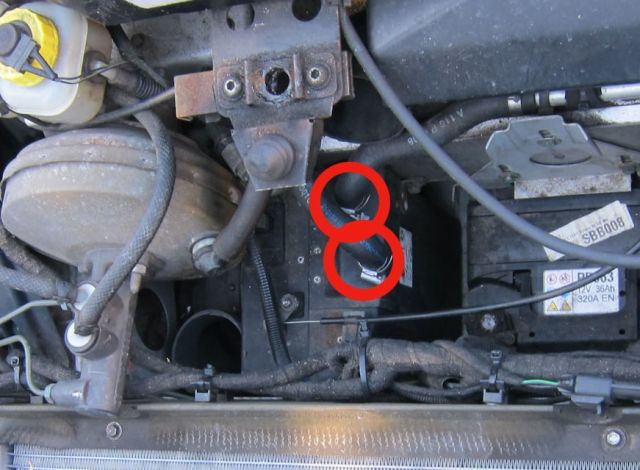
9. Undo the hose clips using a flat head screwdriver or a 7 mm socket on the heater piping and pull tubing off, using a jug to collect coolant.

Posted Image

10. There are two 10 mm headed bolts attaching the heater to the bulkhead. One is visible on the right hand side of the heater when looking down. The second is under the brake servo and can be reached with a 10 mm socket on a 50 mm (approx.) extension bar connected to a small ratchet.

Posted Image

11. Move the heater to the right and lift out. The clips which were holding the wiring loom in place over the battery may foul the heater when it's lifted up and they will either need to be drilled out or hacksawed off. The wiring loom will stay in place if they are not refitted.

Uprated heater fitting

1. Insert the heater into the empty battery compartment and move it to the left under the brake servo

2. The heater re-uses the two 10 mm headed bolts used with the original heater. Hold the heater up and loosely attach the two bolts (the first is clearly visible while the second is directly under the brake servo at the top of the metal bulkhead)

3. Push the heater as far to the left while tightening the bolts to ensure sufficient room to install the battery.

4. Replace battery. Reattach battery clamp using three 10 mm bolts and reconnect the battery, first connecting the postitive (red) then negative (black). Be prepared for your car alarm to reactivate.

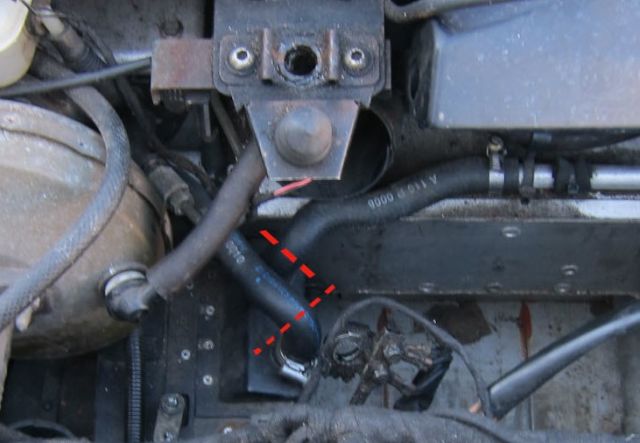
5. The existing hosing to the heater will need to be cut. This should be done immediately after the kink to go into the old heater matrix. A sharp knife or scissors will work.

Posted Image

6. Attach the hoses to the connectors of the new unit.

Posted Image

Edited by fezzasus, 31 January 2012 - 09:00 PM.


#2 CocoPops

CocoPops

    SuperCharged Karting Super Hero

  • 17,177 posts
  • Gender:Male
  • Location:Thatcham, Berks

Posted 31 January 2012 - 08:52 PM

Imnotworthy That's a proper guide thumbsup

#3 hughcam

hughcam

    Super Duper Member

  • PipPipPip
  • 730 posts
  • Gender:Male
  • Location:Hemsworth, West Yorkshire
  • Interests:driving, motorcycling, snowboarding, v12 lawn mowers

Posted 31 January 2012 - 09:21 PM

Yepfantastic guide!

#4 ChrisS1

ChrisS1

    Club OEM

  • PipPipPipPipPipPipPip
  • 8,360 posts
  • Gender:Male
  • Location:South Walers

Posted 01 February 2012 - 08:02 AM

Great stuff. Is there going to be a guide for the under dash work needed?

#5 Pidgeon

Pidgeon

    Scary Internerd

  • PipPipPipPipPipPip
  • 5,254 posts

Posted 01 February 2012 - 08:08 AM

Great guide, all we need now is the heater!

#6 fezzasus

fezzasus

    Whipping Boy

  • PipPipPipPipPipPipPip
  • 7,689 posts
  • Gender:Male
  • Location:Oxford

Posted 01 February 2012 - 08:15 AM

Great stuff. Is there going to be a guide for the under dash work needed?


Yes, just need to take some photos for it first

#7 ChrisS1

ChrisS1

    Club OEM

  • PipPipPipPipPipPipPip
  • 8,360 posts
  • Gender:Male
  • Location:South Walers

Posted 01 February 2012 - 08:20 AM


Great stuff. Is there going to be a guide for the under dash work needed?


Yes, just need to take some photos for it first


Legend.
I guess all your free time is taken up with building the new heaters now! :lol:

#8 fezzasus

fezzasus

    Whipping Boy

  • PipPipPipPipPipPipPip
  • 7,689 posts
  • Gender:Male
  • Location:Oxford

Posted 01 February 2012 - 09:55 AM


Great stuff. Is there going to be a guide for the under dash work needed?


Yes, just need to take some photos for it first


Legend.
I guess all your free time is taken up with building the new heaters now! :lol:


Pretty much, this is the state of my lounge at the moment; four heaters in various stages.

Posted Image

Edited by fezzasus, 01 February 2012 - 09:56 AM.


#9 elwill

elwill

    Billy No Mates

  • PipPipPipPipPip
  • 1,270 posts
  • Gender:Male

Posted 01 February 2012 - 02:09 PM

Great stuff! thumbsup Like the fact that you point out about the alarm reactivating. Scared the bejesus out of me when I changed my battery! :lol:

#10 fezzasus

fezzasus

    Whipping Boy

  • PipPipPipPipPipPipPip
  • 7,689 posts
  • Gender:Male
  • Location:Oxford

Posted 05 February 2012 - 03:41 PM

Heater control fitting

1. Remove stereo: exact technique varies with make, but generally - remove face, remove plastic surround (usually held on with four clips, two above and two underneath). Use make-specific removal tools to remove stereo unit.

2. Remove dash plates - the one around the light controls is held on with double sided tape and can be removed by using a butter knife to wedge upwards behind the plate to cut the tape. The large passenger side plate is held on with three clips which require the plate to be pushed down (away from the dash) to remove.

3. The dash is held to the aluminium behind the dash plates with a number (varies with age) of philips head screws. They are (from left to right, to the right of the VX220 name plate, behind the stereo, to the right of the heater controls. Finally (not shown) behind the light controls. Remove the screws

Posted Image

4. Remove the dash by pulling the back of the instrument binnacle toward the driver while lifting the dash up. Keep an eye out for the starter button connector and disconnect when visible.

5. Pull the knob off the temperature controller (left control) on the heater controls. Using a pair of pliers undo the hex nut holding the control shaft in place:

Posted Image

6. Now the whole unit should be free. Check under the bonnet and ensure the control cable is free, and pull it out from the cabin until the whole unit is free.

Posted Image

7. Connect the new controller in place.

Posted Image

8. Remove the all green connector from the back of the fan speed switch, connect the piggy back spade connector to it and reattach.

Posted Image

9. Push the long connector through the grommet left empty with the removal of the old cable operating the heater.

Posted Image

10. Locate the red wire under the bonnet and attach it to the connector on top of the heater bypass valve.

11. Reassemble as reverse of guide.

Edited by fezzasus, 05 February 2012 - 03:42 PM.


#11 ChrisS1

ChrisS1

    Club OEM

  • PipPipPipPipPipPipPip
  • 8,360 posts
  • Gender:Male
  • Location:South Walers

Posted 05 February 2012 - 03:57 PM

thumbsup

#12 jonnyboy

jonnyboy

    The hardtop guy

  • PipPipPipPipPipPipPip
  • 8,288 posts
  • Gender:Male
  • Interests:Lightweight sportscars, Brunettes, Petrol & Beer.

Posted 06 February 2012 - 06:40 AM

Brilliant. Top work. You should get a job with Lotus!

#13 fezzasus

fezzasus

    Whipping Boy

  • PipPipPipPipPipPipPip
  • 7,689 posts
  • Gender:Male
  • Location:Oxford

Posted 06 February 2012 - 01:21 PM

You should get a job with Lotus!


I've sure i've got some gaffa tape and pritt stick lying somewhere around here - looks like i've got all the tools for the job

#14 jonnyboy

jonnyboy

    The hardtop guy

  • PipPipPipPipPipPipPip
  • 8,288 posts
  • Gender:Male
  • Interests:Lightweight sportscars, Brunettes, Petrol & Beer.

Posted 06 February 2012 - 02:29 PM

And tie wraps!

#15 CocoPops

CocoPops

    SuperCharged Karting Super Hero

  • 17,177 posts
  • Gender:Male
  • Location:Thatcham, Berks

Posted 06 February 2012 - 02:35 PM

and TigerSeal :P they love that stuff bleurgh!

#16 techieboy

techieboy

    Supercharger of Doom

  • 22,914 posts
  • Gender:Male
  • Location:Bedford

Posted 19 February 2012 - 01:30 PM

Anyone on the list for one of these, take Fezzasus' offer of fitting. Removing the old heater box is now officially the most cnuty job on the VX. Looks like my OE heater box was perfectly intact before I started this. It's now in at least 4 pieces. The bolt under the servo wouldn't come out as the rivnut was spinning in the bulkhead. So judicious levering with a large screwdriver managed to get the bracket that fixes the heater box bent out of the way enough to mean the bolt didn't need to be removed. Cue one hole in the OE heater box where a rivet tore out. The resistor pack then fell out, probably as a result of that levering. Simple job next, disconnect the hoses? Oh no, jubilee clips undone, start trying to ease the hoses off and snap. Heater matrix and top of the heater have now become one but are now totally separate to the rest of the heater box and I still can't get the sodding hoses off. Currently toying with the idea of using a lump hammer to break the rest of it into smaller pieces to ease the pain of getting it out of the front compartment. :beat: I don't know how much Tom is charging for a fitting session but it's worth it, whatever it costs. thumbsup Worse still, I've just read the instructions for replacing the heater distribution box that is also in 3 pieces and looks like the only thing on the car that doesn't need removing is the bloody windscreen. :angry: It'll be a miracle if I'm still able to stand up and walk by the end of this. :(

#17 ChrisS1

ChrisS1

    Club OEM

  • PipPipPipPipPipPipPip
  • 8,360 posts
  • Gender:Male
  • Location:South Walers

Posted 19 February 2012 - 02:25 PM

Stick with it Matt!

#18 techieboy

techieboy

    Supercharger of Doom

  • 22,914 posts
  • Gender:Male
  • Location:Bedford

Posted 19 February 2012 - 02:28 PM

Just had bacon sandwiches and two strong coffees. Hope that's the fortification I need to at least finish one part of the job. The SmackD's Big Breakfast was a non-starter this morning.

#19 fezzasus

fezzasus

    Whipping Boy

  • PipPipPipPipPipPipPip
  • 7,689 posts
  • Gender:Male
  • Location:Oxford

Posted 19 February 2012 - 02:41 PM

Matt, the OE unit is ab absolute bitch to get out, Try using a flat head screwdriver to get between the metal nipples of the heater and the hose to loosen them up. Once you've done that you'll have the fun of trying to get the unit out - make sure that you've removed the wiring loom clip above the battery compartment - when I first tried to take mine out the clip got stuck in the opening so I couldn't put the unit back down into the gap or take it out completely. Had to have lunch and attack it once I calmed down a bit.

#20 techieboy

techieboy

    Supercharger of Doom

  • 22,914 posts
  • Gender:Male
  • Location:Bedford

Posted 19 February 2012 - 02:57 PM

Had to have lunch and attack it once I calmed down a bit.


:lol:

I hear that. thumbsup

Good heater

Posted Image

Baaaad heater

Posted Image

I decided it was likely beyond salvage so did my usual and took out my frustration by punching the fcuk out of an inanimate object. Came out a treat after that. And people wonder why I have a spare of everything. :D


Also tagged with one or more of these keywords: fezzasus, heater

0 user(s) are reading this topic

0 members, 0 guests, 0 anonymous users