How can you fix headlight adjustment on NS main beam think the adjuster is broken or popped off. Have searched .org but not found a thread which show mechanism inside or how to fix. I'm sure Fezzasus might be able to advise?

Headlight Adjustment Issu
Started by
Wreelybro
, May 24 2014 03:12 PM
20 replies to this topic
#1

Wreelybro
-
-

- 1,641 posts
Billy No Mates
- Gender:Male
- Location:Leighton Buzzard
-
Interests:Racing WRC/F1/Miglia/Time Attack/MotoGp etc...
360 Gaming 10-Pin Bowling.
Posted 24 May 2014 - 03:12 PM
#2
fezzasus
-

-
- 7,689 posts
Whipping Boy
- Gender:Male
- Location:Oxford
Posted 24 May 2014 - 03:15 PM
Put the headlight in the oven at the lowest temp, after about 2 minutes use a flat headed screw driver to prise off the back cover from the central unit, it might need to be put back into the oven if it starts to cool and becomes difficult to prise off.
Then inspect the projector, there are three mounting points. Use alaldite putty to repair.
#3
Wreelybro
-
-
- 1,641 posts
Billy No Mates
- Gender:Male
- Location:Leighton Buzzard
-
Interests:Racing WRC/F1/Miglia/Time Attack/MotoGp etc...
360 Gaming 10-Pin Bowling.
Posted 24 May 2014 - 03:21 PM
Cheers Tom fancy a job? lol
#4
Bargi
-
-
- 4,483 posts
Scary Internerd
- Gender:Male
- Location:London
Posted 24 May 2014 - 03:30 PM
ohh... I thought the back wouldn't come off without destroying it. May need to give this a go today, any other tipsPut the headlight in the oven at the lowest temp, after about 2 minutes use a flat headed screw driver to prise off the back cover from the central unit, it might need to be put back into the oven if it starts to cool and becomes difficult to prise off. Then inspect the projector, there are three mounting points. Use alaldite putty to repair.

#5
Wreelybro
-
-
- 1,641 posts
Billy No Mates
- Gender:Male
- Location:Leighton Buzzard
-
Interests:Racing WRC/F1/Miglia/Time Attack/MotoGp etc...
360 Gaming 10-Pin Bowling.
Posted 24 May 2014 - 03:54 PM
Fezz what vdo you use to bond the cover back on with?
Bearing in mind I'll probably take the front lense off as well and refurb these.
BTW how's the front lense replacements coming along?
#7
fezzasus
-
-
- 7,689 posts
Whipping Boy
- Gender:Male
- Location:Oxford
Posted 24 May 2014 - 03:58 PM
ohh... I thought the back wouldn't come off without destroying it. May need to give this a go today, any other tipsPut the headlight in the oven at the lowest temp, after about 2 minutes use a flat headed screw driver to prise off the back cover from the central unit, it might need to be put back into the oven if it starts to cool and becomes difficult to prise off. Then inspect the projector, there are three mounting points. Use alaldite putty to repair.
Take it slowly, and check on it while it's in the oven otherwise you'll start melting other parts.
#8
Bargi
-
-
- 4,483 posts
Scary Internerd
- Gender:Male
- Location:London
Posted 24 May 2014 - 05:31 PM
Success!
100C, in a Fan Forced oven. Found 3 mins was my sweet spot. Took about half a dozen sessions.
Just push around with screwdrivers and pull out the adhesive and crack the bond between the two parts.
Now does anyone know where to get the captive/spring loaded mounts?

#9
fezzasus
-
-
- 7,689 posts
Whipping Boy
- Gender:Male
- Location:Oxford
Posted 24 May 2014 - 05:40 PM
They are Hella parts, but I've only seen them sold with the headlights.
I would suggest (and i've just done the same with mine as i'm fitting the new lenses to them) that you sand the area with some 120 grit paper, and use araldite repair putty to mould around the metal bolts to make new cups. I put some grease around the bolts and turned them slightly as it set to ensure they didn't get bonded.
#10
chris_uk
-

-
- 10,060 posts
I Fancy Joe
- Gender:Male
- Location:Leeds UK
Posted 24 May 2014 - 06:14 PM
i did it a different way
looks bad here, but when its all vinyl'd up it looks fine and its never going to break again
#11
P11 COV
-
-
- 7,683 posts
Whipping Boy
- Gender:Male
- Location:MK
- Interests:Cars, Music, God, Family. Holidays.
Posted 28 May 2014 - 08:28 AM
Looks like I may have to go down this route as mine just failed its MOT on headlamps. Left too low, right too high. I got away with it last year by just gaffering the front right dipped unit which had broken. I am not sure whats wrong this time. Its times like this that I just want to get rid of the thing and get something better built.
#12
gingerjon
-
-
- 587 posts
Super Duper Member
- Gender:Male
- Location:Hedge End
Posted 07 December 2014 - 11:57 AM
Anyone know where to get the actual bolts for adjustment from? I have split the headlights, a couple of the bolts has seized so had to drill them out and need to replace them but can't seem to work out that they are actually called?
I don't really want to buy 4 new units for the bolts!!
Thanks
J
#13
Bargi
-
-
- 4,483 posts
Scary Internerd
- Gender:Male
- Location:London
Posted 07 December 2014 - 12:53 PM
I searched and searched to try fix a unit I had and couldn't find anything.
Rally has an clever yet simple mod for broken adjusters using common bits and bolts.
Just hope he sees this and puts pics up of how he did it!
#14
gingerjon
-
-
- 587 posts
Super Duper Member
- Gender:Male
- Location:Hedge End
Posted 07 December 2014 - 01:16 PM
Me too, cannot find anything that matches....except a random Chinese manufacturer for the bolts themselves but not the cup bits/
I'm thinking round head bolts, Acorn Bolts, thread lock and some of the putty Fez suggested.
I'll PM Rally too, thanks Bargi.
#15
Rally
-

-
- 650 posts
Super Duper Member
- Gender:Male
- Location:Staines-Upon-Thames
Posted 08 December 2014 - 12:37 AM
Not been around much lately so Bargi gave me a poke to post here.
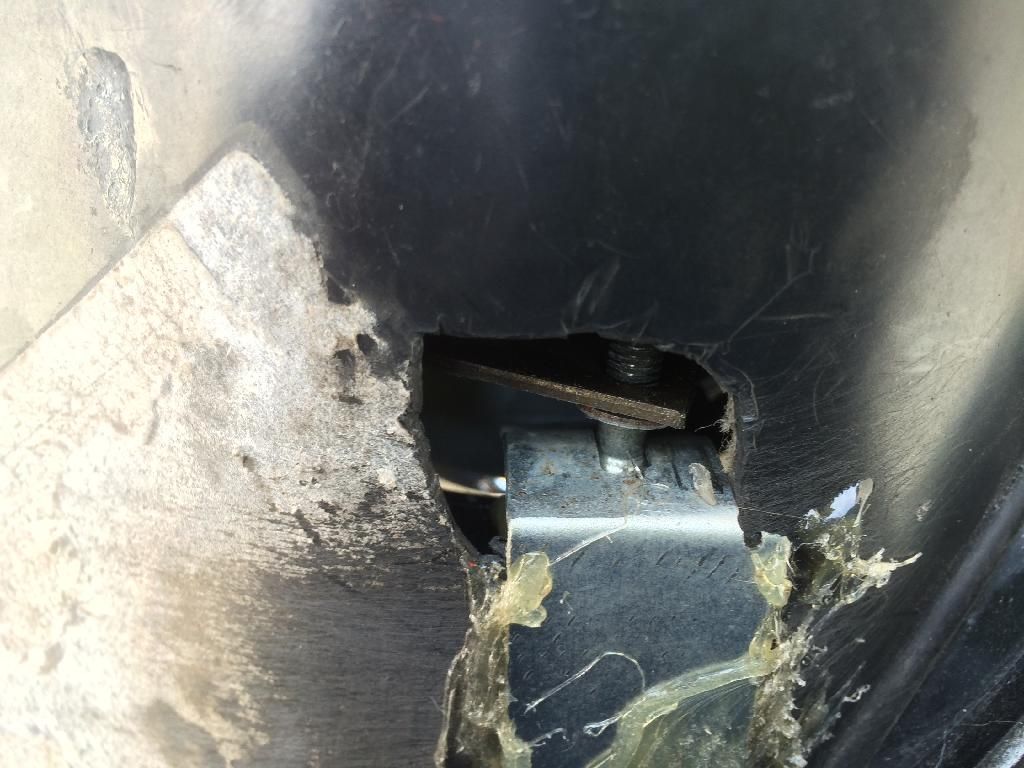
The original is fixed to the shell by the ball-and-socket arrangement that fixes the adjuster to the front of the shell... which is what breaks. Rather than try and fix that arrangement, my solution was to replace the standard adjuster with some threaded bar and anchor it to the shell at the back. This is achieved by sandwiching the plastic of the shell between two penny washers with small washers between to act as a spacer to allow the new adjuster to rotate. This is held in place with nuts and I used the original adjuster nut on the end. Here's a pic:
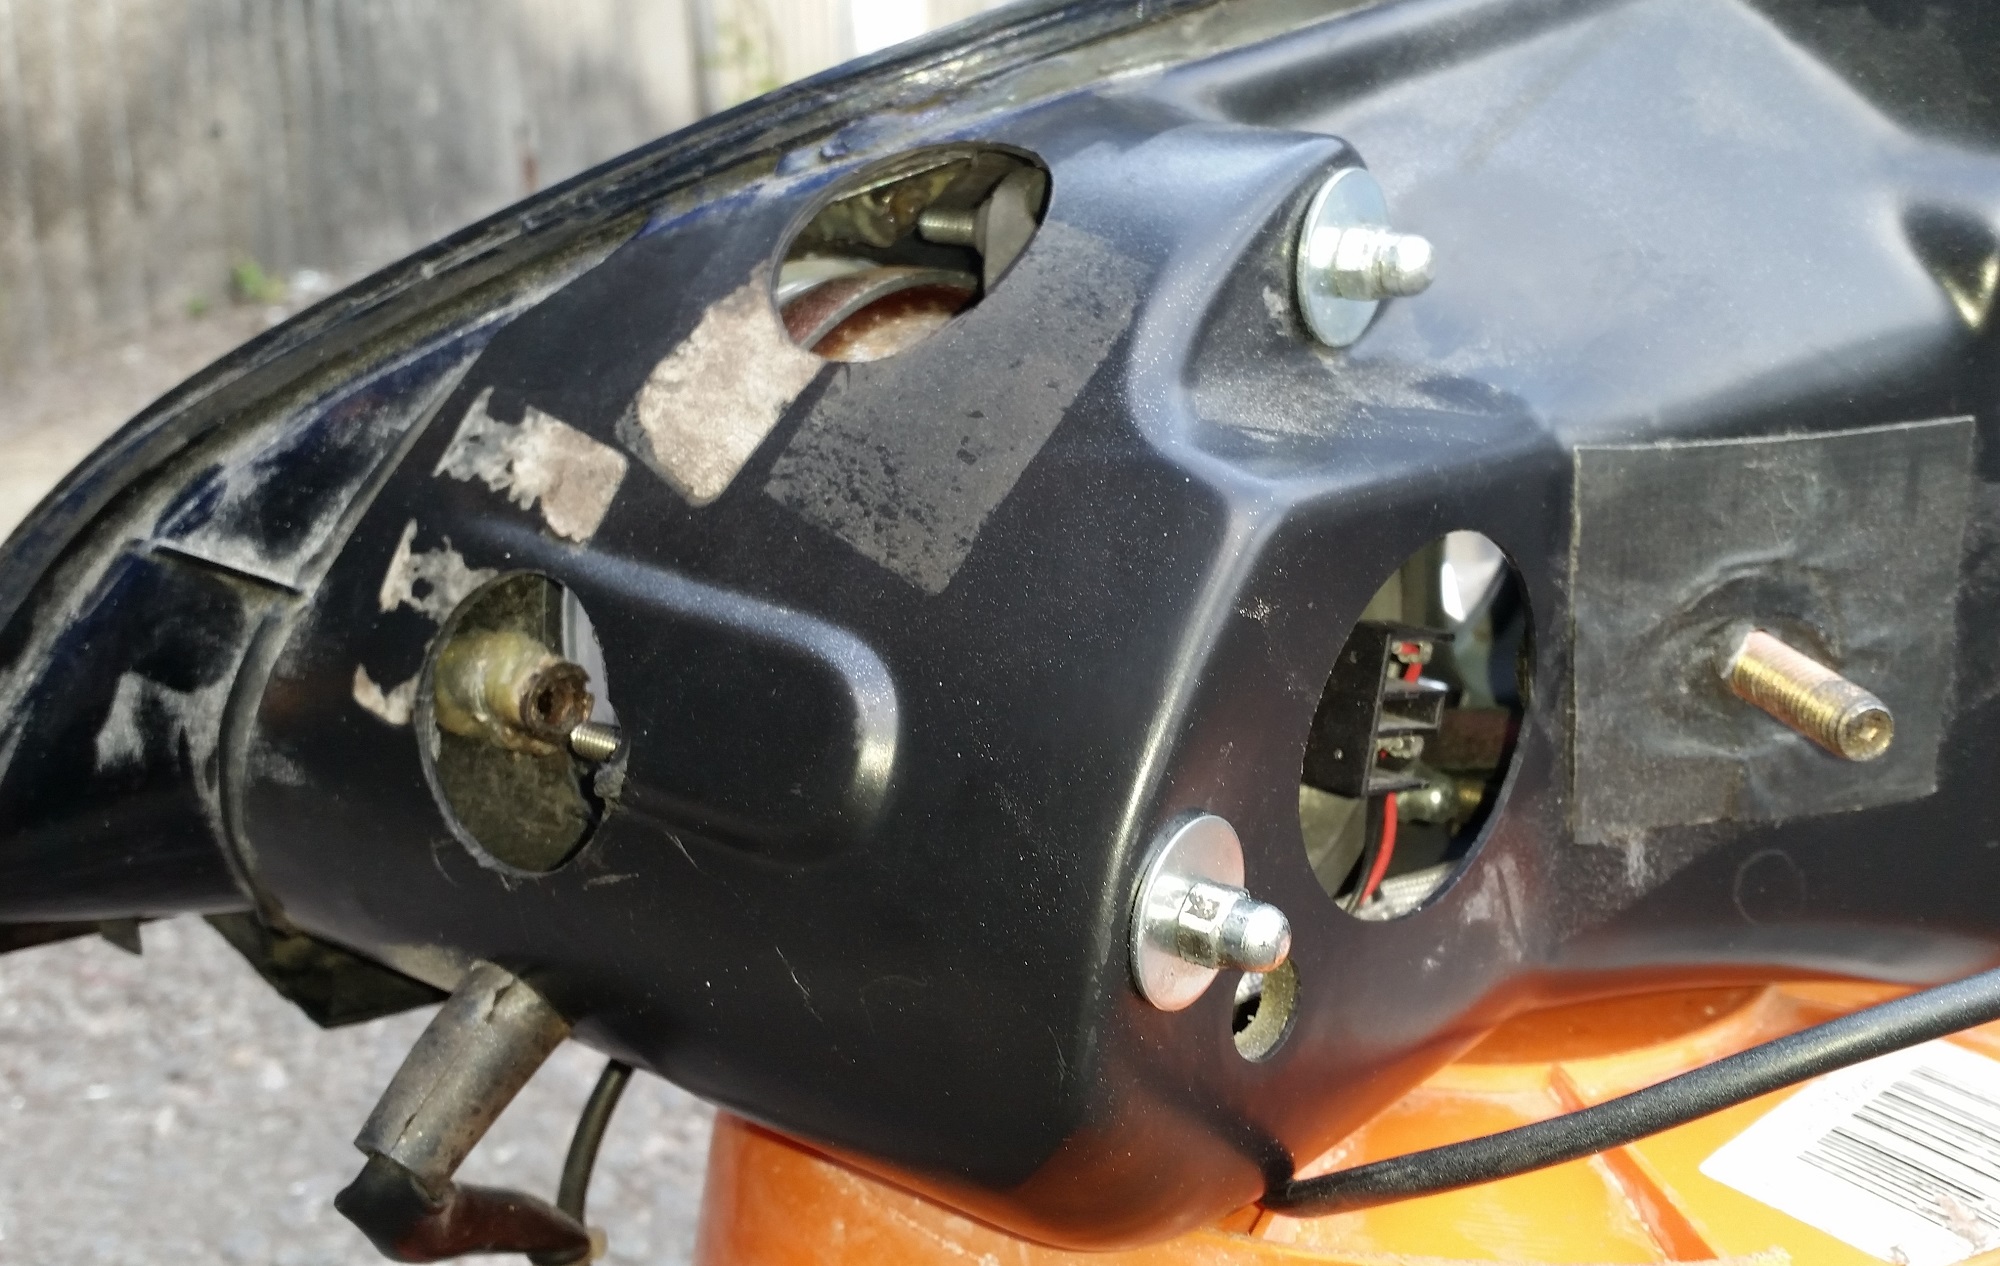
I used a hole cutter to see what was going on and covered up the holes with tank tape when I was done.
Hope that helps!
#16
mbes2
-

-
- 8,508 posts
Someone say Plasti Dip?
- Gender:Male
- Location:Feering, Essex
-
Interests:"Keep it standard"
"Yes, I built it"
Posted 19 August 2015 - 11:09 AM
Just removed the back cover of my O/S headlight... Question...
Are the two mounts in this photo FIXED with the adjustable mount at the top ?


Thanks
#17
fezzasus
-
-
- 7,689 posts
Whipping Boy
- Gender:Male
- Location:Oxford
Posted 19 August 2015 - 12:31 PM
Yes, they should be mounted into plastic cup mounts. These fail over time because the can't hold the weight of the headlight. Stiffer suspension will also give the mount more of a workout.
I recommend covering the metal ball joint at the bottom of the adjuster bolt with a tiny bit of grease/vasoline, then using epoxy putty to form a new ball socket around it. As it sets, turn the bolt slightly to ensure it doesn't bond to the metal.
#18
Mouldy
-

-
- 98 posts
Member
Posted 05 February 2018 - 04:17 PM
Not been around much lately so Bargi gave me a poke to post here.
The original is fixed to the shell by the ball-and-socket arrangement that fixes the adjuster to the front of the shell... which is what breaks. Rather than try and fix that arrangement, my solution was to replace the standard adjuster with some threaded bar and anchor it to the shell at the back. This is achieved by sandwiching the plastic of the shell between two penny washers with small washers between to act as a spacer to allow the new adjuster to rotate. This is held in place with nuts and I used the original adjuster nut on the end. Here's a pic:
I used a hole cutter to see what was going on and covered up the holes with tank tape when I was done.
Hope that helps!
If you're still around... I assume you have to split the headlisght unit in the oven to make these mods?? Mine have to be redone like this as my original fix moved before the putty set and the dip beam is too far to the side. They wont pass it through an MOT again!!
It will be quite nerve racking now since replacements seem hard to find if it goes wrong!!
#19
Rally
-
-
- 650 posts
Super Duper Member
- Gender:Male
- Location:Staines-Upon-Thames
Posted 05 February 2018 - 11:45 PM
You don't have to split the lamp to do the mod that I outlined. If you use a hole cutter like in the photos it give you all the access you need. If you're in the Surrey/Berkshire area, you're welcome to come see the test lamp shell that I still have and see how it's done.
#20
Mouldy
-
-
- 98 posts
Member
Posted 07 February 2018 - 08:46 PM
For the moment I ground away tge putty I had added to one side where it seems it was actually needed. I THINK this may give the adjustment I need and the lamp unit is solid enough. Will see if I can line them up tomorrow. But thanks for the info Sent from my iPhone using TapatalkYou don't have to split the lamp to do the mod that I outlined. If you use a hole cutter like in the photos it give you all the access you need. If you're in the Surrey/Berkshire area, you're welcome to come see the test lamp shell that I still have and see how it's done.


0 user(s) are reading this topic
0 members, 0 guests, 0 anonymous users

