Jump to content


Photo

Supercharger Conversion

supercharger sc stage 2

  • Please log in to reply
51 replies to this topic

#1 alkvalseth

alkvalseth

    Member

  • Pip
  • 89 posts
  • Location:Norway

Posted 30 March 2015 - 10:06 AM

Hello!


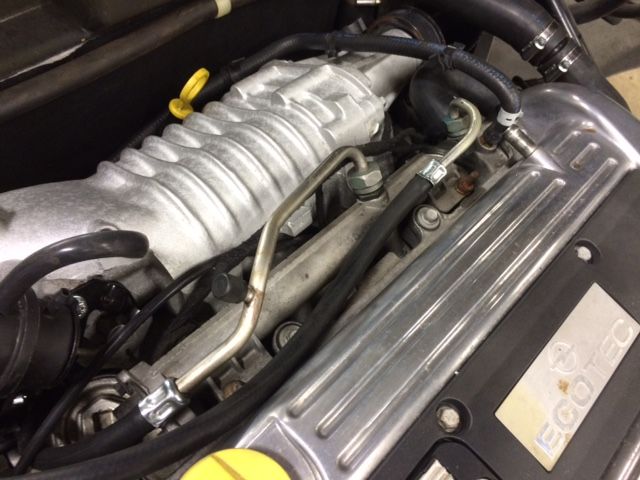
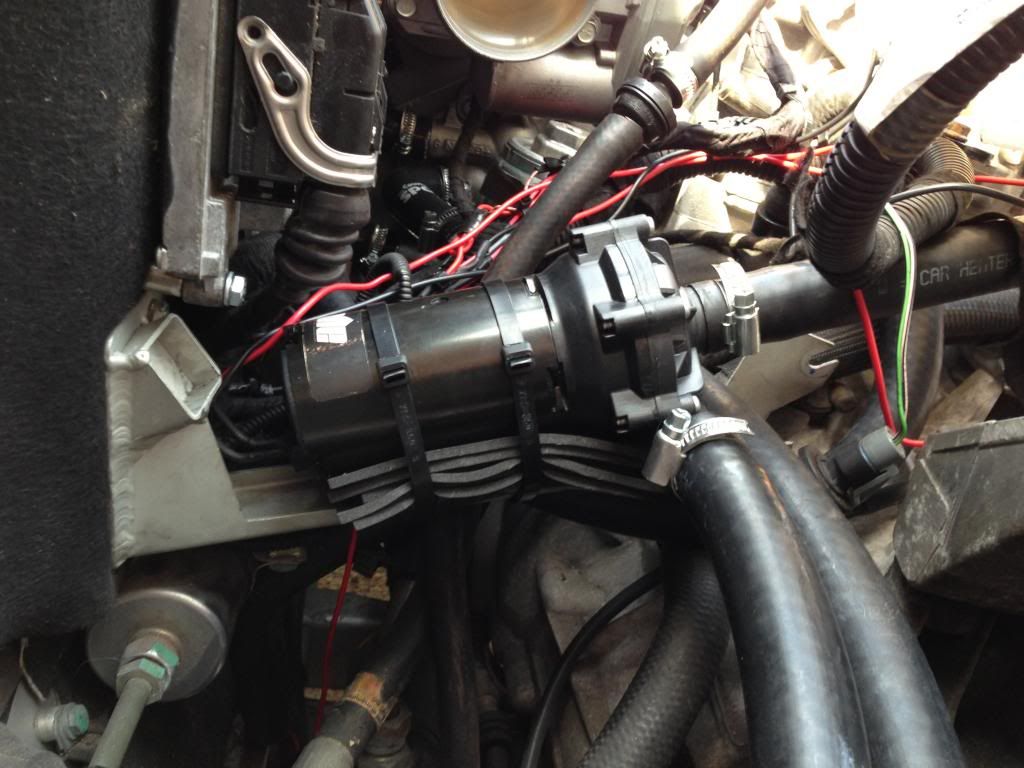
I have started a supercharger conversion. I have bought parts from Joe and Vocky, and they've been very helpful so far. But thought I might as well make a project thread, as I cannot seem to find the exact information for all the questions I have.


I will try to finish with the SC conversion during easter.


I need some advice regarding the fuel return line rerouting. Would you suggest to cut the line behind the firewall and connect a new one to that old line, or to connect a new one directly on the fuel tank?


Thanks

Andreas

Attached Files


#2 smiley

smiley

    Thetan level 15

  • PipPipPipPipPipPipPip
  • 10,427 posts
  • Gender:Male
  • Location:Netherlands

Posted 30 March 2015 - 10:25 AM

The rerouting of the fuel lines is optional, not mandatory. You can either partly unclip plastic fuel hoses at the side of the engine, and bend them away from the charger nossle, or build a protection system for the belt so it cannot hit the fuel lines if the belt snaps.


If you feel comfortable with the rerouting, you have 2 options.

1. Cut the lines after the filter at the firewall, and fit fuel hoses from there to the 180 degrees swiveled pipes on the fuel rail.

2. Replace all lines from the fuel rail all the way up to the tank with the expensive bling stuff.


#3 vocky

vocky

    Moderator

  • 11,969 posts
  • Gender:Male
  • Location:Earth

Posted 30 March 2015 - 07:03 PM

you have the bracket required to move the standard fuel pipes, it routes the lines below the SC and keeps them clear of the belt  thumbsup


#4 TIP

TIP

    Need to get Out More

  • PipPipPipPip
  • 959 posts
  • Gender:Male
  • Location:kent
  • Interests:cars. sci-fi, rum, bass, sheds, making stuff, fixing other stuff (mainly plastic vauxhalls) and other geeky bloke stuff

Posted 30 March 2015 - 09:19 PM

The rerouting of the fuel lines is optional, not mandatory.
You can either partly unclip plastic fuel hoses at the side of the engine, and bend them away from the charger nossle, or build a protection system for the belt so it cannot hit the fuel lines if the belt snaps.


If you feel comfortable with the rerouting, you have 2 options.

1. Cut the lines after the filter at the firewall, and fit fuel hoses from there to the 180 degrees swiveled pipes on the fuel rail.

2. Replace all lines from the fuel rail all the way up to the tank with the expensive bling stuff.


if you go for option 1 make sure you flare the ends of the solid pipework. I went overkill rerouted fuels lines and build a belt guard ( to protect all the fuel filler /breather pipes)

http://www.vx220.org...ture/?p=1720234


Edited by TIP, 30 March 2015 - 09:20 PM.


#5 alkvalseth

alkvalseth

    Member

  • Pip
  • 89 posts
  • Location:Norway

Posted 30 March 2015 - 09:56 PM

Thanks guys! I actually just had to get it done, so I was probably too fast to go for option 1 instead of just moving the lines over, as you suggest Vocky. I went to a plumber store and got a elbow that I could fit to the original plastic/rubber hose. On the other siide I used copper tube that I used to clamp the hose on with hose clamps. On the other side to the steel tubes, I heated thte ends and made flanges, and then had the fuel hoses pressed on.


I think it should be good now. Still waiting for 100A alternator to arrive, and I need tot get two M6x80 bolts for the sc manifold. Started on the Fezzasus heater as all the hardware stores was closed when I found out that I had missed the bolts. I didn't think it was going to be that much wiring.. Hehe. So will try to get my head around that tomorrow. Anyone know if the last picture in the firist post of this thread http://www.vx220.org...2-installation/ still applies for the newest heaters? I cant see any circuit board on mine, except that I know there is one hidden behind a cover.


#6 A-F_20

A-F_20

    Super Member

  • PipPip
  • 253 posts
  • Gender:Male
  • Location:Ampthill, Bedfordshire

Posted 30 March 2015 - 10:20 PM

I bought all the braided fuel lines and fittings to run from the original metal fuel lines on the side of the engine - one line to the filter and one to the pump - AN -6 (AN6 AN06) 11mm Black Billet Fuel Hose Separator 3.79 3 £11.37 AN-6 (AN6) STRAIGHT Teflon Stealth Black Hose Fitting 6.99 1 £6.99 AN -6 180 Degree Teflon Stealth Black Hose Fitting 12.99 3 £38.97 AN -6 (-6AN JIC AN-06) Quick Connect 5/16" Female Fuel Line / Rail Adapter Black 14.99 3 £44.97 AN-6 Teflon PTFE Hose 9.67 4 £38.68 This basically replaces all the plastic pipe but keeps all the oem connectors.

#7 alkvalseth

alkvalseth

    Member

  • Pip
  • 89 posts
  • Location:Norway

Posted 31 March 2015 - 10:12 AM

Great info! As said I've already changed mine, but I might go for that setup at a later stage.


#8 oakmere

oakmere

    Scary Internerd

  • PipPipPipPipPipPip
  • 2,143 posts

Posted 31 March 2015 - 05:23 PM

I would be very carfull messing with fuel lines. Unless you know what you are doing. A leaking fuel line will quickly turn your VX into a ball of flames.

#9 Rosssco

Rosssco

    Scary Internerd

  • PipPipPipPipPipPip
  • 4,180 posts
  • Gender:Male
  • Location:Aberdeen

Posted 31 March 2015 - 06:28 PM

I would be very carfull messing with fuel lines. Unless you know what you are doing. A leaking fuel line will quickly turn your VX into a ball of flames.


Yup, and by that rational, probably the safest course of action is to leave the standard lines intact, and just move them out of the way and regularly inspect / replace the cheap drive belt (and fit a belt guard if you're anal). Chances of a belt completely shredding (most likely get very noisy before hand) and then rupturing the fuel lines always seemed slightly remote...


#10 A-F_20

A-F_20

    Super Member

  • PipPip
  • 253 posts
  • Gender:Male
  • Location:Ampthill, Bedfordshire

Posted 31 March 2015 - 07:16 PM

I was more worried about kinking the plastic and having to force it out of the way rather than a shredded belt. I think the most likely problem is the pipe rubbing on the belt and wearing through - although if you're belt and braces when securing it prob not an issue that would arise.

#11 alkvalseth

alkvalseth

    Member

  • Pip
  • 89 posts
  • Location:Norway

Posted 03 April 2015 - 07:42 PM

Thanks for the feedback guys, here are two pictures of what I've done. 

Posted Image

Posted Image


The last picture shows the return line. I have a copper insert in the original rubber/plastic hose, and then an elbow fitting. Inside the elbow there are cones that seal. I though it was okay since there isn't high pressure on the return side. What are your thoughts?

Thanks

Andreas


#12 vocky

vocky

    Moderator

  • 11,969 posts
  • Gender:Male
  • Location:Earth

Posted 04 April 2015 - 07:58 AM

should be okay, but remember to check for any leaks once it's running  thumbsup


#13 alkvalseth

alkvalseth

    Member

  • Pip
  • 89 posts
  • Location:Norway

Posted 04 April 2015 - 10:28 PM

I did start it today!! After 6 hours of troubleshooting I figured out hat I had forgot the three relays that are normally in the trunk. What a fantastic feeling, I have spent the whole Easter on the conversion. I still haven't attached the water pump as I think it's too heavy too just hang off the cooling hoses, but at the same time it's vibrating too much to mount solid to the chassis. Any good ideas of where and how to secure the CC pump?

#14 Captain Vimes

Captain Vimes

    Scary Internerd

  • PipPipPipPipPipPip
  • 2,755 posts
  • Gender:Male
  • Location:South East
  • Interests:Motorbikes, VX220, Procrastination

Posted 04 April 2015 - 11:19 PM

I mounted mine to the old air box bracket:

Posted Image

#15 Captain Vimes

Captain Vimes

    Scary Internerd

  • PipPipPipPipPipPip
  • 2,755 posts
  • Gender:Male
  • Location:South East
  • Interests:Motorbikes, VX220, Procrastination

Posted 04 April 2015 - 11:22 PM

Oh and congrats on getting it running, it's a great feeling isn't it?

#16 alkvalseth

alkvalseth

    Member

  • Pip
  • 89 posts
  • Location:Norway

Posted 04 April 2015 - 11:41 PM

Thanks Captain Vimes, good to see a picture too. You don't have any problems with vibration? I guess that bar absorbs a lot of it.


Thanks, It really feels great! Can't wait to drive it. But I will have to do a couple of things before I get the front and rear clam on (new vacuum feed for the brake servo etc.)


#17 Steve.i.am

Steve.i.am

    Need to get Out More

  • PipPipPipPip
  • 990 posts
  • Gender:Male
  • Location:Sussex
  • Interests:Bends

Posted 05 April 2015 - 09:20 AM

I did the same as Captain - with a load of foam rubber to help isolate vibes..


Posted Image


#18 alkvalseth

alkvalseth

    Member

  • Pip
  • 89 posts
  • Location:Norway

Posted 21 April 2015 - 03:13 PM

I am considering to buy 15" ats dtc rims - will this fit with 308mm discs and original AP tro piston front calipers on 11mm radial spacers?

#19 smiley

smiley

    Thetan level 15

  • PipPipPipPipPipPipPip
  • 10,427 posts
  • Gender:Male
  • Location:Netherlands

Posted 21 April 2015 - 04:09 PM

Check on the German forum for that.

The 15" usage has not sunken in here yet.


#20 alkvalseth

alkvalseth

    Member

  • Pip
  • 89 posts
  • Location:Norway

Posted 25 April 2015 - 08:51 AM

Thanks smiley, I will do that :)


Did the first trackday after the SC install, with new brake pads, rotors, etc. I run on Castrol 10W60 oil and Motul 660RBF brake fluid. No problems at all, did unfortunately not log the ECU sensors, but the water temp was always good. The exhaust tips was partly blue/purple afterwards. Is this a good or bad sign?

Overall a very good experience, and the car is very competitive now :)


Also tagged with one or more of these keywords: supercharger, sc, stage 2

0 user(s) are reading this topic

0 members, 0 guests, 0 anonymous users