Jump to content


Photo

Misting Rear Light Rectification Guide


  • Please log in to reply
12 replies to this topic

#1 GunnerGibson

GunnerGibson

    Super Member

  • PipPip
  • 367 posts
  • Location:Orkneys

Posted 19 November 2007 - 08:36 PM

Its annoying when you see the moisture in your rear lights after rain / cleaning your car etc.
heres a quick guide on what you'll need to sort it:


Posted Image


8mm ratchet spanner
loctite black silicone sealant
misses hair dryer
and 45 min of your time.


1st: undo the 8mm bolts on each light. gain access via the boot. unclip the bulbs and slowly work the rear light cluster out from the car:

Posted Image
Posted Image
Posted Image

2nd:
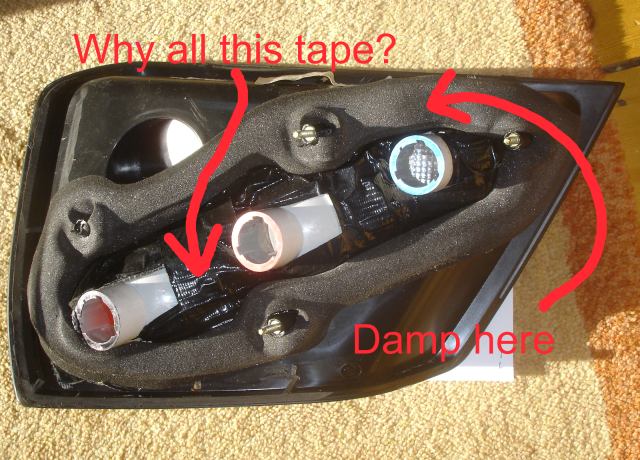
inspect the cluster and you will notice that there will be some sealant missing where the outer casing is bonded on to the actual lighting cluster..see pics below:

Posted Image

3rd:
Using your Mrs / Birds hairdryer blow hot air in to the gap.. warming the casing up and ridding of any condensation... once its all gone you can proceed on to sealing the unit up.


4th:
utilise your loctite silicone sealant and run it along the circumference of the old bonding..making sure you
bridge the gaps:
Posted Image

5th:
leave everything to dry and refit... however do not over tighten the 4 light bolts as they will strip out of the light casing... yes i did it and had to do a bodge. :-)


enjoy your new weather and wash proof mist free rear lights :-)


Gunner

#2 EdButler

EdButler

    Super Duper Member

  • PipPipPip
  • 731 posts
  • Gender:Male
  • Location:Sheffield

Posted 19 November 2007 - 09:29 PM

Going out for a run and leaving the boot open for 10 mins when the engine is warm seems to go the trick for mine. They dont mist badly though... Nice little guide thumbsup

#3 Joe-Turbo

Joe-Turbo

    Scary Internerd

  • PipPipPipPipPipPip
  • 4,176 posts
  • Gender:Male
  • Location:Rayleigh, Essex.

Posted 19 November 2007 - 11:33 PM

did one of my fronts couple of months ago, works very well, now misting at all thumbsup

#4 justin182

justin182

    Super Duper Member

  • PipPipPip
  • 621 posts

Posted 20 November 2007 - 10:41 AM

all four lights are on my to do list! thanks for the guide mate :)

#5 davemate

davemate

    Harrop!!!

  • PipPipPipPipPipPip
  • 3,228 posts
  • Gender:Male
  • Location:Bath
  • Interests:Provoking Badgers

Posted 22 November 2007 - 04:34 PM

can this be put in the useful threads section?

#6 MrSimba

MrSimba

    Scary Internerd

  • PipPipPipPipPipPip
  • 5,197 posts
  • Gender:Male
  • Location:UK

Posted 22 November 2007 - 09:47 PM

If you have any water marks inside the light unit from condensation or leaks then get some de-ionised water (or just boil a kettle and leave it to cool :P ) and pour it into the lamp unit, swill it around until its 'rinsed' the old water marks off, then drain the unit, and dry on a radiator. No more water marks! :D

#7 Retset

Retset

    Billy No Mates

  • PipPipPipPipPip
  • 1,766 posts
  • Gender:Male
  • Location:Somerset

Posted 26 January 2008 - 11:26 AM

One of my lights gets very bad. I brought it in last night and it's nearly dry - maybe by this evening .. Anyway, I'm concerned because all the centre is covered with tape - see pic. Can't see it on the other light so is it bodged? The foam all seems firmly bonded on, even over the tape. Looking in from the other side I can see no damage. I also can't see where the moisture gets in although one area of the foam is damp. Edges all look sealed/resealed. So, do I start cutting into the tape or not?

Attached Files


#8 oconnom

oconnom

    Member

  • Pip
  • 42 posts

Posted 29 January 2008 - 07:36 PM

Just wanted to say big thanks for the guide it has worked a treat and the pictures were very useful in getting over my initial apprehension of taking off the light cluster. Cheers, Mark :)

#9 jasvxt

jasvxt

    Scary

  • PipPipPipPipPipPip
  • 4,527 posts
  • Gender:Male
  • Location:The Dark Side

Posted 11 September 2008 - 06:39 PM

:rolleyes: I can vouch for that , so easy even I can do it :D Thanks Mr Gunner, should have done it years ago thumbsup

#10 Jameshs

Jameshs

    Scary Internerd

  • PipPipPipPipPipPip
  • 3,511 posts
  • Gender:Male
  • Location:Copthorne, Nr Gatwick
  • Interests:Cars and Rock Climbing

Posted 11 September 2008 - 09:29 PM

Thats a job for the weekend chinky chinky

#11 GunnerGibson

GunnerGibson

    Super Member

  • PipPip
  • 367 posts
  • Location:Orkneys

Posted 13 September 2008 - 01:06 PM

Posted Image


the pic over shows tape..

basically last week i had ingress of water. So i removed my rear light and placed it in a bath. the water was flowing in where the glue holds in the individual light plastics. As a result i drained the light and sealed around the rear of the lights with epoxy resin and black sealant. the picture above shows my mod has been done with tape instead

when your boot area is slightly damp it causes the rears to condensate through the minor gaps in the light clusters. also badly fitting lights causes small amounts of rain water to drain behind the lights on to the foam pictured above. this then is directed in through the light clusters.

top tip is make sure your light is completely dried out before sealing it.

Edited by GunnerGibson, 13 September 2008 - 01:07 PM.


#12 Pad-Rock

Pad-Rock

    Member

  • Pip
  • 17 posts

Posted 07 April 2011 - 01:22 PM

Hello ... I'm new to this forum, but was looking at this thread a couple of weeks ago but see that the original pictures have been removed. Was going to follow this at the weekend to try to get rid of the condensation on my left rear light, and was hoping to follow this with the pictures ... any idea if there are any other pictorial guides? Thanks!

#13 LordRagnar

LordRagnar

    Member

  • Pip
  • 189 posts
  • Location:Plymouth

Posted 12 March 2017 - 11:50 PM

Bringing back an old thread but would be great if the pictures could be re uploaded. All 4 of mine are pretty bad so would like to sort this out with the help of this guide


1 user(s) are reading this topic

0 members, 1 guests, 0 anonymous users