If I wanted to fit a stiffer arb is it def a front clam off job?
I've tried to search but it only gives you the last 200 posts now. I await a flaming and general derision
Cheers

Arb Fitting
Started by
Sticky
, Feb 23 2010 09:00 PM
18 replies to this topic
#2

techieboy
-

-

- 22,914 posts
Supercharger of Doom
- Gender:Male
- Location:Bedford
Posted 23 February 2010 - 09:04 PM
No need to remove clam. Just the front undertray.  The bolts through the bushes are a little awkward to access as one on each side is partially blocked by the wishbone. I found a long allen key extension went through the chassis at the front far enough to undo the bolt though.
The bolts through the bushes are a little awkward to access as one on each side is partially blocked by the wishbone. I found a long allen key extension went through the chassis at the front far enough to undo the bolt though.
#3
Sticky
-
-

- 3,462 posts
iTB lover
- Gender:Male
- Location:Herts, UK
Posted 23 February 2010 - 09:09 PM
No need to remove clam. Just the front undertray.
The bolts through the bushes are a little awkward to access as one on each side is partially blocked by the wishbone. I found a long allen key extension went through the chassis at the front far enough to undo the bolt though.
Thanks Matt
#4
techieboy
-
-
- 22,914 posts
Supercharger of Doom
- Gender:Male
- Location:Bedford
Posted 23 February 2010 - 09:12 PM
P.S. The drop links can be a real pain as they'll probably be quite badly corroded (had to cut one of mine off). I'd budget to replace them as part of the upgrade, if I were you.
#5
Sticky
-
-
- 3,462 posts
iTB lover
- Gender:Male
- Location:Herts, UK
Posted 23 February 2010 - 09:21 PM
7/8ths or 1'' diameter ARB that is the question?
#6
techieboy
-
-
- 22,914 posts
Supercharger of Doom
- Gender:Male
- Location:Bedford
Posted 23 February 2010 - 09:22 PM
I'd get Mr Randall's advice on what will work best with his Nitrons.
#7
Sticky
-
-
- 3,462 posts
iTB lover
- Gender:Male
- Location:Herts, UK
Posted 23 February 2010 - 09:36 PM
I'd get Mr Randall's advice on what will work best with his Nitrons.
Hmmm, sounds expensive and I've not even asked yet:rolleyes:
Edited by Sticky, 23 February 2010 - 09:36 PM.
#8
SteveA
-

-
- 9,151 posts
.
- Gender:Male
- Location:North East UK
Posted 24 February 2010 - 10:38 AM
There is a thread in the useful stickys.
#9
Crazyfrog (Fab)
-

-

- 22,801 posts
Iceman
- Gender:Not Telling
Posted 24 February 2010 - 10:42 AM
P.S. The drop links can be a real pain as they'll probably be quite badly corroded (had to cut one of mine off). I'd budget to replace them as part of the upgrade, if I were you.
 spent well over two hours to do my drop link
.................. a real pain

abr done / drop link done

Edited by crazyfrog, 24 February 2010 - 10:43 AM.
#10
Duncan VXR
-

-
- 5,273 posts
Scary Internerd
- Gender:Male
- Location:Lincolnshire
- Interests:Anything to do with making cars faster and better than the original
Posted 24 February 2010 - 10:43 AM
As stated clam on, you also only need to drill the rivets out on one side and by rotating it you can get the other side out without drilling them out  some of the ones I have replaced are a royal PITA lol managed to snap one of my 6mm allen keys getting one bolt out but as techie has said long allen key through the access hole to get it and either use something as an extension bar for leverage or plumbers pliers will work. To get the bottom one you need to jack the wishbone up (or take damper off) to get the bottom one.
I always give the drop link threads a good clean and if really bad run the tap over the thread to allow it a chance of coming off b:D
If changing to uprated ARB you do not use the original mounting points and use longer bolts through the front wishbone - if you are on oe rubber mounts you need to set the wishbone height back to where it should be before final tightening (due to how they operate) have pro bush set on mine so nothing needed
some of the ones I have replaced are a royal PITA lol managed to snap one of my 6mm allen keys getting one bolt out but as techie has said long allen key through the access hole to get it and either use something as an extension bar for leverage or plumbers pliers will work. To get the bottom one you need to jack the wishbone up (or take damper off) to get the bottom one.
I always give the drop link threads a good clean and if really bad run the tap over the thread to allow it a chance of coming off b:D
If changing to uprated ARB you do not use the original mounting points and use longer bolts through the front wishbone - if you are on oe rubber mounts you need to set the wishbone height back to where it should be before final tightening (due to how they operate) have pro bush set on mine so nothing needed  Last point is that on the 7/8th ARB you cannot really go to full stiff setting (well I would not) due to the angle of the drop link) middle setting fine and def stiffer
I have the 7/8th just fitted but would prob have got the 1" if I did not get it so cheap (Theo trying to make me swap lol)
Chris will advise of 1" bar or the stiffest setting you can safely set it to
All depens on what you want from the car also
Morning lesson over
DG
Last point is that on the 7/8th ARB you cannot really go to full stiff setting (well I would not) due to the angle of the drop link) middle setting fine and def stiffer
I have the 7/8th just fitted but would prob have got the 1" if I did not get it so cheap (Theo trying to make me swap lol)
Chris will advise of 1" bar or the stiffest setting you can safely set it to
All depens on what you want from the car also
Morning lesson over
DG
some of the ones I have replaced are a royal PITA lol managed to snap one of my 6mm allen keys getting one bolt out but as techie has said long allen key through the access hole to get it and either use something as an extension bar for leverage or plumbers pliers will work. To get the bottom one you need to jack the wishbone up (or take damper off) to get the bottom one.
I always give the drop link threads a good clean and if really bad run the tap over the thread to allow it a chance of coming off b:D
If changing to uprated ARB you do not use the original mounting points and use longer bolts through the front wishbone - if you are on oe rubber mounts you need to set the wishbone height back to where it should be before final tightening (due to how they operate) have pro bush set on mine so nothing needed
Last point is that on the 7/8th ARB you cannot really go to full stiff setting (well I would not) due to the angle of the drop link) middle setting fine and def stiffer
I have the 7/8th just fitted but would prob have got the 1" if I did not get it so cheap (Theo trying to make me swap lol)
Chris will advise of 1" bar or the stiffest setting you can safely set it to
All depens on what you want from the car also
Morning lesson over
DG
#11
slindborg
-

-
- 22,602 posts
The Bishop of Stortford
- Gender:Not Telling
- Location:.
Posted 24 February 2010 - 10:46 AM
dont plans have a fairly thick ARB kit for £200 or something?
iirc JJJ sent me a guide to fit it.. can forward it on if required
#12
Crazyfrog (Fab)
-
-
- 22,801 posts
Iceman
- Gender:Not Telling
Posted 24 February 2010 - 10:50 AM
dont plans have a fairly thick ARB kit for £200 or something?
bought mine from them at that price
#13
Sticky
-
-
- 3,462 posts
iTB lover
- Gender:Male
- Location:Herts, UK
Posted 24 February 2010 - 05:16 PM
dont plans have a fairly thick ARB kit for £200 or something?
iirc JJJ sent me a guide to fit it.. can forward it on if required
Found the one on the Useful threads sticky. Realised that when I used the search function it looked everywhere rather than just at the forum I was viewing at the time. Cheers for the help
#14
swast4
-
-
- 416 posts
Super Member
- Gender:Male
- Location:Heswall, UK
- Interests:Trackdays
Posted 09 February 2019 - 11:12 AM
Hi,
Just fitted an updated 1" ARB from Matt Bentley (£246 delivered) . It was a PINTA job but would have been easier if I read this thread first. The ARB uses original aluminium bracket and comes with a new rubber mounts.
Top tips as mentioned previously :-
-remove aluminium access plate, covering ARB.
-Drill out the hole to access the top cap head (think I went up 12mm, original is about 8mm) so you can get a proper fitting on it. I also had to chip a small amount of the red hard plastic seal (looks like mastic but Rock hard) this was so that the Allen key fitting and socket was fully on so not to round the cap head bolt.
- remove the front wishbone bolt, really easy to undo.
-use a scissor jack or similar to push wishbone up and out of the way to get bottom cap head bolt out of ARB bracket.
-you have to take off both small aluminum plates by the ARB brackets to remove and replace ARB. (if you have a lift you may get away with 1 bracket) These are held on with 3 rivets. Drill rivet head with 4mm drill then chisel off the back of the rivets (one of them I couldn't drill out so just chiselled off and removed properly when off the car.
-when Re attaching new ARB put top bolt in first (just a couple of threads) then you can see and line up bottom thread otherwise you can't see top bolt alignment.
-As my car is mainly for the track, I have put it on full hard on the drop links, which is the closest hole to the front.
-rivet small aluminium plates back on and reattach aluminium plate covering ARB. (check radiator hoses for leaks while your there).
1st track day is 26th March so I'm looking forward to seeing how it handles as I've heard good things.
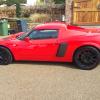
Here some pics


Sent from my LG-H815 using Tapatalk
Just fitted an updated 1" ARB from Matt Bentley (£246 delivered) . It was a PINTA job but would have been easier if I read this thread first. The ARB uses original aluminium bracket and comes with a new rubber mounts.
Top tips as mentioned previously :-
-remove aluminium access plate, covering ARB.
-Drill out the hole to access the top cap head (think I went up 12mm, original is about 8mm) so you can get a proper fitting on it. I also had to chip a small amount of the red hard plastic seal (looks like mastic but Rock hard) this was so that the Allen key fitting and socket was fully on so not to round the cap head bolt.
- remove the front wishbone bolt, really easy to undo.
-use a scissor jack or similar to push wishbone up and out of the way to get bottom cap head bolt out of ARB bracket.
-you have to take off both small aluminum plates by the ARB brackets to remove and replace ARB. (if you have a lift you may get away with 1 bracket) These are held on with 3 rivets. Drill rivet head with 4mm drill then chisel off the back of the rivets (one of them I couldn't drill out so just chiselled off and removed properly when off the car.
-when Re attaching new ARB put top bolt in first (just a couple of threads) then you can see and line up bottom thread otherwise you can't see top bolt alignment.
-As my car is mainly for the track, I have put it on full hard on the drop links, which is the closest hole to the front.
-rivet small aluminium plates back on and reattach aluminium plate covering ARB. (check radiator hoses for leaks while your there).
1st track day is 26th March so I'm looking forward to seeing how it handles as I've heard good things.
Here some pics
Sent from my LG-H815 using Tapatalk
#15
Arno
-

-
- 1,233 posts
Need to get Out More
- Gender:Male
- Location:Netherlands
Posted 11 February 2019 - 07:57 AM
-Drill out the hole to access the top cap head (think I went up 12mm, original is about 8mm) so you can get a proper fitting on it. I also had to chip a small amount of the red hard plastic seal (looks like mastic but Rock hard) this was so that the Allen key fitting and socket was fully on so not to round the cap head bolt.
The red stuff is the chassis glue 
Holds the car together 
No problem to grind/cut some of the excess away as it tends to splooge out during chassis manufacture and baking in the oven and then cures to a hard state.
Bye, Arno.
#16
swast4
-
-
- 416 posts
Super Member
- Gender:Male
- Location:Heswall, UK
- Interests:Trackdays
Posted 11 February 2019 - 09:16 AM
That stuff is really really hard, but if it's holding my chassis together, I'm glad it is ðŸ‘😊
Sent from my LG-H815 using Tapatalk
Sent from my LG-H815 using Tapatalk
#17
Nev
-

-
- 11,587 posts
Nipper's Minion
- Gender:Male
- Location:Bristol
- Interests:Rock climbing, skiing, kayaking, surfing, mountaineering, budgies, chess, practical mechanics.
Posted 28 February 2019 - 07:40 PM
Get ready for understeer if you just up the Lb on the front ARB in isolation...
#18
chris_uk
-

-
- 10,060 posts
I Fancy Joe
- Gender:Male
- Location:Leeds UK
Posted 28 February 2019 - 09:30 PM
fill the ends with sikaflex / tigerseal.. i have seen these rust to death in not such a long time because water gets in and just sits there...


0 user(s) are reading this topic
0 members, 0 guests, 0 anonymous users

