

Tat Diffuser Fitting
Started by
fred666
, Oct 26 2010 08:42 PM
17 replies to this topic
#1

fred666
-
-

- 2,291 posts
All Show, All Go
- Gender:Male
- Location:S Wales
Posted 26 October 2010 - 08:42 PM
Probably a silly question but tbh ive not even looked under the car with the diffuser at hand as it only turned up today.
Do you remove the back undertray to replace with the Tat??
I imagine its going to be a simple bolt on job, but whats with the extra l shape metal pieces that come with it?
Anyone shed any light?
Cheers
#2
techieboy
-

-

- 22,914 posts
Supercharger of Doom
- Gender:Male
- Location:Bedford
Posted 26 October 2010 - 08:45 PM
Yep, replaces the rearmost undertray/diffuser.
Not sure what come with the TAT these days but there should be some braces/supports that fit inside the clam to support the weight of the diffuser. There should also be some pretty good instructions. 
#3
fred666
-
-
- 2,291 posts
All Show, All Go
- Gender:Male
- Location:S Wales
Posted 26 October 2010 - 08:52 PM
Thanks dude. The Tat came with
2 x little L shape lengths (around 6-8 inches long),
1 x diffuser
1 x strip of foam (to go between the clam and Tat but unsure where???
and
No instructions lol  PS - PM'd you
PS - PM'd you
#4
Crazyfrog (Fab)
-

-

- 22,801 posts
Iceman
- Gender:Not Telling
Posted 26 October 2010 - 08:54 PM
i have the instruction on pdf
don't need them no more and easy to fix mainly commun sense

#5
fred666
-
-
- 2,291 posts
All Show, All Go
- Gender:Male
- Location:S Wales
Posted 26 October 2010 - 08:55 PM
Can you send them over please?
common sense i agree, but not with random L shape lengths lol
#6
techieboy
-
-
- 22,914 posts
Supercharger of Doom
- Gender:Male
- Location:Bedford
Posted 26 October 2010 - 09:07 PM
Ah, he's changed the fitting method by the sound of it. There used to be two 6" lengths of aluminium angle plus a 2' piece. These three pieces all sat inside the rear clam and you would bolt the diffuser to them to fix it and spread the weight. The foam is to put along the edge where it sits on top of the engine undertray, to stop any rattles.
#7
fred666
-
-
- 2,291 posts
All Show, All Go
- Gender:Male
- Location:S Wales
Posted 26 October 2010 - 09:10 PM
Now we're cooking on gas looks like its gonna be guess work from here...
cheers  edit - sent Taton a harmless PM
  should have thought of that originally
looks like its gonna be guess work from here...
cheers
edit - sent Taton a harmless PM should have thought of that originally
Edited by fred666, 26 October 2010 - 09:12 PM.
#8
fred666
-
-
- 2,291 posts
All Show, All Go
- Gender:Male
- Location:S Wales
Posted 26 October 2010 - 09:19 PM
For anyone else who could benefit from the fitting guide, Tat's just sent this over
http://www.tat-conce.../PUPdiffFUK.pdf
http://www.tat-conce.../PUPdiffFUK.pdf
#9
techieboy
-
-
- 22,914 posts
Supercharger of Doom
- Gender:Male
- Location:Bedford
Posted 26 October 2010 - 09:21 PM
Was just about to post the same.
#10
MellowYellow
-

-
- 665 posts
Super Duper Member
- Gender:Male
- Location:South East Cheshire via The Blackcountry
Posted 26 October 2010 - 11:01 PM
I have fitted mine this evening, took me two hours in total and that was with me already making sure all the screws came out by giving them a soaking in WD40/Plusgas over a week or so and using ramps to make getting at the front row of screws easier.
The short rounded diffuser I had came with a long piece of angle (bolted to the diffuser), two smaller 6" pieces with it and the foam, the long piece is a transit piece which you take off and then fit across the inside of the clam. This part was fairly easy as it slides under the heatshield (once you have fitted the C clips to the transit bar) and can be manoeuvred into place, lining up the holes by eye,(and the heatshield pretty much holds it in place) prior to putting the diffuser into position.
The two small pieces are a different matter, they go across the two larger outside vent holes so no real way of seeing if they are in line until the diffuser is offered up. It was while I was trying to get the two screws into these smaller pieces that the wife came out and asked how I was doing, all she got was a growl  , I did manage in the end but having the wheels off would make this part easier unless you have arms like a stick insect to reach through the gap between the wheel and the rear arch/clam to line them up by touch. In the end I slid the lead lamp in on top of the diffuser (so I could see clearly), put the screw though the hole in the diffuser and positioned the small piece of angle over it by just holding it at one end, frustrating when I was trying to do it blind / by touch but once I'd sorted the method out on the first side out the other was easy. One more tip, be sure to put plenty of copper slip on the bolts when putting it together, will make getting it off/dropping the oil, a lot easier when you need to.
Unfortunately I didn't take any pictures as it was dark but it does look the part, I'll try to post some tomorrow.
, I did manage in the end but having the wheels off would make this part easier unless you have arms like a stick insect to reach through the gap between the wheel and the rear arch/clam to line them up by touch. In the end I slid the lead lamp in on top of the diffuser (so I could see clearly), put the screw though the hole in the diffuser and positioned the small piece of angle over it by just holding it at one end, frustrating when I was trying to do it blind / by touch but once I'd sorted the method out on the first side out the other was easy. One more tip, be sure to put plenty of copper slip on the bolts when putting it together, will make getting it off/dropping the oil, a lot easier when you need to.
Unfortunately I didn't take any pictures as it was dark but it does look the part, I'll try to post some tomorrow.
#11
fred666
-
-
- 2,291 posts
All Show, All Go
- Gender:Male
- Location:S Wales
Posted 26 October 2010 - 11:05 PM
haha sounds an eventfull evening mate. Cheers for the tips! Printedout along with the guide. Just need toget it powder coated now.
#12
MellowYellow
-
-
- 665 posts
Super Duper Member
- Gender:Male
- Location:South East Cheshire via The Blackcountry
Posted 26 October 2010 - 11:22 PM
I was going to have mine powder coated but the guy flat refused to do it when he saw it, said he'd need to blast it (to key it) so the powder coating would stick and as it was so thin he'd be scared of it distorting when it was being done, you could probably get it done without it being "keyed" first though and it will stick, I just couldn't be arsed to keep asking. I had it painted satin black in the end, to be honest there's not that much of it showing now so not sure if it was worth having anything done to it at all. Good luck with the fitting, it's not so hard to be honest, would have been even easier if I'd done it in daylight.
#13
SteveM
-

-
- 1,608 posts
Billy No Mates
- Gender:Male
- Location:Southampton
Posted 27 October 2010 - 09:36 AM
fitted mine yesterday and the only major problem was the long brace bar which needed to be trimmed to clear my Tullett silencer (fitting the short brace bars was fiddly but managedin the end with a few scraped knuckles)
got mine pre painted and looks great!
#14
MellowYellow
-
-
- 665 posts
Super Duper Member
- Gender:Male
- Location:South East Cheshire via The Blackcountry
Posted 27 October 2010 - 05:20 PM
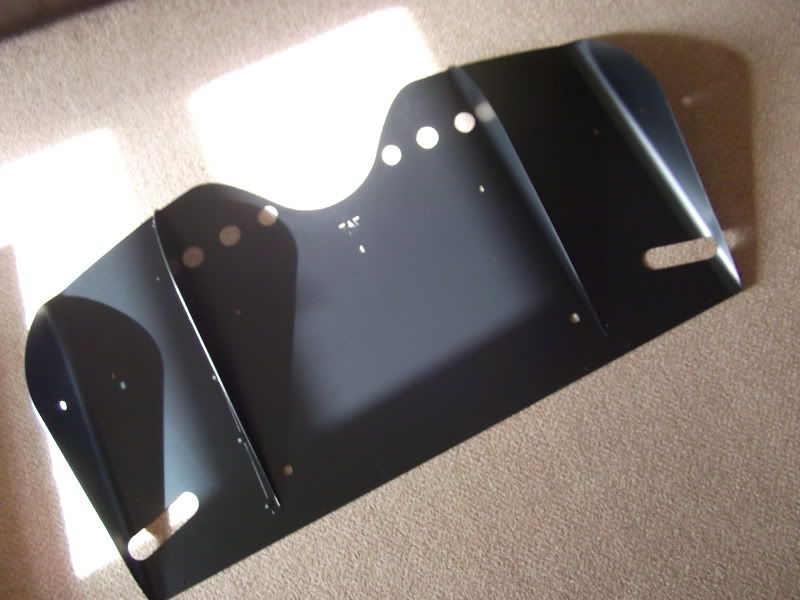
As promised, not,really a very good picture though, dark when I got home.

#15
Wolfstone
-

-
- 12,987 posts
Iceman
- Gender:Male
- Location:Jordan (The country. Not Katie Price)
- Interests:Northants Pedantic Crew global domination of the media.
Posted 27 October 2010 - 08:13 PM
More pics of mine I fitted a month or so ago:


Had mine powdercoated (organised by Deano01 )
Completely agree with MellowYellow's succinct fitting guide. Would be much easier with the wheel(s) off but can be done with them on. Took me 2 hours start to finish as well and it can be done without jacking the car up.
Had mine powdercoated (organised by Deano01
)Completely agree with MellowYellow's succinct fitting guide. Would be much easier with the wheel(s) off but can be done with them on. Took me 2 hours start to finish as well and it can be done without jacking the car up.
Edited by Wolfstone, 27 October 2010 - 08:13 PM.
#16
fred666
-
-
- 2,291 posts
All Show, All Go
- Gender:Male
- Location:S Wales
Posted 27 October 2010 - 09:49 PM
They don't half look good fitted! 
Out of curiosity how much is everyone paying to get these powder coated??
I had mine done today in under an hour and the price was ridiculously cheap!! I couldn't paint it for what i paid! Shall be using this company a lot more in future
meant to ask - do they rattle on the clam?
Out of curiosity how much is everyone paying to get these powder coated??
I had mine done today in under an hour and the price was ridiculously cheap!! I couldn't paint it for what i paid! Shall be using this company a lot more in future
meant to ask - do they rattle on the clam?
Edited by fred666, 27 October 2010 - 09:50 PM.
#17
Wolfstone
-
-
- 12,987 posts
Iceman
- Gender:Male
- Location:Jordan (The country. Not Katie Price)
- Interests:Northants Pedantic Crew global domination of the media.
Posted 27 October 2010 - 09:58 PM
4 of us had a group powder coating deal at £37.50 each. Here are the prices that deano01 negotiated:
http://www.vx220.org...ost__p__1048808
Painted and lacquered would have been £15 each.
So come on fred, spill the beans on how muchy you paid for painting? 
#18
fred666
-
-
- 2,291 posts
All Show, All Go
- Gender:Male
- Location:S Wales
Posted 27 October 2010 - 10:29 PM
Gladly mate, im so chuffed with the price! and finding the company, Its ideal for future pieces. Powder coated not painted.
£20 powder coated any colour, i sh** you not They even do a clear lacquer in powder coat finish so i could have had it extra glossy for the same price, although i opted for matt.
They charge a set price of £35 per wheel if original paint is left on them or £30 and even less if the wheels are given to them bare metal.
The prices are unreal, the local coaters wanted around £60-£75 to do the diffuser so i did a little research and found a company in the heads of the valleys S Wales.
They even do a clear lacquer in powder coat finish so i could have had it extra glossy for the same price, although i opted for matt.
They charge a set price of £35 per wheel if original paint is left on them or £30 and even less if the wheels are given to them bare metal.
The prices are unreal, the local coaters wanted around £60-£75 to do the diffuser so i did a little research and found a company in the heads of the valleys S Wales.
Edited by fred666, 27 October 2010 - 10:30 PM.


1 user(s) are reading this topic
0 members, 1 guests, 0 anonymous users

