Jump to content


Photo

Wiper Motor Fix/cleaning


  • Please log in to reply
5 replies to this topic

#1 Stik

Stik

    Member

  • Pip
  • 174 posts
  • Gender:Male
  • Location:Grantham, Lincs
  • Interests:Cake

Posted 15 May 2011 - 05:21 PM

So i've just bought a VXT220 and its windscreen wiper wasn't working. (As it turned out the three hour drive back was through sporadic and torrential downpours so this was quite a problem!). There's a few threads on here about them getting corroded and how much a replacement motor costs. I figured i'd have a go at cleaning it down instead. It's worked great, and i thought i'd write it up. It took me about 3 hours in total:


Requisites:
- Crosshead screwdriver
- Small pliers (the smaller the better)
- Torx T25 screwdriver
- 10mm spanner
- 13mm spanner
- Kitchen towels
- Degreaser (WD40 seems to work okay)
- Insulating tape (waterproof)
- Toothbrush or small paintbrush for cleaning.

Optional and helpful:
- Small mirror
- Flathead screwdriver

Posted Image


Step 1:
Posted Image
Remove the little plastic cover over the motor mechanism, i've highlighted its location on the image (which i stole from this thread - sorry). It has two screws. Unplug the motor connector. Remove the windscreen washer bottle and put it aside.

Step 2:
Remove the motor assembly from the car. This is by far the hardest bit as there are four nuts to undo and they're all underneath and hard to get at. If you have a small mirror then it helps immensely, a blob of bluetack underneath it will let you rest it underneath and pointing in the right direction. If you don't have a small mirror then this is what it looks like, it'll help if you're having to do it through touch alone:
Posted Image

There are three nuts (10mm) holding the motor mechanism in place and a fourth one (13mm) attaching the wiper arm linkage to the spindle. I recommend you take the linkage nut off first, then you can move it out of the way. It's a splined spindle so once you've removed the nut slip a flathead screwdriver behind it to lever it off


Step 3:
Posted Image
Peel off the tape around the top of the motor. It should expose two slots with flat square nuts on them. Use a Torx T25 driver to undo the two bolts on the end of the motor. Be careful to make sure the two square nuts fall out of the motor and not into it. You should now be able to pull the metallic can that forms the body away from its guts. It's got two large magnets in it which will resist so give it a good tug.

Step 4:
Posted Image
Posted Image
In my case the motor was full of brown rusty water, no idea how long it'd been in there. Clean the insides. This is messy and time consuming. The reason my motor had failed was because the gunk had so thoroughly coated the commutator ring that it was rarely ever making contact with the brushes. On top of that the runners that the three carbon brushes slide back and forth in had become gunged up as well. Sliding the brushes back and forwards several times using a small pair of pliars seems to have freed them up. Degreaser would be best here, WD40 seemed to work okay for me with liberal application of kitchen towels. The components on the board aren't so important but while you're at it you may as well try to get the crap off them too. The reason my motor didn't work well was because of the amount of gunge that had accumulated on the commutator ring and brushes, electrical contact was very intermittent.

This is as clean as i could (be bothered to) get mine, and it seems to be sufficient:
Posted Image

Ensure there's no bits of rust from the inside of the can stuck to the armature, there's not a lot of clearance between it and the stator magnets when you put it together so a lump of rust could jam it.

Step 5:
Leave the parts somewhere warm for a bit to make sure they're dry. Put the motor back together with its two Torx bolts, the small pliars are useful here for holding the little square bolts in place as you tighten. Don't drop them inside. Note that the can is keyed, so it will only go together one way. Before you put it together make sure the ground bearing at the end of the motor spindle is clean.

Step 6:
Posted Image
Wrap a few turns of insulating and waterproof tape around the seal on the motor, covering the holes. There is a small hole on the back end of the can, it might be worth covering that as well in case that's how the water gets in there in the first place.

Step 7:
Put it back in the car. Do everything in reverse and you should be okay. Don't attach the link arm yet, just do up the three mounting bolts. Re-attach the 5wire connector and turn the car on, and set the wipers to intermittant. You will be able to hear the motor going, when it stops to pause turn the car off again. This ensures that the motor is in the "bottom left" position. Manually move the wiper blade so that it's in the rest position and then attach the linkage arm. Make sure you do the bolt up tightly, if it's loose it will strip the splines over time and then you really will need a new motor.

Step 8:
If you used a mirror then don't forget to take it out or your girlfriend will kill you for losing her makeup mirror. Put the little plastic cover back on and put the windscreen washer bottle back in place.

Hope that helps someone else some day!

#2 s-express

s-express

    Super Member

  • PipPip
  • 311 posts
  • Gender:Male
  • Location:Chester
  • Interests:cars (obviously) but also turning into a bit of a conservationist....which doesn't really make sense...

Posted 16 May 2011 - 07:34 PM

good write up chinky chinky

#3 moneyhunster

moneyhunster

    Oooh whats this bit do??

  • PipPipPipPip
  • 1,168 posts
  • Gender:Male
  • Location:redruth
  • Interests:Bodybuilding, Rc planes, RC Quad flyers, trucks, motorbikes, quad bikes, fast cars, car Audio, Security, computers, business, FPV flying and most of all my girlfriend Lisa

Posted 14 August 2011 - 02:21 PM

spot on mate, i was about an hour trying to get the wiper lined up properly thumbsup

#4 Marcowpolo

Marcowpolo

    Member

  • Pip
  • 110 posts

Posted 11 December 2011 - 04:42 PM

on the elise S1 ! the WIPER MOTOR is an CITROEN AX ! maybe it's the same part for the VX220 ?

#5 KurtVerbose

KurtVerbose

    His Serene Highness

  • PipPipPipPipPipPip
  • 3,743 posts
  • Gender:Male
  • Location:Merlischachen
  • Interests:Big baps.

Posted 02 March 2014 - 08:41 AM

Thought I'd update this a little as the pics have gone.


Step 2:
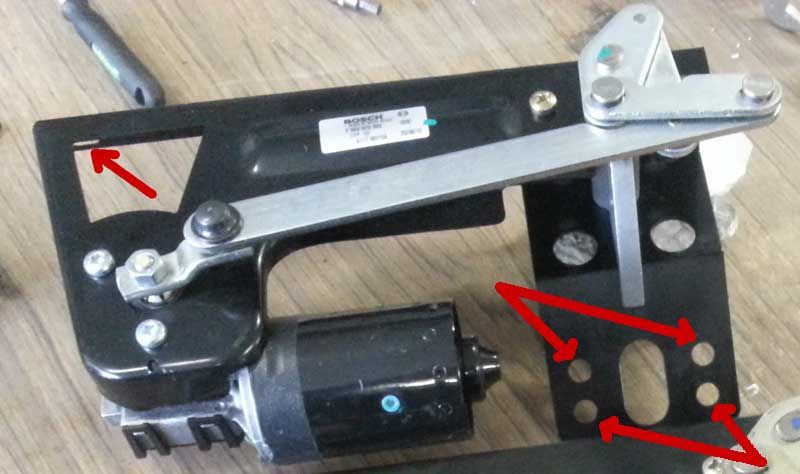
Remove the motor assembly from the car. This is by far the hardest bit as there are four nuts to undo and they're all underneath and hard to get at. If you have a small mirror then it helps immensely, a blob of bluetack underneath it will let you rest it underneath and pointing in the right direction. If you don't have a small mirror then this is what it looks like, it'll help if you're having to do it through touch alone:
Posted Image

There are three nuts (10mm) holding the motor mechanism in place and a fourth one (13mm) attaching the wiper arm linkage to the spindle. I recommend you take the linkage nut off first, then you can move it out of the way. It's a splined spindle so once you've removed the nut slip a flathead screwdriver behind it to lever it off


Hope that helps someone else some day!


This step is indeed the trickiest part. I used a socket with a universal joint on all of the bolts.


Posted Image


This is the thing removed and I've highlighted where the bolts go. When you've removed the bolts you're half way there. Getting it out involves a gentle squeeze past the air box for the cabin heater. I can't get this out due to a siezed screw. You don't have to remove the airbox out though, although it's a close run thing.


Posted Image


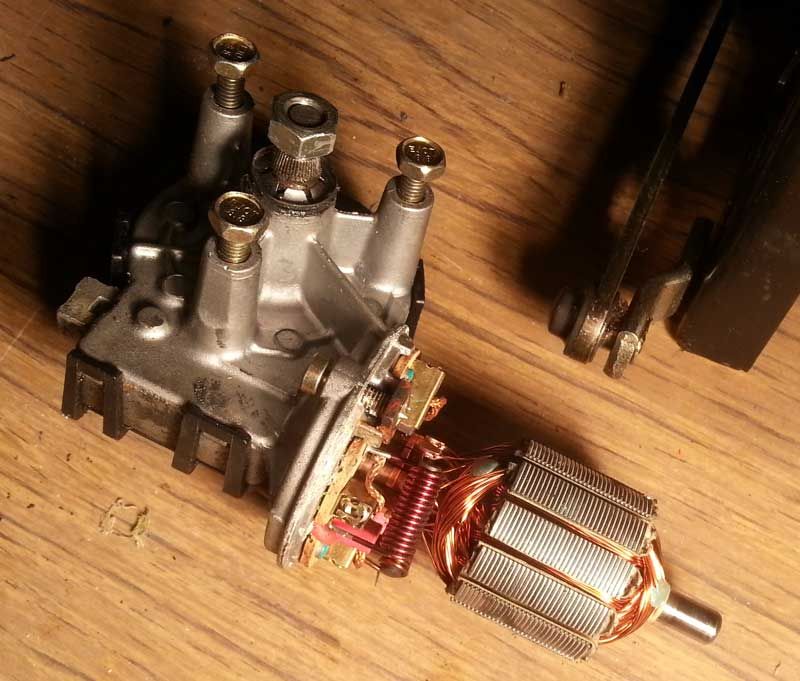
Mine still worked, and as you can see there's not much wrong with the motor.


Posted Image


Why did I remove it then, for fun?


Well, it was increadibly noisy. Turning it over by had showed it was very rough. Clearly an internal bearing had gone, so it needed replacing. They're £350 in the UK.


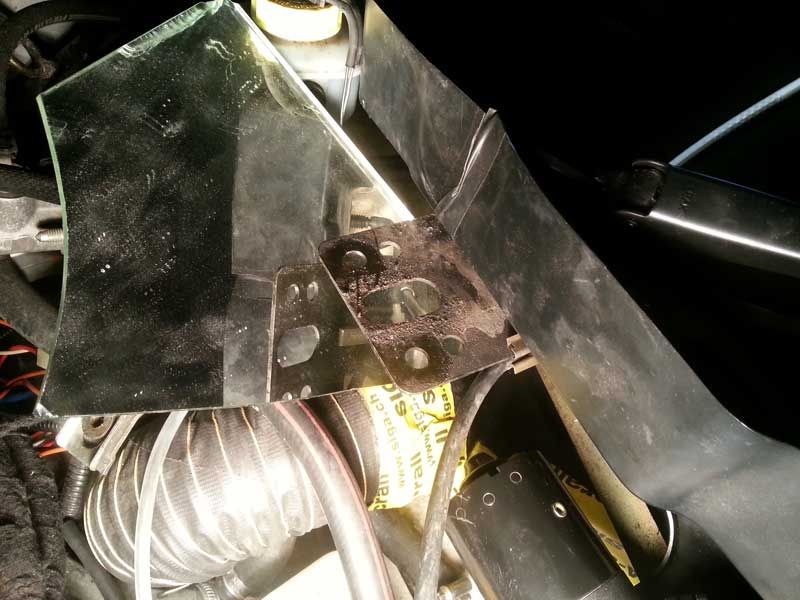
So why had it gone? I'm not sure, but in this picture you can see some white tape I've put on to join a split in the water proof tray. The previous owner had also taped it and I hadn't noticed the tape was peeling away. Actually, you can see the original tape in the first picture. So maybe there was some water ingress. Or maybe it's just an 11 year old motor.


Posted Image


I suspect some work has already gone on here during the custodianship of the previous owner. As well as the split in the drip tray there were also only 2 of the four bolds installed, but it might have been to get to the heater which never worked.


Hope that helps someone else some day!


It was Stik, thank you.


#6 KurtVerbose

KurtVerbose

    His Serene Highness

  • PipPipPipPipPipPip
  • 3,743 posts
  • Gender:Male
  • Location:Merlischachen
  • Interests:Big baps.

Posted 02 March 2014 - 09:41 AM


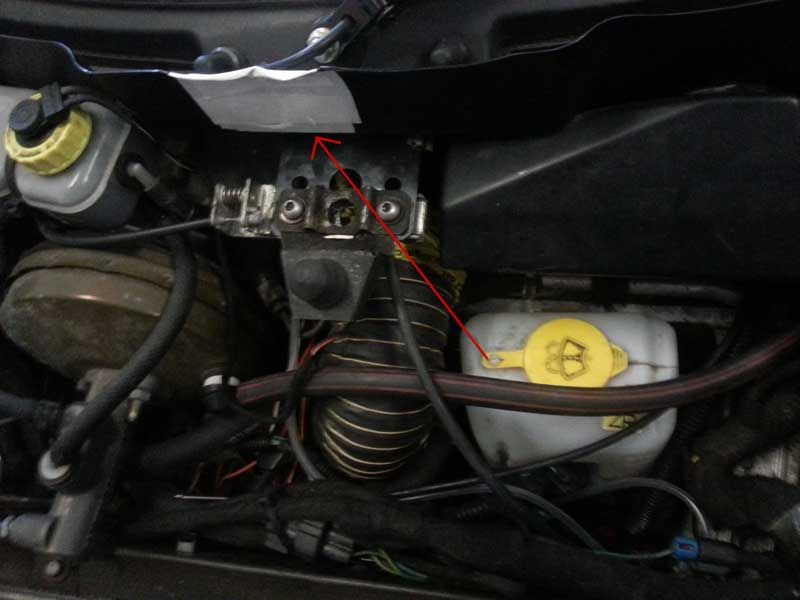
Posted Image


Actually, the arrows on that pic are wrong. The 4 bolts arrowed are for the bonnet catch. The actual ones are on the other side, as per the one bolt on the left. :drink:


I'll try and get a better picture later.


1 user(s) are reading this topic

0 members, 1 guests, 0 anonymous users