Jump to content


Photo

Project Itbs


  • Please log in to reply
28 replies to this topic

#1 yaaan

yaaan

    Need to get Out More

  • PipPipPipPip
  • 956 posts
  • Gender:Male
  • Location:Bristol

Posted 14 April 2012 - 10:57 PM

Well, with some practical help from Nev and online support from Vocky I've finally taken the plunge and made a start on fitting my ITBs and Stage 2 compcams. It's a bit of a step up from changing brake pads which my previous foray into DIY but looking like it'll be fun until I get pissed off with in about 3 days' time when I can't get it all back together :)

Thus far I've made some room for everything by 'carefully' removing the induction kit, inlet manifold and a large amount of wiring loom. There's an awful lot of random unconnected connectors floating about now but hopefully there will matching connections for them all on the new loom but for now I just have a lot of space in the engine bay.....
Posted Image
IMG_1489 by Yaaan74, on Flickr
A vx lung...anyone want it?

Posted Image
IMG_1491 by Yaaan74, on Flickr
Lots of space for some shiny new ITBs. They don't appear to take up anywhere near as much space so hopefully putting everything back in should be easier than getting it out :)

Tomorrow I get to fish an O ring out which fell in when removing an injector, and then get the old cams out and the new ones in so will get a few photos up of that as I go.

#2 yaaan

yaaan

    Need to get Out More

  • PipPipPipPip
  • 956 posts
  • Gender:Male
  • Location:Bristol

Posted 14 April 2012 - 11:00 PM

Oh, and.....
Posted Image

:D

#3 Crazyfrog (Fab)

Crazyfrog (Fab)

    Iceman

  • 22,801 posts
  • Gender:Not Telling

Posted 14 April 2012 - 11:12 PM

Mine are all black now Good luck and enjoy.... And ps don.t forget to mod the oil dip.(ask Neil)........

Edited by crazyfrog, 14 April 2012 - 11:15 PM.


#4 yaaan

yaaan

    Need to get Out More

  • PipPipPipPip
  • 956 posts
  • Gender:Male
  • Location:Bristol

Posted 14 April 2012 - 11:24 PM

Thanks:) looking forward to hearing them in all their glory soon....got 2 weeks to get them sorted before a trackday at Pembrey so no pressure! The oil dip? I've got an extension for that in the kit but is there more that needs doing? I'll add it to my list of things to ask him :)

#5 Crazyfrog (Fab)

Crazyfrog (Fab)

    Iceman

  • 22,801 posts
  • Gender:Not Telling

Posted 14 April 2012 - 11:35 PM

Mine wasn't.t included in the kit at the time so vocky crafted a new bracket out of nice aluminium piece.... Keep asking vocky he love it

#6 Sticky

Sticky

    iTB lover

  • PipPipPipPipPipPip
  • 3,462 posts
  • Gender:Male
  • Location:Herts, UK

Posted 15 April 2012 - 02:25 AM

Worth also drilling a larger hole in the bottom of the dipstick to give a more reliable reading, hopefully! In fact, ask Neil!

#7 vocky

vocky

    Moderator

  • 11,969 posts
  • Gender:Male
  • Location:Earth

Posted 15 April 2012 - 10:56 AM

in the second picture I can see the knock sensor is still on the engine, this is not required so can be removed (near the alternator and starter motor). Also the coilpack capacitor can be removed, this is not required any more (bolted onto the engine at the same point as the cam cover earth strap) EGR valve is no longer required, get a blanking plate from the dealers, only a few quid

Edited by vocky, 15 April 2012 - 10:56 AM.


#8 yaaan

yaaan

    Need to get Out More

  • PipPipPipPip
  • 956 posts
  • Gender:Male
  • Location:Bristol

Posted 15 April 2012 - 11:16 AM

in the second picture I can see the knock sensor is still on the engine, this is not required so can be removed (near the alternator and starter motor).

Also the coilpack capacitor can be removed, this is not required any more (bolted onto the engine at the same point as the cam cover earth strap)

EGR valve is no longer required, get a blanking plate from the dealers, only a few quid


Excellent, more weight saving :)

Not being very familliar with this sort of stuff, can someone annotate the picture to show which bits these are? :blush:

#9 DarrylB

DarrylB

    Billy No Mates

  • PipPipPipPipPip
  • 1,629 posts
  • Gender:Male
  • Location:Just outside Uxbridge

Posted 15 April 2012 - 11:52 AM

Cooool - I'm now full of questions: where did you get the kit and cams from? Have you done anything on the exhaust front? What do you have to do with ECU once you've fitted the ITB's? Go and get it mapped? Oh and more pics please :-D

#10 yaaan

yaaan

    Need to get Out More

  • PipPipPipPip
  • 956 posts
  • Gender:Male
  • Location:Bristol

Posted 15 April 2012 - 12:00 PM

Tempting aren't they :) The ITB kit came direct from Webcon and the cams I ordered through Summit Racing in the States. I already had a 2bular 2.5" system installed and just on the look out for a 4-1 manifold to complete it now. The ECU comes with the kit ready mapped. These are staged I believe and I just ordered the stage map that will cover the mods that I'll have in place by the time it's all complete. Stage 3 map covers new cams, manifold and exhaust so hopefully I can get a manifold sorted and installed fairly quickly after the current work is all done. There'll be plenty more pictures once I get passed my cam installation block (just apprehensive about fcuking it up as I've not attempted anything quite so 'advanced' with the car before) :D

#11 DarrylB

DarrylB

    Billy No Mates

  • PipPipPipPipPip
  • 1,629 posts
  • Gender:Male
  • Location:Just outside Uxbridge

Posted 15 April 2012 - 12:17 PM

Soooo tempting but I must resist! I must...for my bank balances sake As for the cams...just follow the TIS guide and be ultra methodical :-) Can I suggest that unless you've had it done recently, change the cam chain too and bits too, and I'd also recommend checking the high pressure relief valve in the oil pump whilst you're under there...I've just had to replace my oil pump coz mine was jammed.

#12 vocky

vocky

    Moderator

  • 11,969 posts
  • Gender:Male
  • Location:Earth

Posted 15 April 2012 - 01:09 PM

Posted Image

top = fuel tank vent valve, remove pipe from large black canistor
left = knock sensor
middle = egr valve
right = coilpack capacitor thingy

#13 yaaan

yaaan

    Need to get Out More

  • PipPipPipPip
  • 956 posts
  • Gender:Male
  • Location:Bristol

Posted 15 April 2012 - 05:54 PM

Ah brilliant, thanks very much :) I'm glad that's the egr valve as the conector got a bit broken earlier so it's good to know I don't need it :) Cams are all in now. Much easier than I expected....which probably means that I've done something wrong! Tomorrow I can start on the ITBs :D

#14 yaaan

yaaan

    Need to get Out More

  • PipPipPipPip
  • 956 posts
  • Gender:Male
  • Location:Bristol

Posted 17 April 2012 - 10:07 AM

Ok, yesterday was accelerator pedal replacement. This proved to be as awkward as anticipated. Not a difficult job, just fiddly and much easier if you have a second pair of hands to help out....I should think. A spanner, an old rag and some bits of string come in remarkably handy when you can't reach both ends of a bolt at the same time.

For anyone who has yet to experience the joy of pedal replacement, pull down the brown clip down and then the connector just pulls out.
Posted Image

The first two nuts to remove at the front of the pedal are pretty straight forward and undo without a problem. I didn't have any need to hold the heads of the bolts which was just as well as at this point I didn't know where they were. Then I discovered that there is a third bolt holding the pedal on. This is at the rear of the pedal where you can't see and I couldn't get my hand up behind it to feel if there was a nut there. The head of the bolt however is located as below. Cutting the cable tie around the reservoir allows it to be moved out of the way just enough to get better access at the head of this third bolt which is just out of view below where the ring end of the spanner is. At this point I found the heads of the other two bolts which are forward under the base of the windscreen.
Posted Image

One pedal removed.
Posted Image

Fitting the new pedal is pretty straightfoward. Now I know where the bolts are located it's just a case of dropping them through the holes beneath the bonnet (my magnet/inspection light widget was handy here for holding the bolts whilst inserting into these holes...dropping them here would see them disappear into the depths of the car never to be seen again) and then getting your head back under the dash and tightening the nuts. Fortunately the third bolt screws into the pedal mounting and deosn't require a nut. The only tricky part is holding the tops of the bolts when tightening the nuts so if you know someone with small hands rope them in for this!

Posted Image

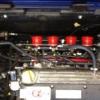
New pedals in! Then it was just a case of stripping out all of the interior to get to the bulkhead to pass the cable through to the engine bay. I happily drilled a hole through and then discovered that there was already one there. I must have save at least half a gram there in removed grp so not completely wasted. Next up to fit the ITBs so I can get the cable set up and the retaining bracket mounted.

#15 DarrylB

DarrylB

    Billy No Mates

  • PipPipPipPipPip
  • 1,629 posts
  • Gender:Male
  • Location:Just outside Uxbridge

Posted 17 April 2012 - 10:16 AM

great progress! on a side note - can I call 'dibs' on your old throttle pedal? I have a P1516 code which equates to either the throttle body/throttle pedal being at fault. I'm slowly checking all the wiring as I go to rule things out, I even completely dismantled the big black and blue plugs on the loom but they checked out ok.

#16 yaaan

yaaan

    Need to get Out More

  • PipPipPipPip
  • 956 posts
  • Gender:Male
  • Location:Bristol

Posted 17 April 2012 - 10:18 AM

Yep no worries. Once it's all done I've got to work out what I'm going to sell and what will get stored in the garage but this I'll reserve for if you need it.

#17 Nev

Nev

    Nipper's Minion

  • PipPipPipPipPipPipPipPip
  • 11,587 posts
  • Gender:Male
  • Location:Bristol
  • Interests:Rock climbing, skiing, kayaking, surfing, mountaineering, budgies, chess, practical mechanics.

Posted 17 April 2012 - 05:30 PM

Keep spannering old chap ;) I think you must be over the 1/2 way point now, and got the hardest bits over with :)

#18 yaaan

yaaan

    Need to get Out More

  • PipPipPipPip
  • 956 posts
  • Gender:Male
  • Location:Bristol

Posted 17 April 2012 - 07:29 PM

Yep the end is in sight, sort of :) I just need to get the crank sprocket off which looks to be the last big job....looking pretty rusty down there! Then hopefully it's just a case of connecting lots of things together!

#19 badgerade

badgerade

    Need to get Out More

  • PipPipPipPip
  • 1,173 posts
  • Gender:Male
  • Location:Reading

Posted 17 April 2012 - 08:41 PM

It will all be worth it!! Good effort!

#20 yaaan

yaaan

    Need to get Out More

  • PipPipPipPip
  • 956 posts
  • Gender:Male
  • Location:Bristol

Posted 18 April 2012 - 08:51 AM

So having spent most of yesterday doing small jobs like removing the EGR valve and replacing the lambda sensor (left the second one in place rather than blanking it off as it looked to be even more of a pain to do than the first one) I thought I'd offer up the throttle bodies to see how they looked.
Posted Image

All looking good, however, spot the small problem
Posted Image
Yep the backing plate appears to be on the wrong way around and interferes with the plumbing in quite a major way so this morning's first job is to swap that around. Then it's on to a bit of buggering around with the crank sprocket.....


2 user(s) are reading this topic

0 members, 2 guests, 0 anonymous users