Yes, it really has taken me this long to build up courage to do the first doorcard, but here´'s the result:

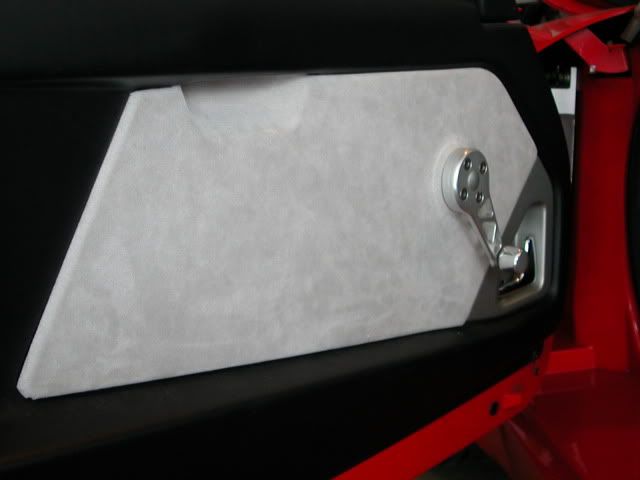
The sharper eyed amongst you might spot a couple of "bubbles" in the most concave parts of the door pull, and around the window winder, but after fitting, they're not noticeable at all. Maybe the next one will be better, and maybe this one will deteriorate after a while, but for the time being I'm very satisfied with the result.
After spending ages thinking out all sorts of complicated "smart" ways, I finally did it in the simplest way imaginable. Because I never actually managed to find a description of how to fit the Alcantara, here's mine. Hopefully others with more experience than myself will be prompted to contribute with alternative suggestions and hopefully this will help others that are don't know where to start. No pictures though - it's kind of difficult to take pictures when you only have two sticky hands and you're trying to finish as quickly as possible before the glue dries.
0.1- I passed on the "3M 90" spray glue - it costs GBP 40 over here. At that price I'd rather take a chance on having to do the whole lot over again.
0.2- I didn't remove the silver paint first as it didn't seem to react to the glue, but it really seems stupid not to, so I probably will next time. Paint stripper, then roughening up the surface slightly with sandpaper sounds like a good idea.
1- After cutting out the material I spent some time stretching the area where the door pull would be. I did this by (difficult to explain this..) holding the ends of my thumbs together on the one side, then gripping the material and "bending" it over. It didn't seem to be close to getting torn. The result was a very "saggy" area, indicating that this really helps. Next time I'll stretch the fabric even more in that area, and maybe a little in the window winder area.
2- Spray the glue evenly over the correct

side of the Alcantara.
3- Spray the rear of the door card around the edges, and around the window winder hole (I covered the velcro fasteners with gaffa tape first).
4- Turn it over and spray an even, not too thick, coat over the entire front surface of the door card (I think I might have had too much in the concave areas of the door pull and window winder.
5- Wait as long as it takes for the glue on the front surface to become tacky. At 0C in the garage, this took quite a while. I suspect that this is *
THE* most important part of the whole process.
6- Lay the door card gently on to the Alcantara in exactly the correct position - first time. You will have cut it about 2cm. oversize, so this is not difficult.
7- Turn it over and start pressing the Alcantara into the door pull first. Take care that wrinkles don't appear on the rest of the card surface.
8- Once the door pull is done, the rest is easy, but should probably be done as quickly as possible before the glue dries too much. Not sure how long that would be though. Smooth out the front carefully, avoiding wrinkles and bubbles.
9- Lastly, turn it over and fold over the edges, cutting out the extra material at the corners with scissors, and cutting the window winder hole into segments with a sharp knife.
10- I used some strong clips to press and hold a thick piece of rubber into the door pull part to try to prevent the material from loosening while the glue set. I believe this helped. Didn't bother with clips anywhere else though.
HTH!


 Had very similar in my astra