This topic is intended to inspire and assist anyone with little or no technical expertise who wants to fit the Webcon throttle bodies kit but who is concerned that the kit does not come with detailed, step by step instructions. I hope it will be of some use; please do not rely on it but rather use it as additional information.
The logical reason for deciding to fit this kit to my 2003 2.2 n/a is that it should increase the power without forcing me to change the class in which I run the car in my local sprint series. Supercharging the car would put the car in a higher class and consequently, in my opinion, make it less competitive considering the other vehicles in that class. Otherwise I’m pretty sure I’d be supercharging it!
It will be interesting to see what power gain I get as I put the car on a local rolling road to benchmark it before starting the project. This gave the following results:
Run 1
Max power: wheels -124bhp; engine – 153bhp
Max torque: 156 lbft
Inertia Run
Max power: wheels -130bhp; engine – 160bhp
Max torque: 164 lbft
I discovered after this that I could not go back to the same rolling road to tune the car after fitting the kit because only Webcon dealers can connect to the new ecu supplied with the kit. This would be fine if there were more of them and they were significantly closer to where I live!
The emotional reason for fitting the kit comes from when I heard the sound of throttle bodies on this YouTube clip:
http://www.youtube.com/watch?v=lYrjLdtv3bk&feature=player_embedded
I should say that my previous mechanical experience extends to bolting and unbolting and I have no idea what a throttle body actually does. Apologies if what I say in places is obvious to you but it wasn’t obvious to me so I’m assuming there are others who may find this useful.
There are two topics that I found really useful in assessing whether or not I had the nerve to do this. This is Vocky’s:
http://www.z22se.co....le-bodies.9736/
This is Yaaan’s:
http://www.vx220.org...1-project-itbs/
Before starting I copied and pasted these in to a Word document to create a make shift instruction manual. Photos are particularly helpful! Both Vocky and Yaaan have been really kind in offering online support as I work my way through the project.

Fitting Webcon Throttle Bodies
Started by
luckman
, Nov 20 2012 08:58 PM
69 replies to this topic
#2

luckman
-
-

- 123 posts
Member
- Gender:Male
- Location:North Wiltshire
Posted 20 November 2012 - 08:59 PM
To start with here is what you get in the box from Webcon.
Filter:

Fuel pressure regulator:

Throttle cable:

Throttle cable bracket (pedal end):

Crank pulley trigger disk fitting kit - and the only instructions you get for any part of the kit!

Filter:
Fuel pressure regulator:
Throttle cable:
Throttle cable bracket (pedal end):
Crank pulley trigger disk fitting kit - and the only instructions you get for any part of the kit!
#3
luckman
-
-
- 123 posts
Member
- Gender:Male
- Location:North Wiltshire
Posted 20 November 2012 - 08:59 PM
Throttle pedal:

Assorted hoses:

New engine management unit:

New wiring loom:

Cable ties:

Assorted hoses:
New engine management unit:
New wiring loom:
Cable ties:
#4
luckman
-
-
- 123 posts
Member
- Gender:Male
- Location:North Wiltshire
Posted 20 November 2012 - 09:00 PM
Coil pack adaptor:

Coolant temp sensor:

Rear lambda bung (Webcon ecu only uses one lamba):

Cobra clips:

Core plugs, O rings and fuel line connectors:

Engine top hose fan switch housing:

Assorted fixings:

In addition to buying the kit, I have also purchased an egr blanking plate and the crank pulley belt (both from local Vauxhall dealer and both had to come from Germany!). You don’t have to replace the belt but it seemed worth doing to me at the same time as removing the crank pulley.
Coolant temp sensor:
Rear lambda bung (Webcon ecu only uses one lamba):
Cobra clips:
Core plugs, O rings and fuel line connectors:
Engine top hose fan switch housing:
Assorted fixings:
In addition to buying the kit, I have also purchased an egr blanking plate and the crank pulley belt (both from local Vauxhall dealer and both had to come from Germany!). You don’t have to replace the belt but it seemed worth doing to me at the same time as removing the crank pulley.
#5
luckman
-
-
- 123 posts
Member
- Gender:Male
- Location:North Wiltshire
Posted 20 November 2012 - 09:02 PM
I have also done some preparation as follows:
Removed the passenger seat so I could remove the rear bulkhead interior trim. This is just an unbolting job but I had to buy a 6mm ball ended hex key (from Halfords) to remove the bolt under the seat at the front nearest the door. I managed to get this key between the seat and the sill and undo it that way.
Removed the rear bulkhead interior trim. I had to buy a trim clip prying tool (from Amazon) to remove these clips without breaking them. Once these were all removed together with the speakers, the trim still did not want to come out so I was back on this site asking why. In the end I pushed a flat cold chisel under the tray and closed my eyes and it suddenly burst free from whatever was holding it at the bottom. Only one thing was stuck to the back of the trim which I think is the motion sensor for the alarm so I peeled this off and made a mental note to get some double sided tape to stick it back on when I come to re-assemble.
Removed the roof;
Removed the aerial;
Removed the bonnet taking care to tape on the spacer/shims so I don’t lose them;
Removed the offside rear wheelarch liner to give better access to change the belt.
Edited by luckman, 20 November 2012 - 09:09 PM.
#6
luckman
-
-
- 123 posts
Member
- Gender:Male
- Location:North Wiltshire
Posted 20 November 2012 - 09:03 PM
I also loosened the crank pulley nut on the basis that before I rendered the car undriveable I’d better check I didn’t need to get it to a local garage for them to do this for me! To do this, you need to jack up the offside rear of the car, remove the wheel and support the car on stands. The nut you are looking for is this one:

I had to buy a two foot breaker bar (from Halfords) to undo this. It is on incredibly tight so I put the car in fifth gear and jammed a screwdriver through the pulley to stop it turning. After much swearing and lying on the garage floor with my feet pressing against the wall, it finally started to undo. That saved a few quid paying someone else to do it but cost me a few blood vessels I think!
I had to buy a two foot breaker bar (from Halfords) to undo this. It is on incredibly tight so I put the car in fifth gear and jammed a screwdriver through the pulley to stop it turning. After much swearing and lying on the garage floor with my feet pressing against the wall, it finally started to undo. That saved a few quid paying someone else to do it but cost me a few blood vessels I think!
#7
luckman
-
-
- 123 posts
Member
- Gender:Male
- Location:North Wiltshire
Posted 20 November 2012 - 09:06 PM
As I understand it the basic steps are:
1. Remove the entire engine loom from the blue and black plugs, including the knock sensor (near the alternator and starter motor) underneath the original manifold (held on with a M8 bolt (13mm spanner).
2. Remove the entire inlet system
3. Remove the coilpack capacitor (bolted onto the engine at the same point as the cam cover earth strap)
4. Remove the EGR valve
5. Fit trigger kit
6. Replace throttle pedal and run throttle cable
7. Fit new manifold assembly and connect fuel lines and wiring
Sounds simple! I have now booked this Friday off work to give myself a long weekend to achieve this – what could possibly go wrong?
#8
CocoPops
-

-

- 17,177 posts
SuperCharged Karting Super Hero
- Gender:Male
- Location:Thatcham, Berks
Posted 20 November 2012 - 09:08 PM
Good luck  Appropriate username?
Appropriate username?
#9
badgerade
-

-
- 1,173 posts
Need to get Out More
- Gender:Male
- Location:Reading
Posted 20 November 2012 - 09:14 PM
My basic steps were slightly different:
Take car to Vocky
Leave for a week
Pick up car from Vocky  Good luck with everything, hope it goes well
Good luck with everything, hope it goes well
#10
robin
-

-
- 3,810 posts
Scary Internerd
Posted 20 November 2012 - 09:25 PM
rough price of kit? and what you hoping to get bhp wise?
#11
leevx2.2
-

-
- 4,830 posts
Turbo's are for girls and throttle bodies are too slow
- Gender:Male
- Location:Bedford
-
Interests:Taking apart vx220s for fun
getting p!!sed
genraly playing with large power tools
Posted 20 November 2012 - 09:38 PM
When I first fitted my old webcon throttle bodies all is easy the hardest job is the throttle pedal ,
Upside down in the foot well is not a nice place lol
On a standered engine with a miltek no cams etc I got about 165 bhp
Edited by leevx2.2, 20 November 2012 - 09:41 PM.
#12
Sticky
-

-
- 3,462 posts
iTB lover
- Gender:Male
- Location:Herts, UK
Posted 20 November 2012 - 10:50 PM
Pleased my Youtube video inspired you  Moved on performance wise a bit since then!
Moved on performance wise a bit since then!
#13
yaaan
-
-
- 956 posts
Need to get Out More
- Gender:Male
- Location:Bristol
Posted 21 November 2012 - 08:13 AM
Good luck! It's not too bad once you get going, just looks a little daunting with all the bits and no instructions Just remember to use some epoxy on the injector blanking plugs when you fit them. I didn't and have blown two of the buggers out
Just remember to use some epoxy on the injector blanking plugs when you fit them. I didn't and have blown two of the buggers out
#14
vocky
-

-

- 11,969 posts
Moderator
- Gender:Male
- Location:Earth
Posted 21 November 2012 - 08:29 AM
I will try and remember to take a picture of those injector blanking plugs fitted, which should give you an idea of how far to knock them in. I use a suitable sized socket and a small hammer to gently tap them in place.
#15
TheRealVXed
-

-
- 5,975 posts
Sidekick
- Gender:Male
- Location:Gotham City
- Interests:Holy potatoes, fist combat, lycra
Posted 21 November 2012 - 09:49 AM
Welcome to a world of financial pain Lots of money, amazing sound, fcuk all power gains... 
Lots of money, amazing sound, fcuk all power gains...
#16
yaaan
-
-
- 956 posts
Need to get Out More
- Gender:Male
- Location:Bristol
Posted 21 November 2012 - 10:33 AM
I will try and remember to take a picture of those injector blanking plugs fitted, which should give you an idea of how far to knock them in. I use a suitable sized socket and a small hammer to gently tap them in place.
8mm socket fits if I remember correctly. Two of mine have stayed in, 1 blew out on the first drive and the second about a week ago. When I spoke to Webcon to order some spares they suggested a bit of epoxy was the way to go.
It's entirely possible that I didn't knock them in far enough of course
Edited by yaaan, 21 November 2012 - 10:34 AM.
#17
luckman
-
-
- 123 posts
Member
- Gender:Male
- Location:North Wiltshire
Posted 21 November 2012 - 01:41 PM
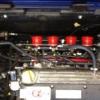
Thank you all for being so polite not to point out I missed a picture out in the whats in the kit series - a picture of the throttle bodies themselves!!! Here it is (photographed on the carpet which would have been replaced if I had not bought this kit!):

#18
luckman
-
-
- 123 posts
Member
- Gender:Male
- Location:North Wiltshire
Posted 21 November 2012 - 02:00 PM
Responses to your comments as follows:
Cocopops - thanks for wishing me luck
Badgerade - a much better plan than mine!
Robin - 2000 and 20 unfortunately in that order!
Leevx2.2 - I don't know how I'm going to get myself in to that footwell as its only big enough for my feet!
Sticky - More footage like that anytime pease!
VXed - Reflects my life, I feel!
Vocky and Yaaan - I'm relying on you guys!
#19
fezzasus
-

-
- 7,689 posts
Whipping Boy
- Gender:Male
- Location:Oxford
Posted 21 November 2012 - 02:43 PM
Leevx2.2 - I don't know how I'm going to get myself in to that footwell as its only big enough for my feet!
Try doing it about ten times in one day, by the end I was so tired I couldn't remember how to get out.
#20
yaaan
-
-
- 956 posts
Need to get Out More
- Gender:Male
- Location:Bristol
Posted 21 November 2012 - 02:46 PM
Leevx2.2 - I don't know how I'm going to get myself in to that footwell as its only big enough for my feet!
Try doing it about ten times in one day, by the end I was so tired I couldn't remember how to get out.
The last time I tried I had the seat in situ and had to get the wife to help me out (much to her amusement). Much easier with the seats out


0 user(s) are reading this topic
0 members, 0 guests, 0 anonymous users

