As a matter of interest, has anyone supercharged AND installed webcon? I know that mating/making a plenum to feed into the 4 barrels might be tricky, but the result would be good surely ?

Fitting Webcon Throttle Bodies
Started by
luckman
, Nov 20 2012 08:58 PM
69 replies to this topic
#41

Nev
-

-

- 11,587 posts
Nipper's Minion
- Gender:Male
- Location:Bristol
- Interests:Rock climbing, skiing, kayaking, surfing, mountaineering, budgies, chess, practical mechanics.
Posted 25 November 2012 - 04:51 PM
#42
vocky
-

-

- 11,969 posts
Moderator
- Gender:Male
- Location:Earth
Posted 25 November 2012 - 05:10 PM
Pm replied to 
#43
badgerade
-
-
- 1,173 posts
Need to get Out More
- Gender:Male
- Location:Reading
Posted 25 November 2012 - 06:25 PM
As a matter of interest, has anyone supercharged AND installed webcon? I know that mating/making a plenum to feed into the 4 barrels might be tricky, but the result would be good surely ?
Not sure there'd be room to squeeze it all in
#44
luckman
-
-
- 123 posts
Member
- Gender:Male
- Location:North Wiltshire
Posted 25 November 2012 - 06:28 PM
Can I just record my thanks publicly to Vocky who has never failed to reply to any of my many pm's and always within 24 hours (usually much quicker). Also many thanks to Yaaan who has also helped by pm and email.
#45
yaaan
-
-
- 956 posts
Need to get Out More
- Gender:Male
- Location:Bristol
Posted 25 November 2012 - 06:31 PM
As a matter of interest, has anyone supercharged AND installed webcon? I know that mating/making a plenum to feed into the 4 barrels might be tricky, but the result would be good surely ?
Not sure there'd be room to squeeze it all in
Well, if my future plans don't make enough of a difference maybe I'll give it a go

There's certainly a lot of empty space in the engine bay. I guess it's just a case of whether there's room between the ITBs and the bulkhead to fit any of the necessary gubbins in there.
#46
vocky
-
-
- 11,969 posts
Moderator
- Gender:Male
- Location:Earth
Posted 25 November 2012 - 08:00 PM
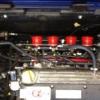
you can see the crank wiring loom going behind the oil filter and down the block where it is held by a P clip, it then connects to the crank sensor loom and then goes down under the corner of the sump to the new webcon crank sensor

Edited by vocky, 25 November 2012 - 08:03 PM.
#47
MrSimba
-

-
- 5,197 posts
Scary Internerd
- Gender:Male
- Location:UK
Posted 25 November 2012 - 08:25 PM
Now thats the mother of all inspection hatches!!! 
#48
Jason
-

-
- 1,327 posts
Billy No Mates
- Gender:Male
- Location:Huntingdon, Cambridgeshire
- Interests:Trackdays, Walking, Photography
Posted 25 November 2012 - 08:32 PM
Not running the oil cooler?
#49
vocky
-
-
- 11,969 posts
Moderator
- Gender:Male
- Location:Earth
Posted 25 November 2012 - 08:35 PM
it does make access so much easierNow thats the mother of all inspection hatches!!!

that is my old engine, which ran the Saab oil cooler (just to the right of the oil filter). My new engine will be using the vx220 oil coolerNot running the oil cooler?
#50
MrSimba
-
-
- 5,197 posts
Scary Internerd
- Gender:Male
- Location:UK
Posted 25 November 2012 - 08:38 PM
it does make access so much easier
Now thats the mother of all inspection hatches!!!
Didn't make mine quite so big but with hindsight would have done!
Already saved me form a certain engine out job to fix an oil leak that would have been nigh on impossible without the access it gave

#51
CocoPops
-

-

- 17,177 posts
SuperCharged Karting Super Hero
- Gender:Male
- Location:Thatcham, Berks
Posted 25 November 2012 - 08:47 PM
Looks great with the foam tape and the rivnuts 
#52
vocky
-
-
- 11,969 posts
Moderator
- Gender:Male
- Location:Earth
Posted 25 November 2012 - 08:52 PM
Joe also has the same size access panel which makes changing the Harrop much easier, we just need to finish adding the brackets and making the 4mm alloy panel to cover it
#53
Nev
-
-
- 11,587 posts
Nipper's Minion
- Gender:Male
- Location:Bristol
- Interests:Rock climbing, skiing, kayaking, surfing, mountaineering, budgies, chess, practical mechanics.
Posted 26 November 2012 - 01:00 PM
4mm alloy panel to cover it
4mm? It doesn't need to be bullet proof !
#54
vocky
-
-
- 11,969 posts
Moderator
- Gender:Male
- Location:Earth
Posted 26 November 2012 - 02:36 PM
Not yet, the Rotrex would workAs a matter of interest, has anyone supercharged AND installed webcon? I know that mating/making a plenum to feed into the 4 barrels might be tricky, but the result would be good surely ?

Its a fire wall
4mm alloy panel to cover it
4mm? It doesn't need to be bullet proof !
 sorry Joe
#55
luckman
-
-
- 123 posts
Member
- Gender:Male
- Location:North Wiltshire
Posted 27 November 2012 - 02:04 PM

#56
luckman
-
-
- 123 posts
Member
- Gender:Male
- Location:North Wiltshire
Posted 27 November 2012 - 02:14 PM
For the benefit of future ITB enthusiasts this is how to deal with the fuel lines courtesy of Vocky:
The original fuel pipe (coloured red in the image above) is removed from the fuel filter. The white plastic washer supplied is installed into where the original pipe came from (into the threaded section) and then the new metal fitting is screwed into the fuel filter. From there the rubber fuel pipe is connected to the end of the webcon fuel rail (passenger side of the engine).
The return fuel pipe (coloured blue) is cut where it goes up the bulkhead, below the new fuel pressure regulator (fpr) then a section of rubber fuel pipe is connected to the remaining return pipe and then to the bottom of the fpr.
The driver side of the webcon fuel rail goes to the fpr with some more rubber fuel hose. Use the silver fuel hose cobra clips supplied on all the rubber hose connections.
The metal fuel pipes are all removed including the bracket all of which is best accessed through the osr wheel arch.
#57
luckman
-
-
- 123 posts
Member
- Gender:Male
- Location:North Wiltshire
Posted 27 November 2012 - 02:30 PM
Electrical connections:
Water temp - goes on new sensor fitted below where coil capacitor was removed
Lambda sensor connects to harness near that (one plug is not connected to as it is for the rear lambda sensor that isn't used by webcon)
Coil - goes to coilpack. Note when fitting new plate with Alpha on it remove the plug extension from the coilpack with a pair of pliers else the Webcon connection won't fit.
Black wire with circular connector goes to earth on engine
Red wire with circular connector goes to starter motor
RPM connector connects to the crank sensor fitted when the trigger wheel kit was fitted
Air temp - connects to plug on alloy plate below air filter on ITBs
POT goes to potentiometer with lead hanging off end of ITBs
Two spade connectors go to new radiator fan temperature switch to be fitted in top hose
Inertia plug is cut off and the two wires joined together as it is no longer used - leave the original inertoa switch connected
You also have to modify a relay in the boot (which is tucked right up over the nsr wheel arch) as follows: cut the thin brown wire (where it joins the big brown wire) on the brown relay base and join it to the white/violet wire on the grey relay base (so both relays get power from the white/violet)
#58
JohnTurbo
-
-
- 3,635 posts
SuperScruff
- Gender:Male
- Location:wigan
- Interests:Performance cars!
Posted 27 November 2012 - 05:51 PM
This is good work. Keep it up!
#59
J4EY D
-

-
- 3,236 posts
Bob Maloogaloogaloogaloogalooga
- Gender:Male
- Location:Sidcup, Kent (SE London)
Posted 28 November 2012 - 03:15 PM
I don't know if you'll have the same problem as me, but just in case i'll post it up as could save you a battery
Webcon may have changed this now, so might be worth checking with Vocky as im sure he'll know.
The brown relay in the boot is a switched live, but as mine was the first plug n play loom (i think), they forgot and wired it as a permanent live  . So it was pulling quite a bit of power out of the battery even when the Vx was off. It was a simple 2 minute fix that Vocky kindly performed, but i haven't got a clue what he did as i got distracted
Webcon may have changed this now, so might be worth checking with Vocky as im sure he'll know.
The brown relay in the boot is a switched live, but as mine was the first plug n play loom (i think), they forgot and wired it as a permanent live . So it was pulling quite a bit of power out of the battery even when the Vx was off. It was a simple 2 minute fix that Vocky kindly performed, but i haven't got a clue what he did as i got distracted
#60
vocky
-
-
- 11,969 posts
Moderator
- Gender:Male
- Location:Earth
Posted 28 November 2012 - 03:36 PM
The problem is the webcon ecu doesn't have a spare internal source for a switched live, so the easiest option is to modify the relay wiring as below:
The z22se ecu switches the negative on the brown relay, it has a permanent live feed, webcon added a negative but there are no switched negatives coming from the webcon ecu.
You also have to modify a relay in the boot (which is tucked right up over the nsr wheel arch) as follows: cut the thin brown wire (where it joins the big brown wire) on the brown relay base and join it to the white/violet wire on the grey relay base (so both relays get power from the white/violet)
The z22se ecu switches the negative on the brown relay, it has a permanent live feed, webcon added a negative but there are no switched negatives coming from the webcon ecu.
Edited by vocky, 28 November 2012 - 03:38 PM.


1 user(s) are reading this topic
0 members, 1 guests, 0 anonymous users

