Jump to content


Photo

Project Ged

rebuild refresh

  • Please log in to reply
88 replies to this topic

#1 Gedi

Gedi

    404 Not Found

  • PipPipPipPipPipPip
  • 5,547 posts
  • Gender:Male
  • Location:North West
  • Interests:Nothing

Posted 30 April 2013 - 12:24 PM

Not the most original of project names, but it'll do.

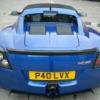
I bought my VX (p40lvx's old car) in 2009 on impulse after regretting selling my previous VX. I didn't really have the funds or time to drive it, but I knew how great of a car it was (kudos to Paul and Nelson) so just buying it without thinking seemed like a good idea......
I drove it around for a few months after picking it up, and then bought a trickle charger and a car cover and put it away with the intention of coming back to it when the time was right. That was 4 years ago ...... oops

Before I got back to the car I wanted to build a garage for it so I could strip it down to the chassis and rebuild it. The garage idea morphed into a house extension, and I've kinda been putting this on hold as I didn't wanna have the car in bits then find out the builders would be coming in a few weeks and I'd have to try and move it out of the way.

Anyway, having no idea if/when my planning permission will arrive or when the builders can come, I decided to make a start but not go too far yet, and to do it in stages. Once the garage is built, I'll strip it down anyway as that's half the fun of owning these cars.

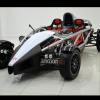
So, this is what the car looked like before I started

Posted Image


I decided to start with refreshing just the front suspension and then doing the rear once the front was back on its wheels.

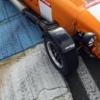
Getting the wheel bolts out was probably the hardest job I've come across so far. I went though 3 17mm sockets (they all cracked / exploded) ad I had to buy a specalist wheel brace with a long extension and bounce on it to get them off. It took me a whole day to get two damn wheels off. I was worried about what I was letting myself in for.

Luckily the front clam off came off without any problems:
Posted Image

Posted Image

I thought I was gonna have to replace the brake disks, but on closer inspection there's very little wear.
The bells should come up like new with a clean, and I think I'll just get the rotors shot blasted and painted to stop them rusting again.
The caliper's paint have protected them perfectly, so I'm just gonna clean them and replace the seals and they should be like new.

Posted Image


The shocks should also come up like new with a clean. They'll be going back to Nitron for a refresh too.
I'm gonna get the springs powder coated. Probably in the new turquoise they seem to be using now instead of the original black

Posted Image

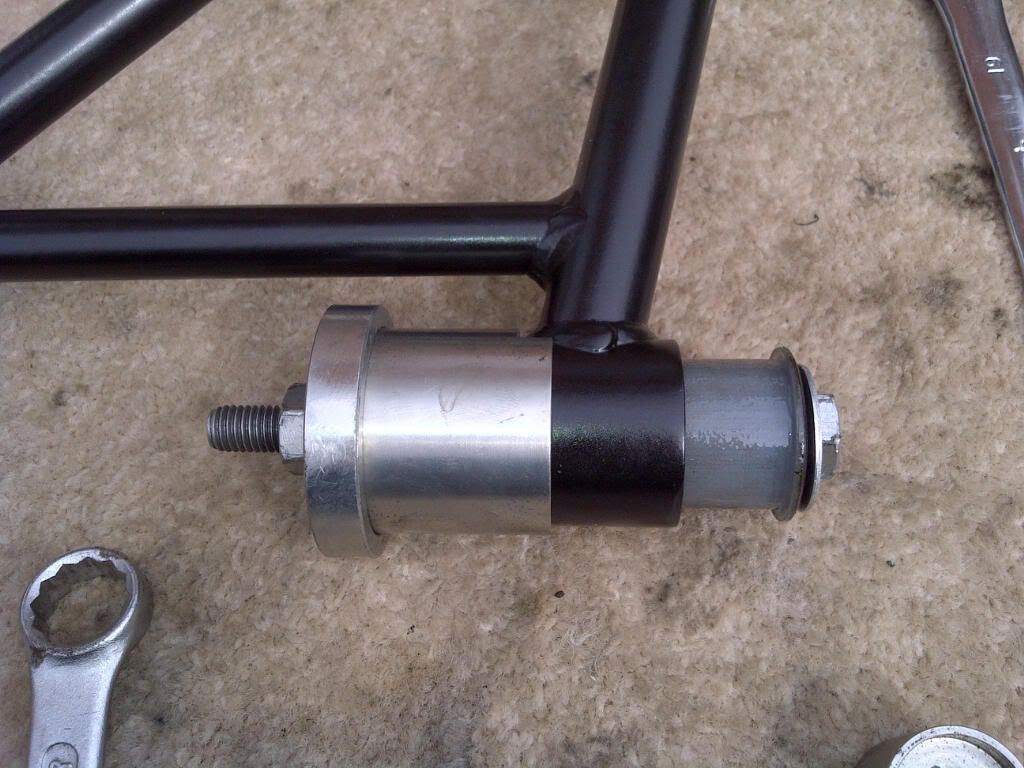
All suspension bolts are now off on both sides and wasn't too bad. I actually quite enjoyed it.I forgot to pick up a ball joint splitter before I started so I can't release the wishbones from the hub carrier. Although the nuts are off, I've left the wishbone bolts in place for now to make splitting the ball joints easier
I'm also not sure how I'm gonna get the hub/bearing away from the carrier. The 3 bolts came out without too much trouble, but I can't seem to separate them. Looks like I'm gonna have to get them in a vice and persuade them apart with a screwdriver and a hammer.

Posted Image

I've just bought myself one of these http://www.machinema...TC=RV-040214998 so I'm good for next weekend :)
Then I'll hopefully be off to the powder coaters for the first of many trips

#2 Rickwoo118

Rickwoo118

    Scary Internerd

  • PipPipPipPipPipPip
  • 5,800 posts
  • Gender:Male
  • Location:Stamford

Posted 30 April 2013 - 01:26 PM

Brilliant. looks like good progress made already. Keep the post up to date with all your forthcoming work and I am sure it will all be worth it in the end.

#3 JamesC

JamesC

    Need to get Out More

  • PipPipPipPip
  • 991 posts
  • Gender:Male
  • Location:Shropshire
  • Interests:Cars, Beer, Diving, not necessarily in that order....

Posted 30 April 2013 - 01:34 PM

With regards to seperating the hubs from the carriers, I found a copper faced mallet just knocking around the rear of the hub got them apart eventually. I replaced the hubs so I wasnt too concerned with damaging them. In fairness they all came away fairly easily though.

#4 tommobot

tommobot

    Need to get Out More

  • PipPipPipPip
  • 1,007 posts
  • Gender:Male
  • Location:Stratford Upon Avon

Posted 30 April 2013 - 02:29 PM

I left blowtorch on it for about 5 mins, being carefull not to get the wire, seemed to help it separate with a few big smacks..

#5 ArticMonkey

ArticMonkey

    On the run from the grammar police!

  • PipPipPipPipPipPip
  • 4,792 posts
  • Gender:Male
  • Location:Essex

Posted 30 April 2013 - 05:34 PM

Changing the seals in the callipers is an easy task. Just soak the new seals in brake fluid before you install them. Use two flat headed screwdrivers to lift the pistons out and a flat bit of wood to press hem back in. Good luck.

#6 Gedi

Gedi

    404 Not Found

  • PipPipPipPipPipPip
  • 5,547 posts
  • Gender:Male
  • Location:North West
  • Interests:Nothing

Posted 30 April 2013 - 05:53 PM

I don't have a blowtorch yet (I'm sure I'll be buying one soon though), and I'm a little worried about damaging them with my hefty ball pein hammers. I'm gonna start by cleaning them off with a wire brush and trying to carefully separate them with a scraper / chisel. Not sure that I'm ready to hand over £300 for new bearings just yet, so I can't risk damaging them.

AM, yeah I'm looking forward to doing the calipers. I prefer fiddly bench work to brute force work. I've got much less chance of breaking something :)
As you pointed out in our previous conversion here http://www.vx220.org...pot-refurb-kit/ I have the Thorney 4 pots which are different than the elise/exige 4 pots
I'm hoping the part number for the refresh kit is CP4525-EE SEAL, otherwise I'm back to square one trying to work out what Thorney had made.....

#7 ArticMonkey

ArticMonkey

    On the run from the grammar police!

  • PipPipPipPipPipPip
  • 4,792 posts
  • Gender:Male
  • Location:Essex

Posted 30 April 2013 - 06:00 PM

Are yes, I remember. I've seen the kit you need in my own hands. So it is out there, so just a case of finding that dreaded part number.

#8 Gedi

Gedi

    404 Not Found

  • PipPipPipPipPipPip
  • 5,547 posts
  • Gender:Male
  • Location:North West
  • Interests:Nothing

Posted 11 May 2013 - 09:25 PM

I had a bit of time today, so I finished stripping the front end down. The ball joint splitter worked a treat, best value for money tool ever. Some of the ball joint nuts started spinning, and after blunting off my last hacksaw blade I ended up just grinding them off. The bushes knocked out without too much hassle, but the ball joints are faaar to tight to knock out and I didn't have a press, so things stopped there. Gonna have to find someone to press them out for me....


I spent the rest of the day watching my mate rebuild a 2.7 Pajero engine. Complete rebuild from the block in 6 hours, it was very impressive.


Pic was taken before I knocked the bushes out


Posted Image


Edited by Gedi, 11 May 2013 - 09:26 PM.


#9 JG

JG

    Newbie

  • 13,609 posts
  • Gender:Male
  • Location:West Berks

Posted 12 May 2013 - 06:25 AM

Looks like paul went to explore the titanic with it. :D

#10 Gedi

Gedi

    404 Not Found

  • PipPipPipPipPipPip
  • 5,547 posts
  • Gender:Male
  • Location:North West
  • Interests:Nothing

Posted 12 May 2013 - 10:23 AM

Haha, it's nowhere near as bad as that. To be fair, the car was spotless when I got it and all the components are still in great condition. The rust you can see is very fine surface rust on the cast iron pieces and the strengthening plates on the whishbones. It probably wouldn't have been able to accumulate if the car had been used. It's also full of grease and bits of crap.


Don't worry, when I'm done it'll be better than new and cleaner than a cat's arse


#11 Gedi

Gedi

    404 Not Found

  • PipPipPipPipPipPip
  • 5,547 posts
  • Gender:Male
  • Location:North West
  • Interests:Nothing

Posted 12 May 2013 - 10:53 AM

Whilst reading about suspension refreshes (again), I've just realised that my old bushes were fitted incorrectly. All my bushes were fitted outside in, meaning the top hats were on the outside of the sleeves on both upper and lower wishbones.


This pic shows the upper wishbone on the left and the lower wishbone on the right. 


Posted Image


According to this http://wiki.seloc.or...wishbone_bushes (bottom of page) my lower wishbone bushes were fitted incorrectly and the top hat you see should actually have been on the inside and the slotted side (as seen on the inside of the upper) is what should have been on the outside.


I doubt this was done from factory, so someone has obviously changed them and f**ked it up at some point. Doesn't really give me confidence that all the notes I took when dismantling are correct, and I'm now gonna have to ignore how it was previously set up and make sure I rebuild it carefully


Edited by Gedi, 12 May 2013 - 10:56 AM.


#12 Arno

Arno

    Need to get Out More

  • PipPipPipPip
  • 1,233 posts
  • Gender:Male
  • Location:Netherlands

Posted 12 May 2013 - 07:28 PM

Those bushes in the photo are not the originals anyway. Those are polyurethane ones.


Bye, Arno.


#13 Gedi

Gedi

    404 Not Found

  • PipPipPipPipPipPip
  • 5,547 posts
  • Gender:Male
  • Location:North West
  • Interests:Nothing

Posted 12 May 2013 - 07:41 PM

Oh dear, it sounds like I might be replacing little used (but maybe 6 year old) polly bushes with Seriously Lotus OEM bushes....


It's weird you should reply with that, I had my suspicions and was actually gonna ask about this sometime soon.

I was reading JG's thread earlier and saw this pic of his SL bushes which didn't match up with what I had


Posted Image


I didn't throw the bushes out, and I'm thinking maybe I should put them back. What do you reckon??


#14 JohnTurbo

JohnTurbo

    SuperScruff

  • PipPipPipPipPipPip
  • 3,635 posts
  • Gender:Male
  • Location:wigan
  • Interests:Performance cars!

Posted 12 May 2013 - 08:09 PM

Some fair kit screwed to this car!! And its blue. Can I have it?


#15 Gedi

Gedi

    404 Not Found

  • PipPipPipPipPipPip
  • 5,547 posts
  • Gender:Male
  • Location:North West
  • Interests:Nothing

Posted 12 May 2013 - 08:14 PM

Paul and Nelson spent an absolute f**king fortune on this car, which is the reason I bought it back when I really couldn't afford it.


I'm not keen on giving it away :P but considering I'm in your neighbouring town (westhoughton), you can drive it when it's rebuilt and remapped :)


#16 JohnTurbo

JohnTurbo

    SuperScruff

  • PipPipPipPipPipPip
  • 3,635 posts
  • Gender:Male
  • Location:wigan
  • Interests:Performance cars!

Posted 12 May 2013 - 08:16 PM

Sounds good to me!


#17 Winstar

Winstar

    Scary Internerd

  • PipPipPipPipPipPip
  • 4,264 posts
  • Gender:Male
  • Location:Chesterfield

Posted 13 May 2013 - 10:05 AM

Those bushes in the photo are not the originals anyway. Those are polyurethane ones.


Bye, Arno.


they look like powerflex, there is a part number embossed around the edge of the top hat if they are and if I remember from when I did my rebuild they will only fit one way


#18 Gedi

Gedi

    404 Not Found

  • PipPipPipPipPipPip
  • 5,547 posts
  • Gender:Male
  • Location:North West
  • Interests:Nothing

Posted 13 May 2013 - 10:09 AM

Yeah, I've been digging and worked out that they're powerflex from eliseparts. https://www.elisepar...ishbone-bushes/

I'm trying to work out how old they are before I consider putting them back or replacing them for OEM bushes.


They were still fitted the wrong way on the bottom wishbone though  thumbsdown


#19 Arno

Arno

    Need to get Out More

  • PipPipPipPip
  • 1,233 posts
  • Gender:Male
  • Location:Netherlands

Posted 13 May 2013 - 11:42 AM

IMHO the only 2 real choices are:


- OEM (alike) bushings -> Fit and forget, work well and last ages


- Spherical bearing (Nitron, Pilbeam, etc.) or Erlaton -> Need regular maintenance and replacement, but tighter control of suspension movement


Polyurethane basically combines the 'bad' points from both into one.. They need regular maintenance/cleaning to stop dirt grinding away on the subframe/mounts and inside the wishbone eyes, while still giving a lot of compliance/flex in the bushings.


Ran most types of bushings on my car in it's 12+ year lifespan by now and have settled on Nitron spherical bearings for mine, but otherwise I'd have gone back to the OEM (alike) rubber ones.


Bye, Arno,


#20 techieboy

techieboy

    Supercharger of Doom

  • 22,914 posts
  • Gender:Male
  • Location:Bedford

Posted 13 May 2013 - 12:09 PM

otherwise I'd have gone back to the OEM (alike) rubber ones.


That's my next job, if I ever get the urge to do anything with the car again.


Also tagged with one or more of these keywords: rebuild, refresh

0 user(s) are reading this topic

0 members, 0 guests, 0 anonymous users