Jump to content


Photo

No.1240 - My Ownership


  • Please log in to reply
67 replies to this topic

#61 sford

sford

    Billy No Mates

  • PipPipPipPipPip
  • 1,435 posts
  • Gender:Male
  • Location:Stratford-upon-Avon

Posted 22 August 2019 - 11:54 AM

I then set about the fuel pump replacement. I bought the pump from Joe and so it wasn't brand new but had done very few miles. I opted to do this by expanding the inspection hole as if I was dropping the tank, a nice shiney pro-alloy one would be going back in. First I stripped out most of the interior. I disconnected the battery as I wanted to remove the seat belt and didn't want to trigger the air bag light. I drew out what I thought would roughly be the hole, taking the existing hole and expanding it to the left. I ensured I didn't come close than around an inch to the front fold in the tub so as to prevent any damage to the strength it adds. I then disconnected everything to find that the hole wasn't quite big enough annoyingly to get the pump through. I didn't want to use any tools at this stage as the fuel tank was now open to atmosphere fire is not a look I wanted to go for. Using some snips, I enlarged the hole to get the old pump out and the new one in and then tidied it up later. The new spitfire pump uses a slightly different seal system and given all the horror stories on here thought it was going to be a pig to get the split ring back on. Turns out with the correct lube and a little force I was able to get it in and sealed without too much fuss  :tt:  :wub:  :blink:


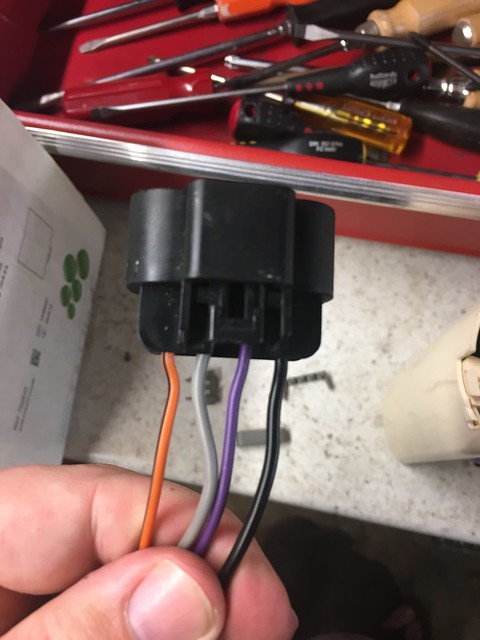
Wiring was next and I replaced the old connector with the new one that comes with the pump. After some back/forwards with Gaz he sent me over the fitting instructions and I set about stripping the old connector. This is clearly labeled as ABCD and these correspond to.


A = Sender Live

B = PUMP LIVE

C= PUMP EARTH

D = Sender Earth


The colours may differ from car to car so I have omitted those but it should be fairly obvious when doing it what letters apply.


The new plug, looking at it from the side where the wires enter it go ABDC, with orange/black in the pic below being A and the black one being C. 


48598820427_1c0d77037b_z.jpg


Once all connected up, I reconnected the battery, primed the line pump which all sounded good and realised I hadn't reconnected the seat belt. Frantic rush to turn it all off as I didn't want to have to reset the airbag light and luckily that wasn't enough to leave it triggered. I refitted that, then primed the system. I went round to the bleed nipple on the fuel line on the engine and to my delight, fuel came out!


The car started first time without any problems. 


I was going to make a cover for the hole with some sheet steel I had but then my wife turned around and said, why don't you make it from carbon fibre. Ordered up a sheet and before you know it, 


48598681421_104b093bdf_z.jpg


Added some edging trim to seal it down and voila. I even had the aluminium rivnuts in stock for attaching. 


48598820487_c54aa22f03_z.jpg


Took the car to C&M for the monthly meet. It felt faster and happier to rev although I imagine that was just a placebo.


The car has developed a funny sound now, like a metallic spring/twang at slow speed. It increases with speed but not revs and stops when brakes are applied. Seems to be coming from the drivers front area. In preparation for a track day on 3rd September, I have replaced the hub carrier bolts and the drop links. While the suspension was off I checked the wishbones and they move freely up and down. The ARB was not creaking either so not sure what is causing it. I'll go round the block to see if the problem is cured sometime soon. 


Edited by sford, 22 August 2019 - 12:03 PM.


#62 sford

sford

    Billy No Mates

  • PipPipPipPipPip
  • 1,435 posts
  • Gender:Male
  • Location:Stratford-upon-Avon

Posted 04 September 2019 - 10:17 AM

Chasing the sound I replaced my ARB drop links, took all the shocks off to clean/check them and replaced my hub carrier bolts while I was there. I checked all of the wishbones to see if they were still ok and all would lift and fall with very little input. All the joints seemed to be lubricated still so I re-assembled everything and the sound was gone. No idea what it was but all that tinkering seems to have fixed it. I checked all the hub carrier bolts I removed and they were all ok, no signs of any bending or deforming but they were replaced anyway as they were a few years old now and had done multiple track days. 


This was all in preparation for a track day at Castle Combe yesterday. Having not driven the car on track for a while my first couple of sessions I was getting used to the car again. Soon settled back in and was carrying what I thought was a good pace and became noticeably quicker closing in on a lot of stuff through the corners far faster than I had been before. Was good to get the confidence back in the car having not really used it much recently. The brakes just didn't fade which was a bonus. I'm running the standard calipers, plain discs and Pagid RS14 pads all round. I've got fog light ducts cooling the fronts and the fluid was new-ish (last 12 months). 


I was there with a couple of friends, one has a Clio 182 that is on it's way to be prepped for use in a race series. The other was a 991.1 gt3rs. The car is exclusively used for track days and he had a firend along with him who was a driving instructor https://www.chrisdymond.co.uk/. I was lucky enough to be taken for a few laps by Chris in the gt3 and f8%k me it was fast. Like blisteringly fast. 


All in a great day and good to know the VX is still quick and able to do a track day without any hiccups or problems! 


#63 sford

sford

    Billy No Mates

  • PipPipPipPipPip
  • 1,435 posts
  • Gender:Male
  • Location:Stratford-upon-Avon

Posted 04 September 2019 - 12:54 PM

Oh and for reference, my stage 2 SC with ITG Stab99XL enclosed air filter, Eaton M62 with standard pulley, standard engine, Chris Tullet manifold, decat and turbo back box registered 91db on the static castle combe noise test. 


#64 paul_mck

paul_mck

    Super Member

  • PipPip
  • 284 posts
  • Location:NI

Posted 04 September 2019 - 01:51 PM

So I bought one of the carbon fuel caps recently which turned out to be nice and easy to fit.


48598820567_4885da6278_z.jpg


I know it's only aesthetic but my aluminium one was starting to look a bit old and tired. The surround was easy to remove, undo bolts and then used a bit of fishing wire to run between it and the car. It isn't stuck on but 18 years of grime meant it didn't want to move.Removed the cork backing with a stanley knife and applied it to the rear of the carbon outer. I also bought some aluminum bolts that were anodised black. Had to make sure none of the crud went down the filler hole whilst doing all this. The cover on the cap itself took a bit more work. First stuck the key in the lock, then removed the retaining clip off of the back. This means the lock mechanism slides out. Gave it all a good clean and ensured I didn't lose the two o-rings inside here. The aluminium cover is a friction fit and takes some force to remove but bit by bit I managed to get it off. Strrooooonnnggg double sided tape was used to attach the cover and it now looks like this. Ignore the grubby fingerprints.


48598681461_9a435dcb21_z.jpg


where did you pick this up mate?


car looks brilliant I love the journey!


#65 sford

sford

    Billy No Mates

  • PipPipPipPipPip
  • 1,435 posts
  • Gender:Male
  • Location:Stratford-upon-Avon

Posted 04 September 2019 - 02:40 PM


So I bought one of the carbon fuel caps recently which turned out to be nice and easy to fit.


I know it's only aesthetic but my aluminium one was starting to look a bit old and tired. The surround was easy to remove, undo bolts and then used a bit of fishing wire to run between it and the car. It isn't stuck on but 18 years of grime meant it didn't want to move.Removed the cork backing with a stanley knife and applied it to the rear of the carbon outer. I also bought some aluminum bolts that were anodised black. Had to make sure none of the crud went down the filler hole whilst doing all this. The cover on the cap itself took a bit more work. First stuck the key in the lock, then removed the retaining clip off of the back. This means the lock mechanism slides out. Gave it all a good clean and ensured I didn't lose the two o-rings inside here. The aluminium cover is a friction fit and takes some force to remove but bit by bit I managed to get it off. Strrooooonnnggg double sided tape was used to attach the cover and it now looks like this. Ignore the grubby fingerprints.


where did you pick this up mate?


car looks brilliant I love the journey!


That was on here http://www.vx220.org...re-parts/page-4


#66 sford

sford

    Billy No Mates

  • PipPipPipPipPip
  • 1,435 posts
  • Gender:Male
  • Location:Stratford-upon-Avon

Posted 09 March 2020 - 11:36 AM

This weekend wife and son went away for a break so I made a start fitting some of the bits I'd amassed. First up was the lovely aluminium gt hubs made by Tonie. Great quality and nice clear instructions came with them. Took around an hour a side to fit as all the bits were relative clean still. Bit of rust build up on the ball joint tops but for once an easy job on the old car! 


49638478963_d314955259_z.jpg664CDE0A-C6B2-40B8-AD1C-FF8E038F5886 by Tom Peach, on Flickr


49639278772_71a2734b2d_z.jpgB818EF8A-3214-4065-8599-C5CB408409E7 by Tom Peach, on Flickr


Then I got set on fitting these. Not as straight forward. 


49639278802_b0d338539b_z.jpg272EC7CB-5C13-44CE-A331-00683AF420C2 by Tom Peach, on Flickr


Luckily they came with the subframes which fitted the seats. Drivers is in ok and doesn't foul the harness bar. Passenger one less so. Can fit the seat to the frame but then can't fit that to the car. The seat has a little too much recline to it. I'm looking to see what other mounts are available that will either move the seat forward an inch or rotate it forward by a couple of degrees. 


Still to do;


CV boot (again)

Geo

Fuel lines

Rocker cover bolts

Oil and filter

Add resistor to seatbelts and remove


Also, plan on actually using the car. Hoping to have everything done ready for the April MOT. Will also start thinking about a Sunday morning midlands meet at C&M. 


Edited by sford, 09 March 2020 - 11:36 AM.


#67 sford

sford

    Billy No Mates

  • PipPipPipPipPip
  • 1,435 posts
  • Gender:Male
  • Location:Stratford-upon-Avon

Posted 24 March 2021 - 06:02 PM

MOT time again and off I went today. Car passed without issue. It's done 662 miles in the last two years. Ironic really as my last post was just prior to lockdown when I was so full of want to use it and had all the nice new bits. Still, the seats are comfy and the uprights mean that the front sits nicely while not being on the limit of the loose springs. 


Of the jobs from above the following were completed prior to the MOT.


CV boot (again) - turns out this wasn't spilt once I'd got the wheel off. The grease was just residue from the last split. 

Geo - still to do. 

Fuel lines - still to do. 

Rocker cover bolts -  done. 

Oil and filter - done. 

Add resistor to seatbelts and remove - done. 


I need to MTFU and do the fuel lines and then I'm going to use it through the summer for all those little errands that I might end up having to do. It's my son's second birthday and he loves the car at the moment. Going to park that on the lawn and make it have eyes/a number like Lightning McQueen in his primer stage. Times like this I wish I had a red one. 


#68 sford

sford

    Billy No Mates

  • PipPipPipPipPip
  • 1,435 posts
  • Gender:Male
  • Location:Stratford-upon-Avon

Posted 29 July 2021 - 08:27 AM

More recent modifications to a fairly undriven car, I still have the fuel lines to do and the geo to get done. 


I got one of the Max88 spark plug covers as the supercharged badge had started to look quite tired. 


51343504125_2dbaf4c134_c.jpg


Found a child seat that fits the Corbeau seats. This will be for taking my son to car things on a sunday morning locally. He loves cars and has already got his own collection of ride on toys. 


51342712973_35c61d063d_c.jpg


Speaking of which, for his second birthday we had a small party for him and his friends with a Cars theme. Even put some stickers on the car and he straight away called it 'Lightning' which was pretty good for a 2yo. So wish I had a red one and could do what Cliffie did to his all those years ago! 


51343230934_d995ee2a05_c.jpg


I recently bought a Milltek turbo back box for the car as fancied something a little different. The standard turbo box was great and quiet but I fancied seeing what a larger bore would do. This has a 2.5 inch inlet on it and sounds a lot different.


51341765182_3be3d76213_c.jpg


51341770197_2e6abfe0c5_c.jpg


I also had the windscreen replaced under insurance as it had two good sized chips in it. This was done by Worcester Autoglass who were pretty good. I had to loosen the clam to allow it to be tilted forwards but they got the old one out and the new one in. This was done on the car's 20th birthday so a little present.


Next job is the timing chains as that 10 years has come around again. And some cosmetic bits really. Paint, lights and wheels will be next. 


Edited by sford, 29 July 2021 - 08:28 AM.


0 user(s) are reading this topic

0 members, 0 guests, 0 anonymous users