Jump to content


Photo

No.1240 - My Ownership


  • Please log in to reply
67 replies to this topic

#41 sford

sford

    Billy No Mates

  • PipPipPipPipPip
  • 1,435 posts
  • Gender:Male
  • Location:Stratford-upon-Avon

Posted 22 March 2018 - 05:26 PM

Having not really looked at the car since Bruntingthorpe, I started to take it apart yesterday to fit bits that I've acquired over the winter period.

Took the rear clam off which was nice and easy as it was off last winter and the winter before. Luckily from where I had replaced the manifold last time (probably around 5-6 years ago) all of the nuts came undone without issue. Will be replaced with new while I'm there.

Posted ImageUntitled by Tom Peach, on Flickr

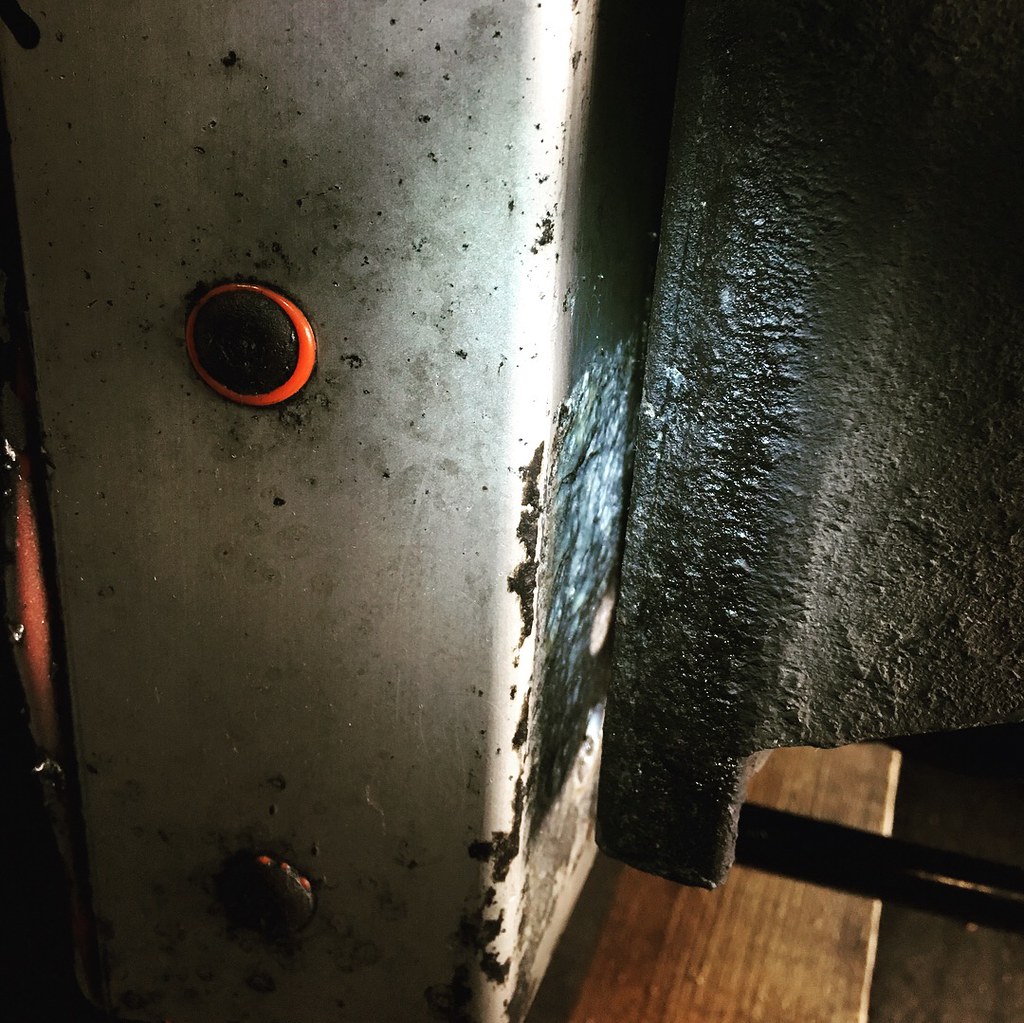
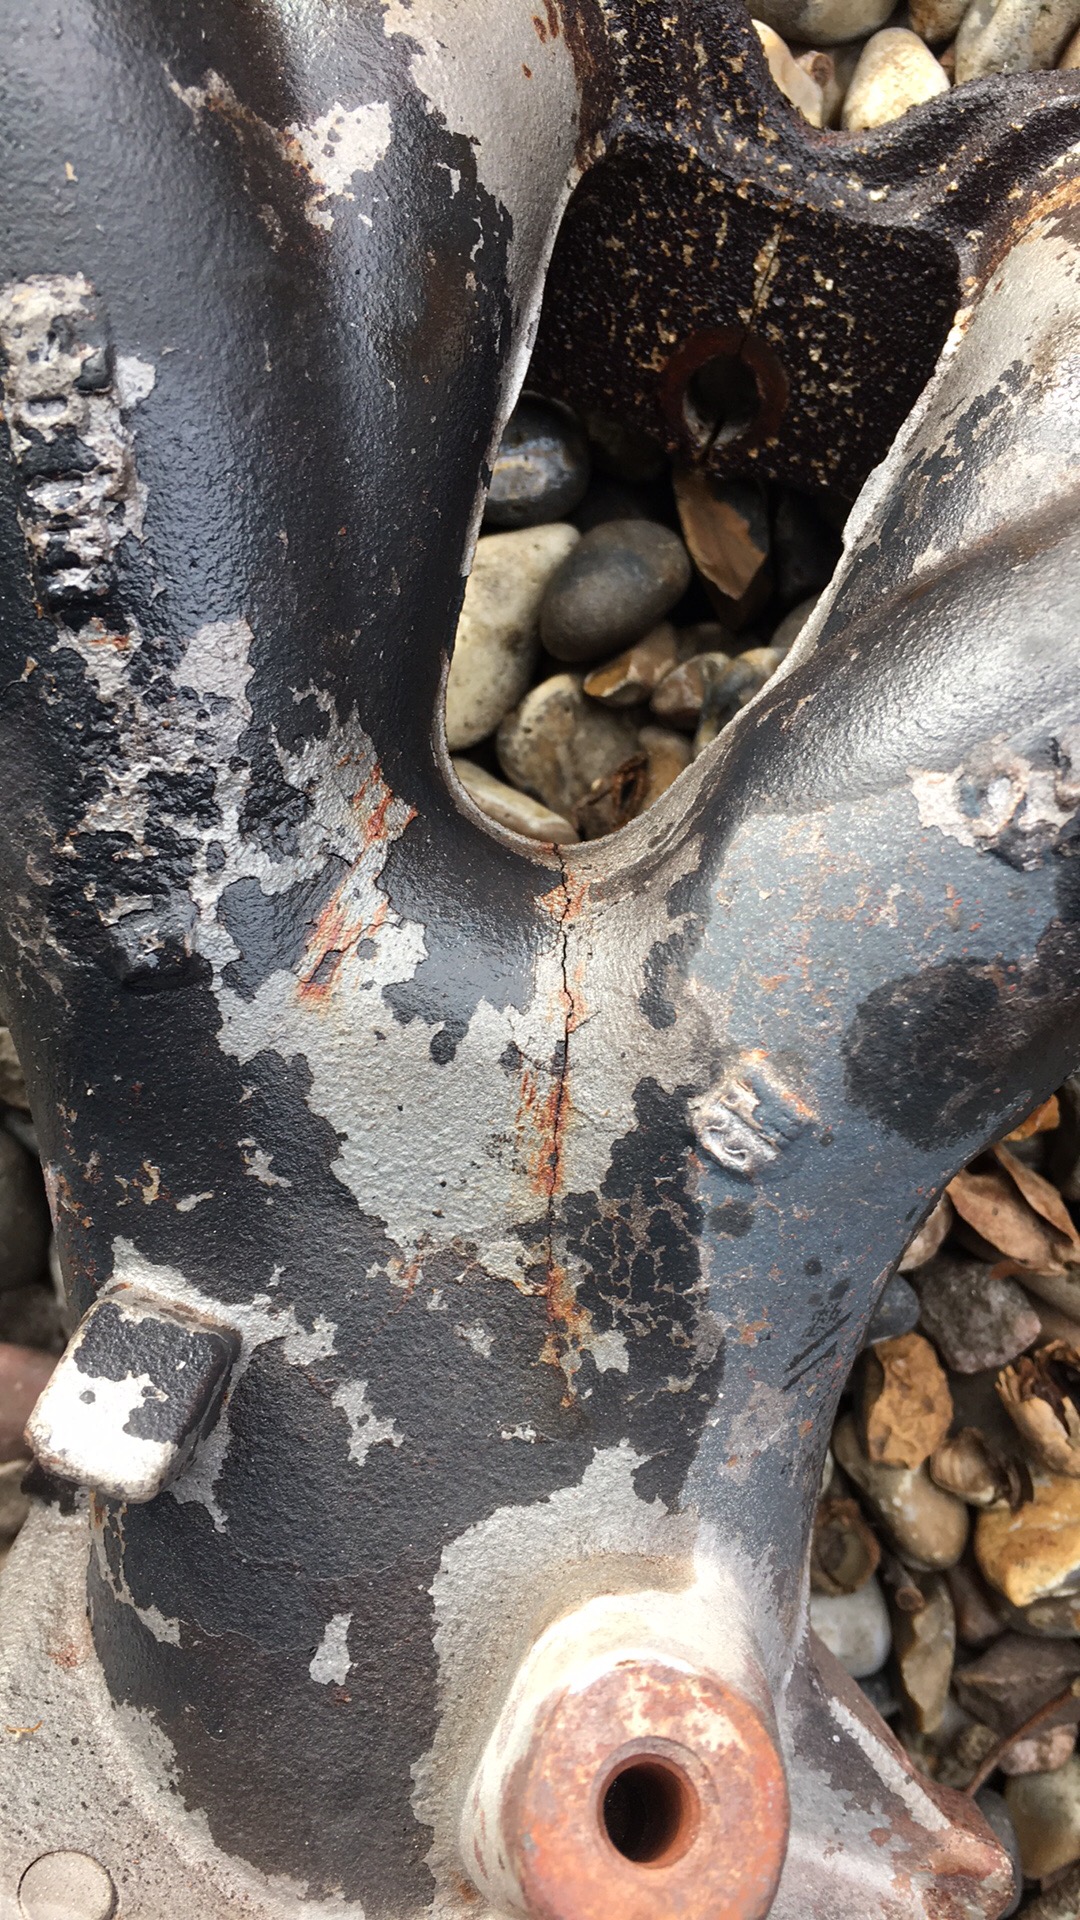
This was the crack in the old manifold.

Posted ImageUntitled by Tom Peach, on Flickr

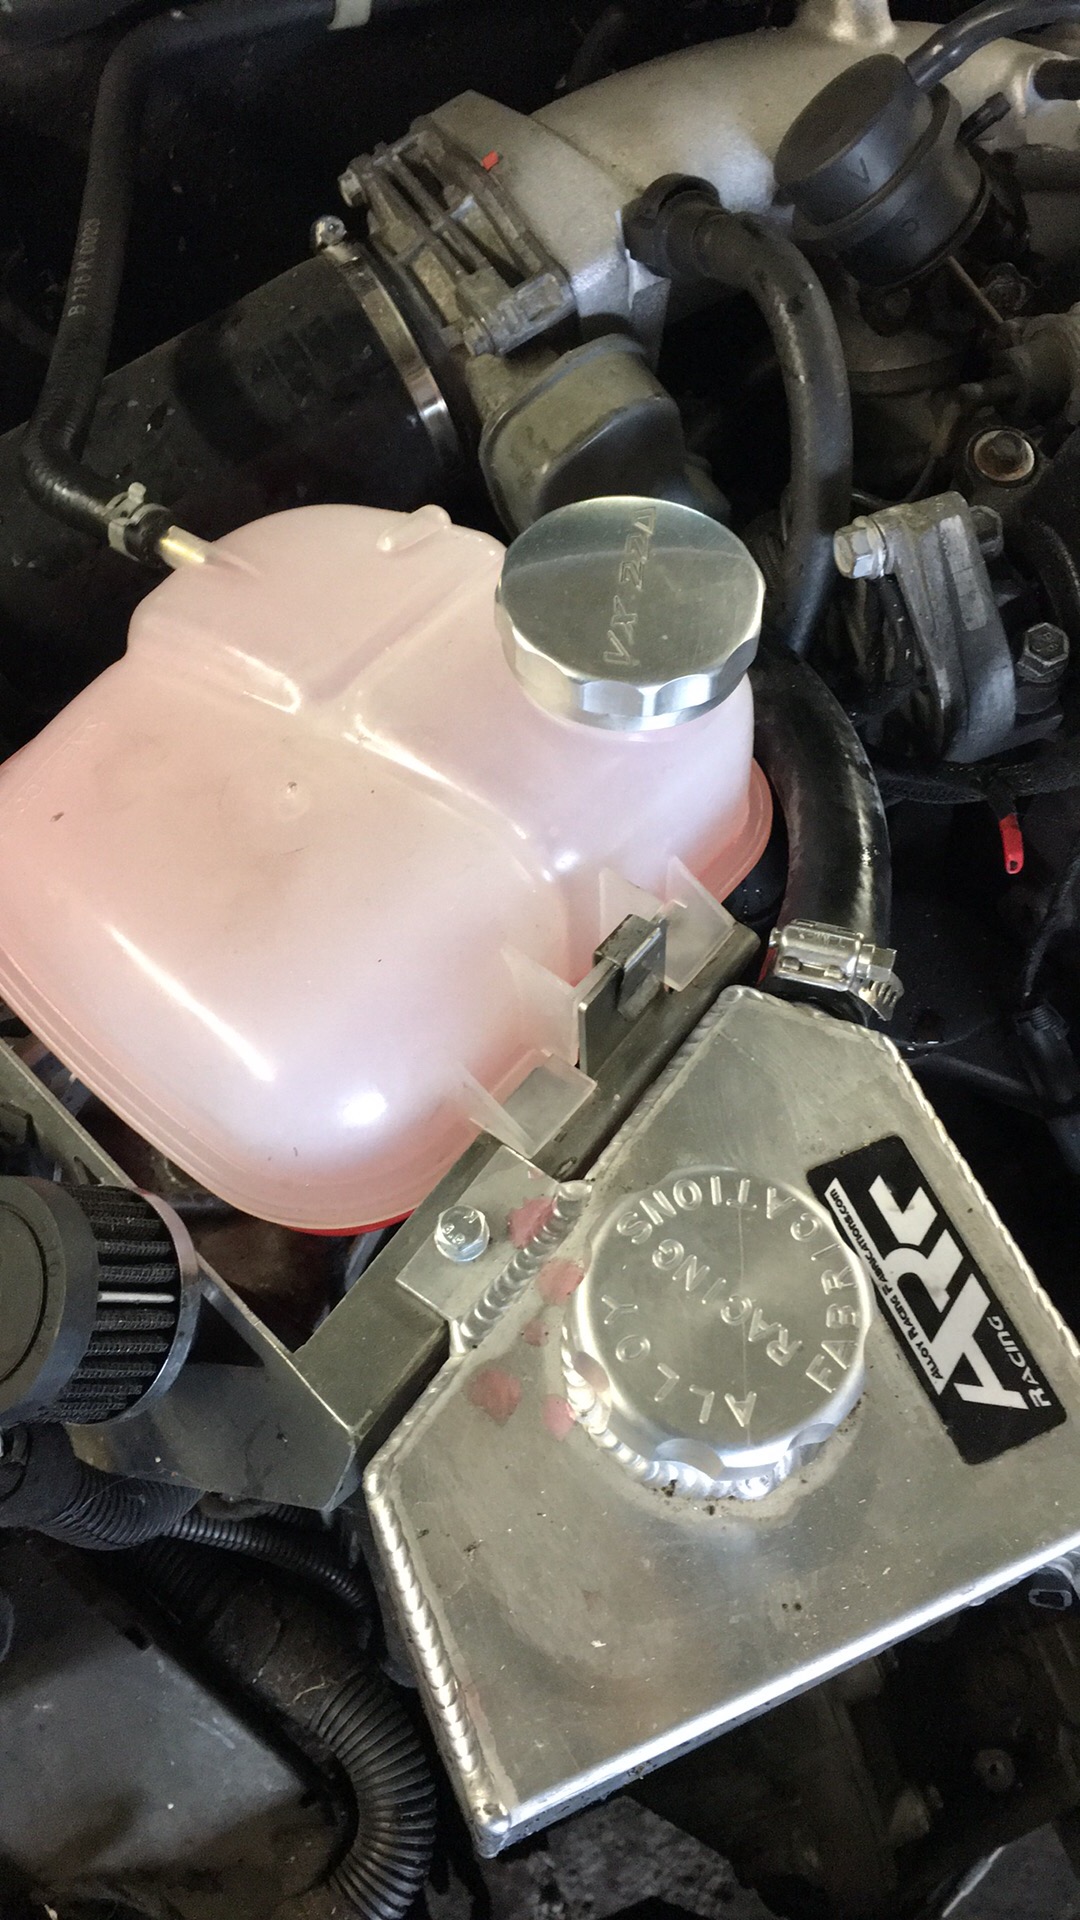
I also fitted my new header tank. Wasn't required necessarily but the old one was looking yellow so thought I may as well.

Posted ImageUntitled by Tom Peach, on Flickr

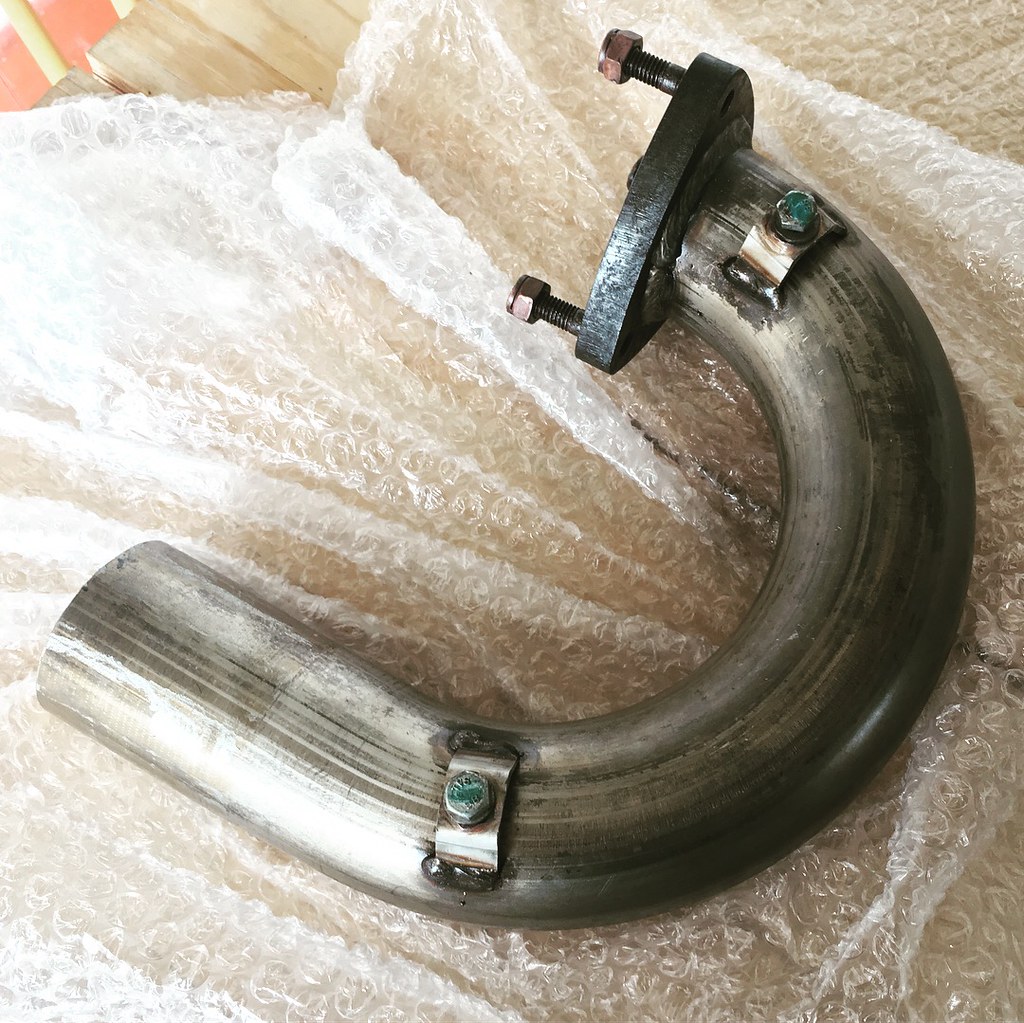
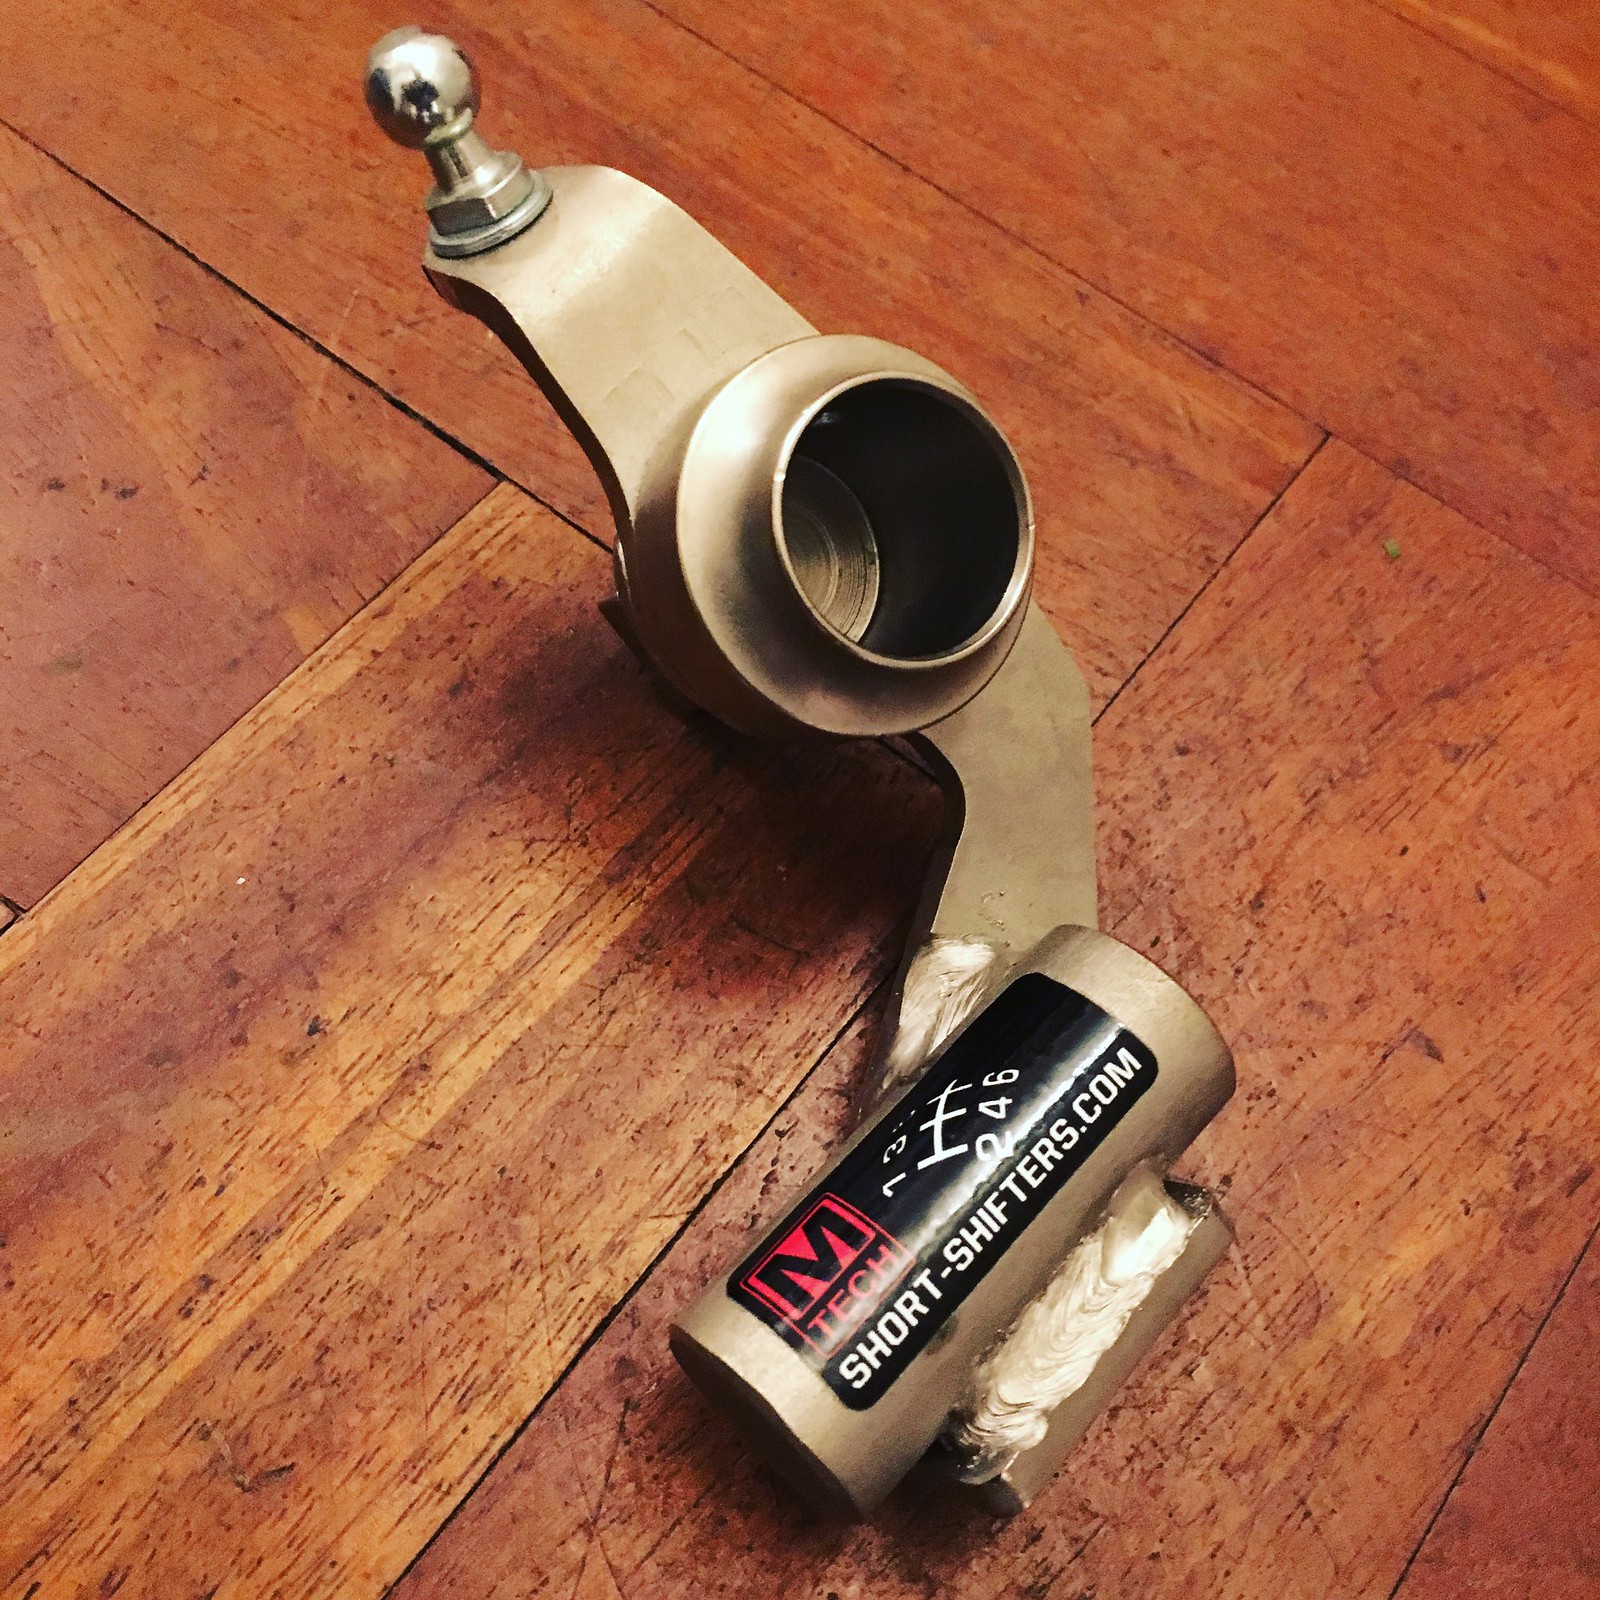
I also took the time to fit the short shifter. I had already changed the shifter that was on there originally as the replacement gearbox that I fitted had a bent arm. This meant I didn't have to hammer the hell out of the pin and just undid the bolt I had fitted.

Posted ImageUntitled by Tom Peach, on Flickr

I did notice that there was a nice spattering of CV grease everywhere. Then that the tie that was around the larger end of the inboard joint was nowhere to be seen. Guess that will have to be looked at again!

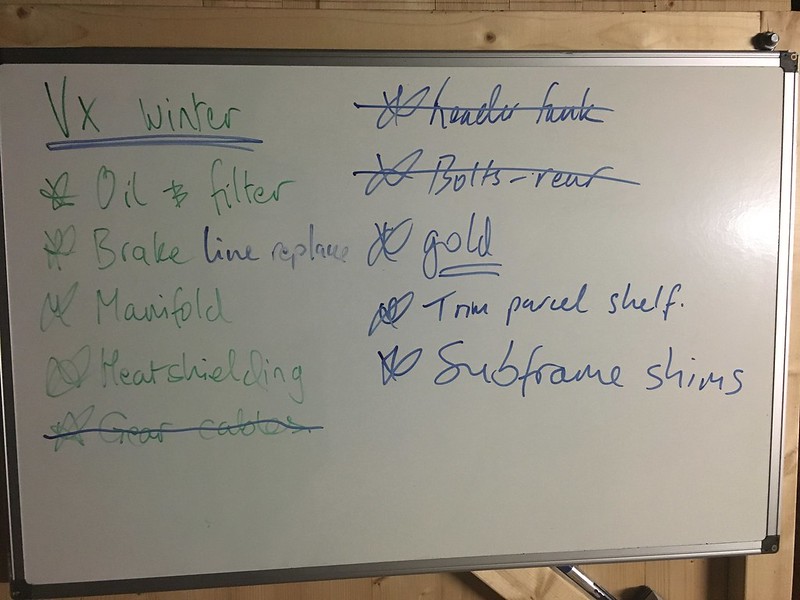
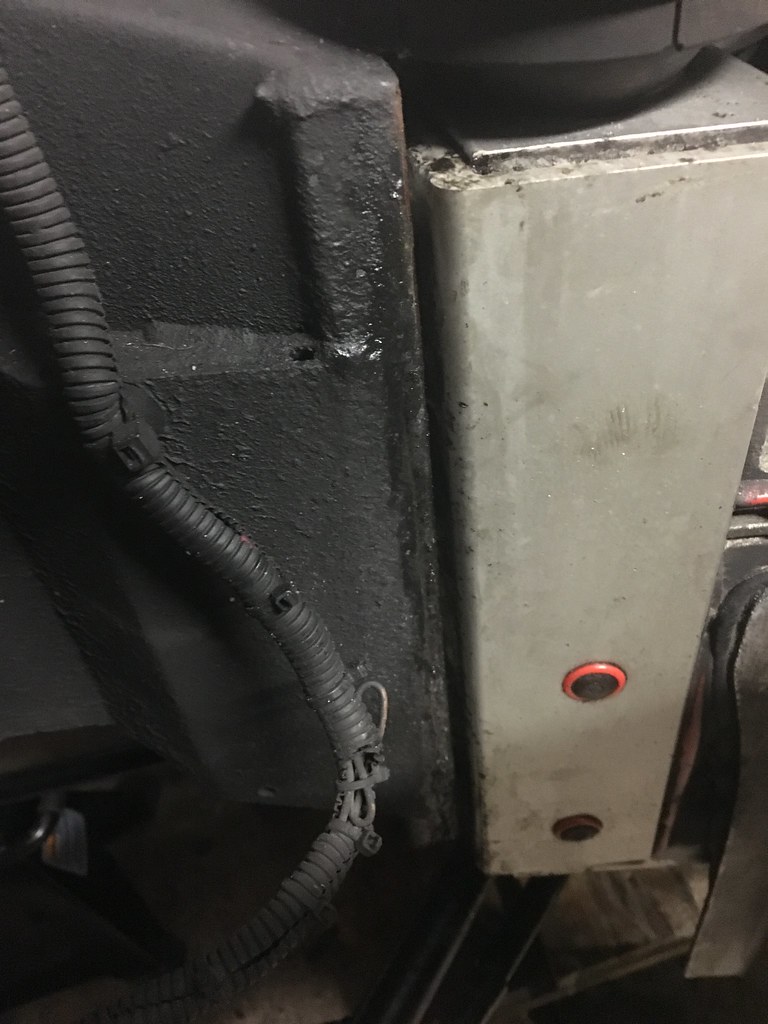
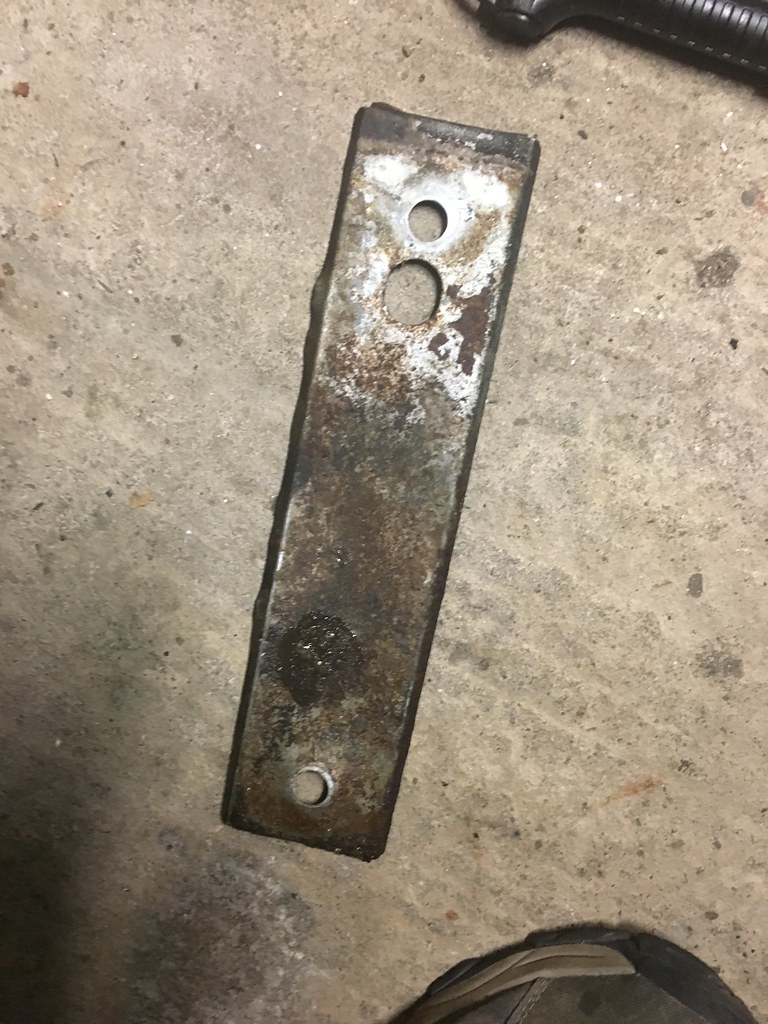
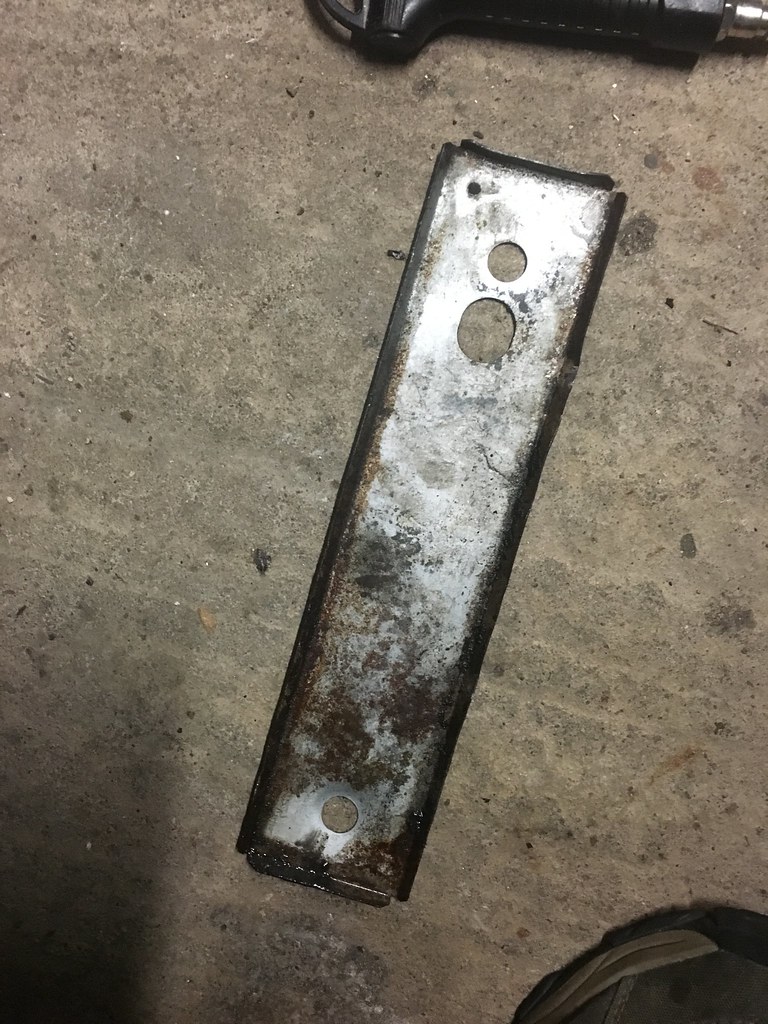
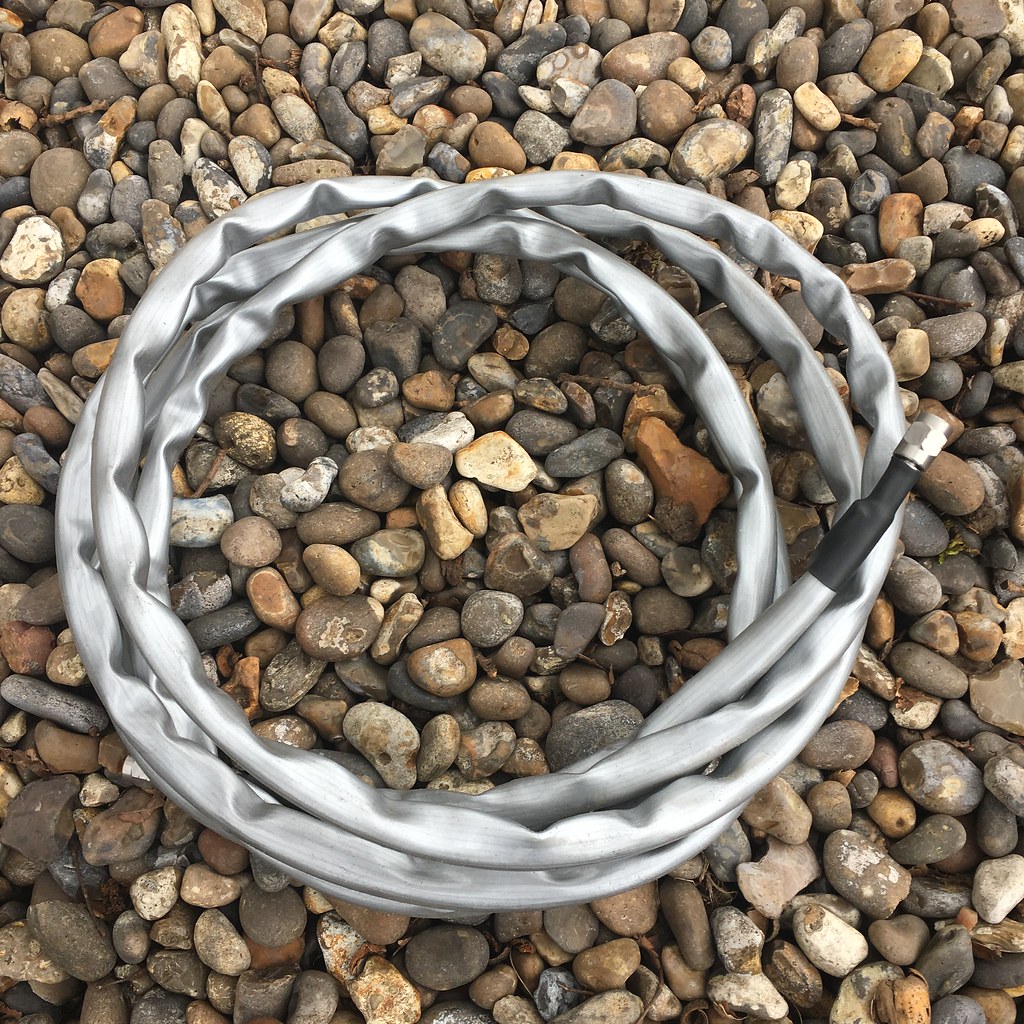
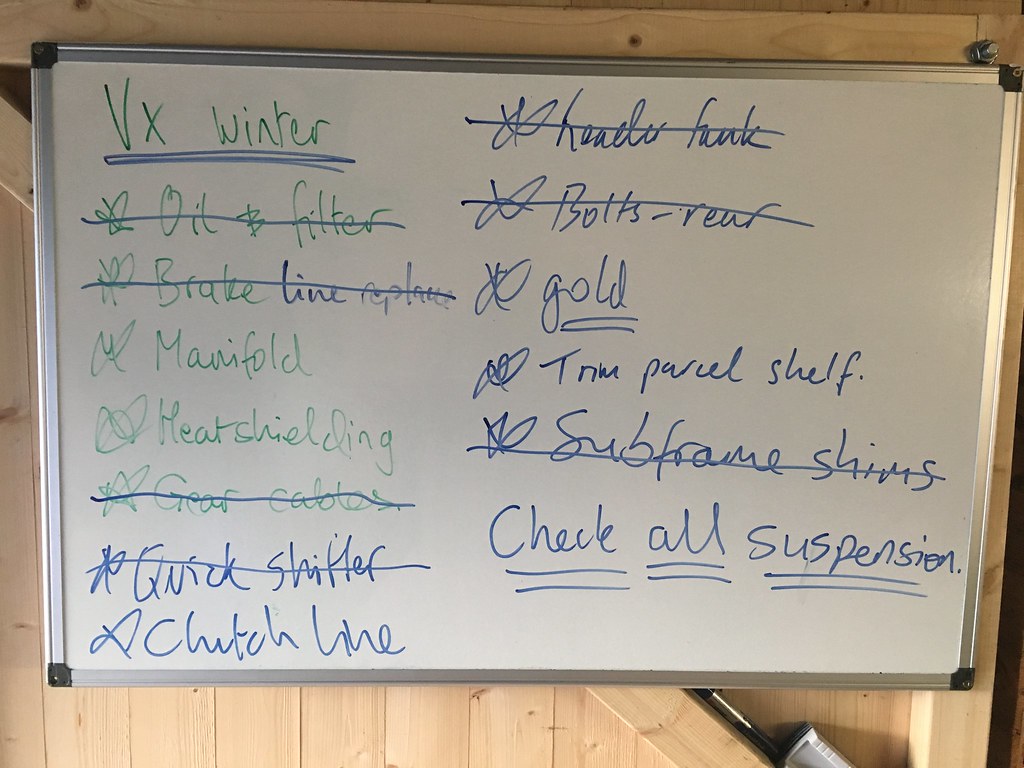
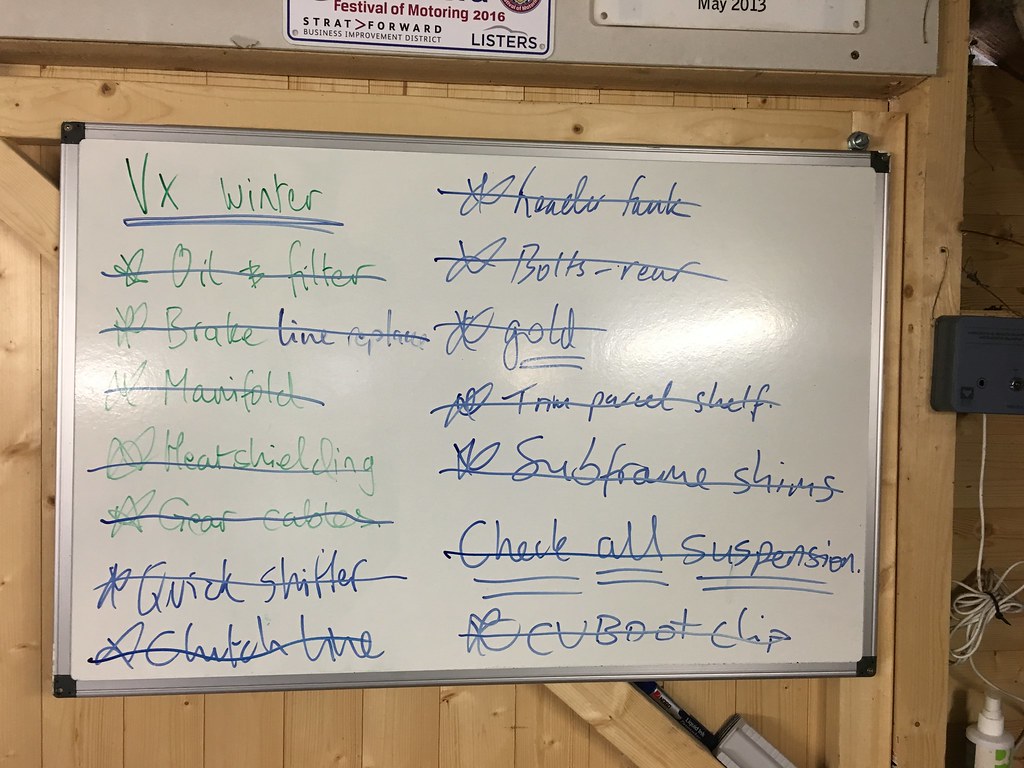
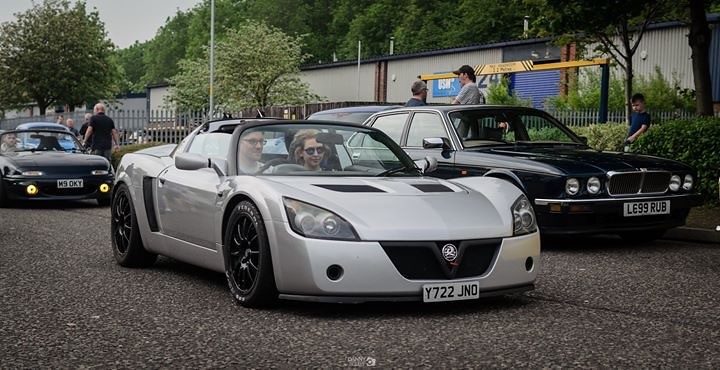
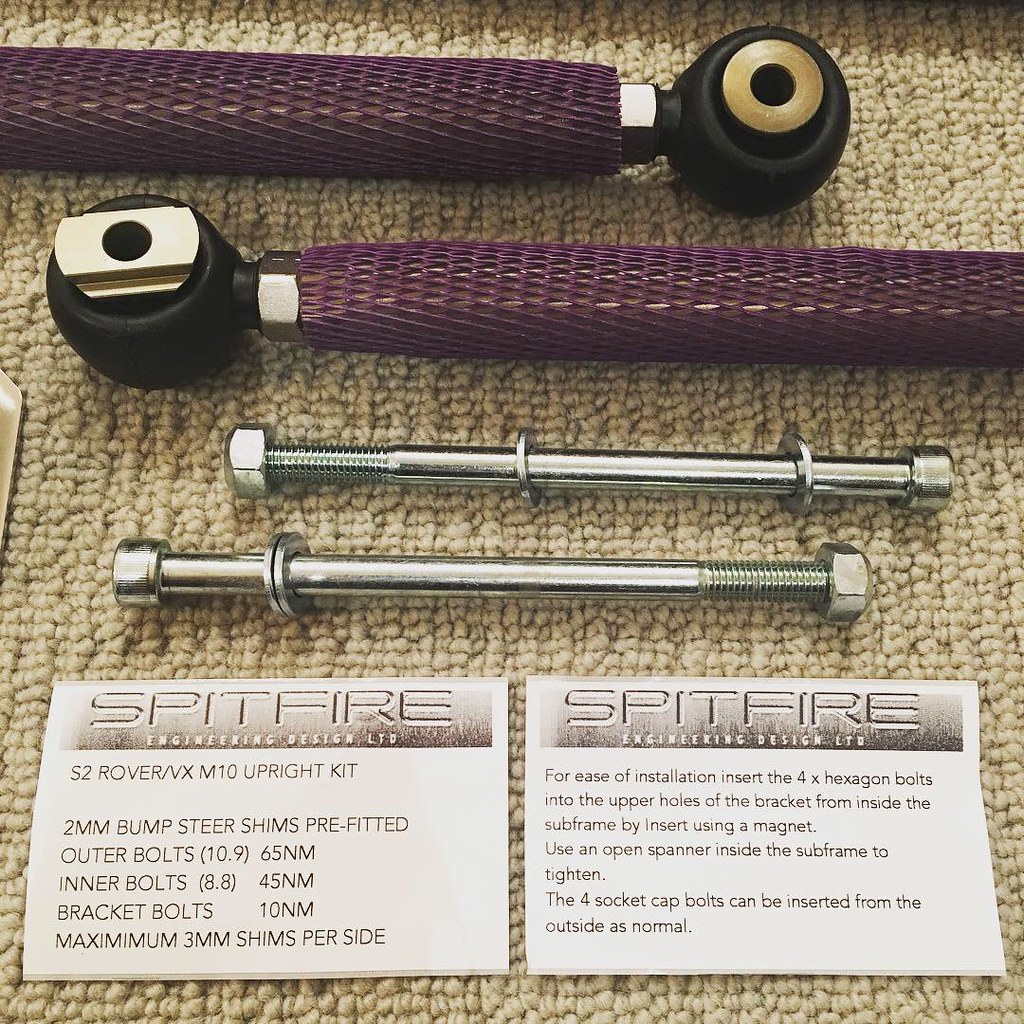
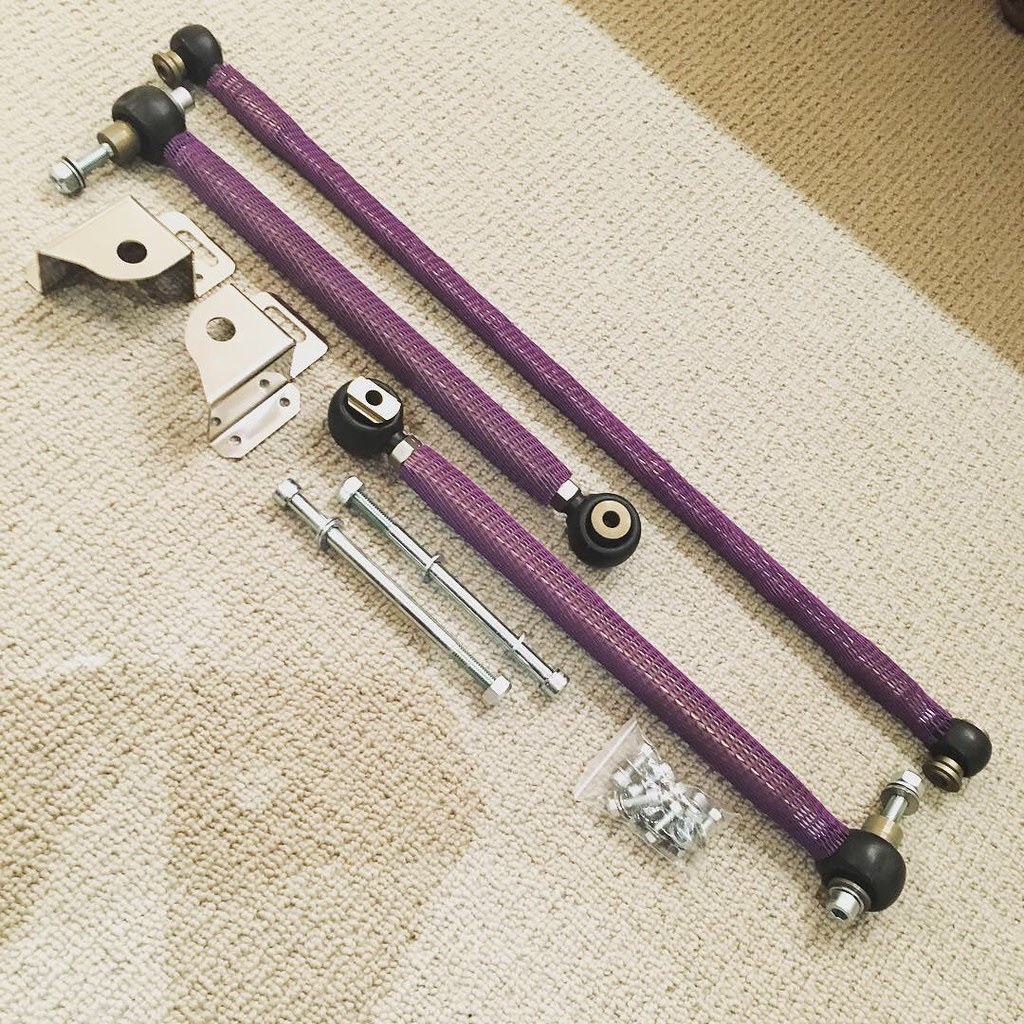
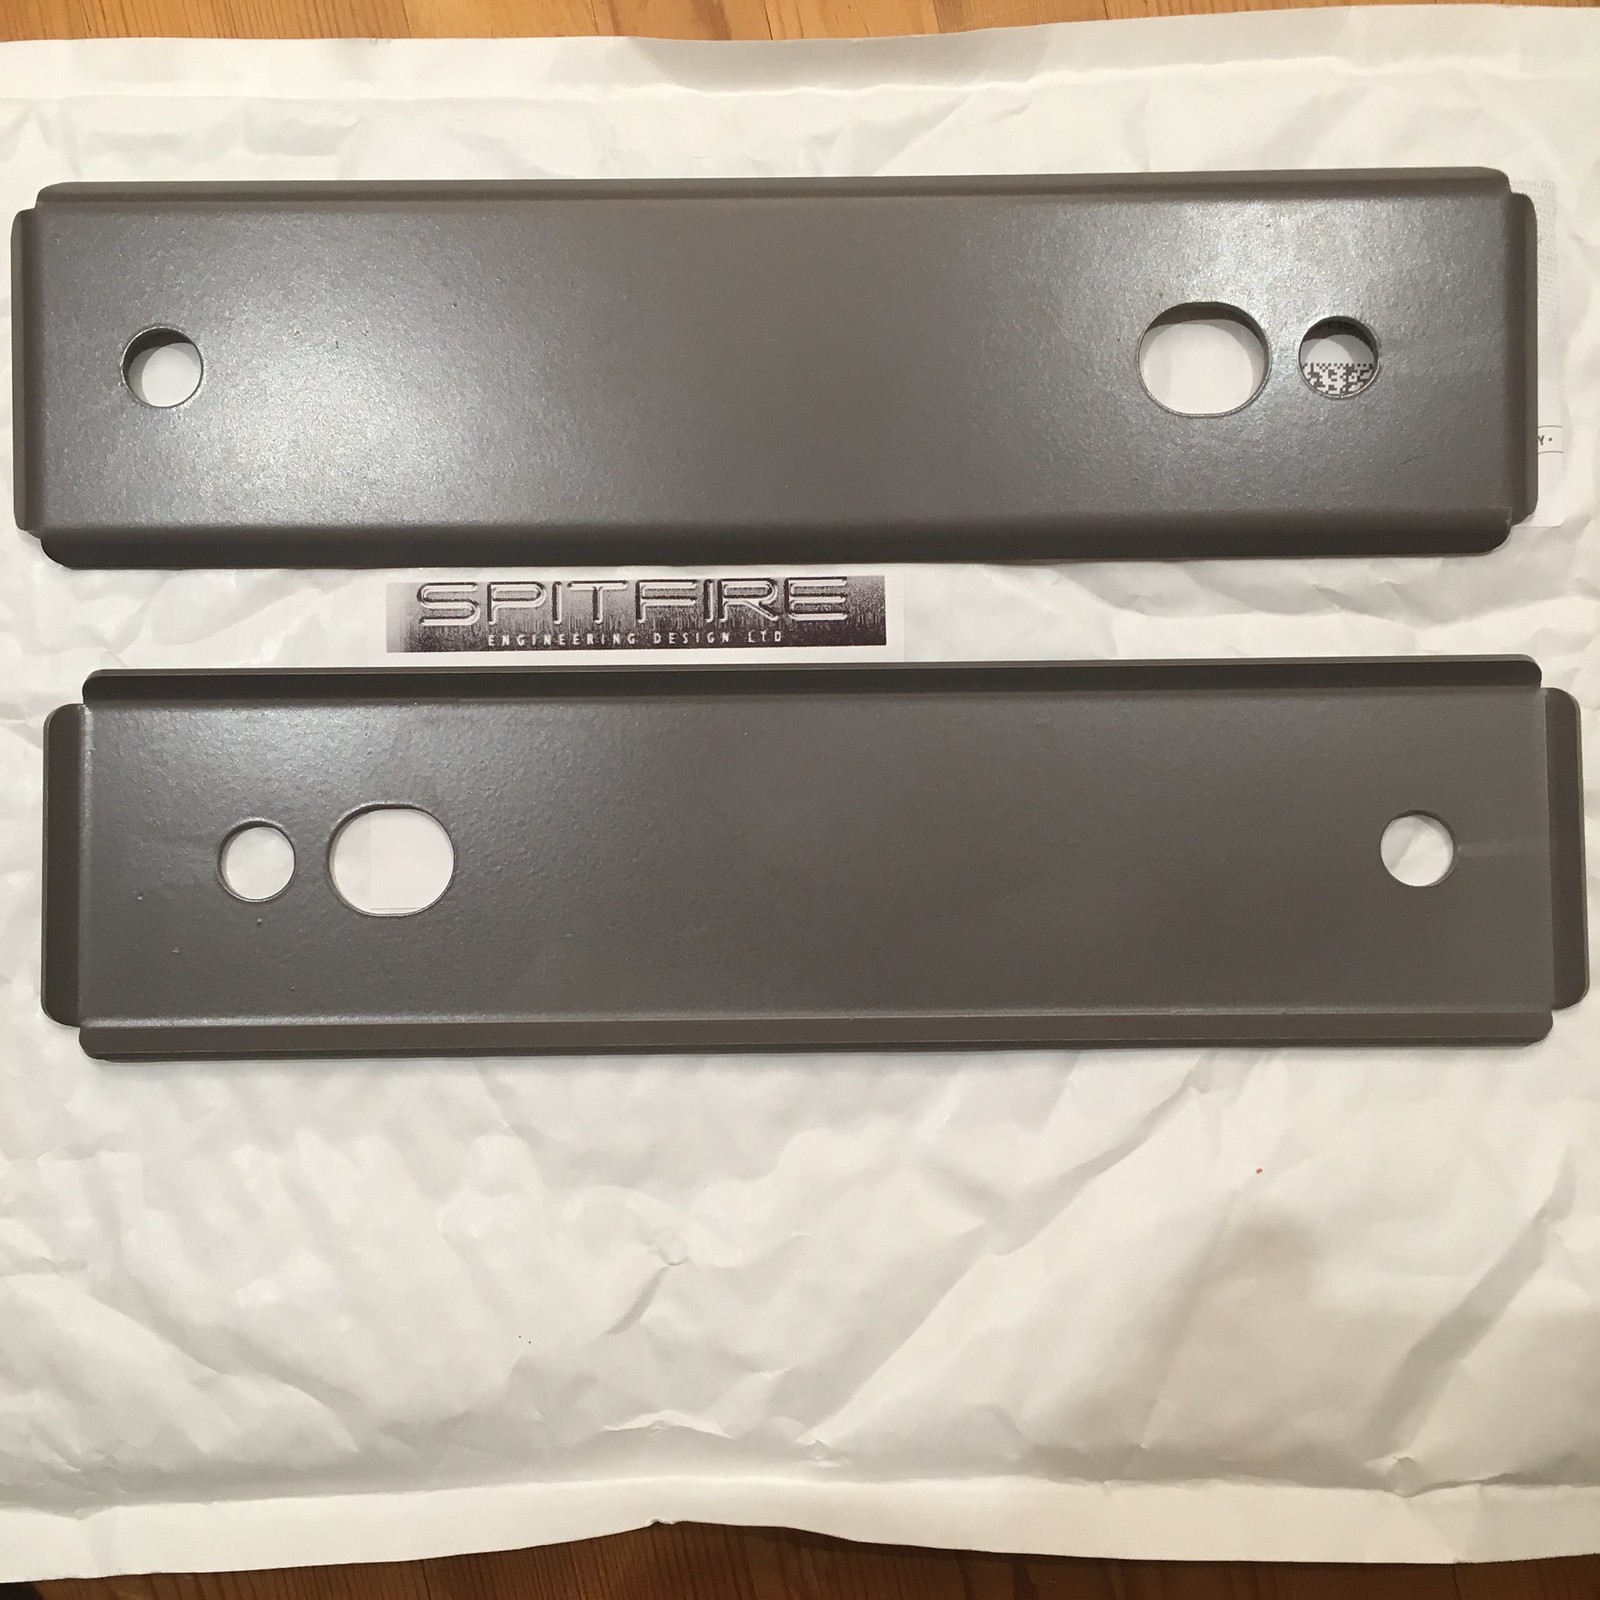
Finally, I'm going to tackle the subframe shims and sill brake lines. I've a set of the Spitfire shims (thanks Gaz) and am awaiting delivery of the Hel braided kit to run through the sills.

Posted ImageUntitled by Tom Peach, on Flickr

#42 sford

sford

    Billy No Mates

  • PipPipPipPipPip
  • 1,435 posts
  • Gender:Male
  • Location:Stratford-upon-Avon

Posted 26 March 2018 - 11:32 PM

I'll try not to make the pictures as huge this time.

Job list for this winter/hibernation time.

Posted ImageUntitled by Tom Peach, on Flickr

Started taking the rear subframe off tonight. It's not hugely complicated but there are a lot of bolts to undo.

Gave each side a liberal dosing of WD40 to try and loosen things up. This meant the surfaces between the subframe and chassis were a bit looser.

Posted ImageUntitled by Tom Peach, on Flickr

And one shim out.

Posted ImageUntitled by Tom Peach, on Flickr

Not too much deformation in the shim. I was able to jack up the engine with the rear mount undone and take off each side mount separately to undo all the bolts and then put the side mounts back on. Got the day off on wednesday/thursday so hoping to get the new shims in and then if the new bolts turn up, tighten it all back up.

#43 VX Boyd

VX Boyd

    Billy No Mates

  • PipPipPipPipPip
  • 1,257 posts
  • Gender:Male
  • Location:Hertfordshire
  • Interests:Stevenage FC.
    The VX220.
    My work.
    Pubs.

Posted 27 March 2018 - 08:24 AM

A lot of the jobs I'll be attempting, though I need the sub frame out for a good clean. Are you able to keep a good diary of going about the brake lines as it's definitely a job I need to do and there doesn't seem to be much on here?


#44 sford

sford

    Billy No Mates

  • PipPipPipPipPip
  • 1,435 posts
  • Gender:Male
  • Location:Stratford-upon-Avon

Posted 27 March 2018 - 08:27 AM

My subframe will be moved further back than that for the cleaning aspect. Trying to work out what is going to be best for getting the corrosion off without doing any damage to the aluminium.

#45 VX Boyd

VX Boyd

    Billy No Mates

  • PipPipPipPipPip
  • 1,257 posts
  • Gender:Male
  • Location:Hertfordshire
  • Interests:Stevenage FC.
    The VX220.
    My work.
    Pubs.

Posted 27 March 2018 - 09:41 AM

Ah looked like your sub frame was already in a good shape. Mine looks terrible from the side view never mind what it must be like either side of the shim so very interested in whatever method you come up with.


#46 sford

sford

    Billy No Mates

  • PipPipPipPipPip
  • 1,435 posts
  • Gender:Male
  • Location:Stratford-upon-Avon

Posted 29 March 2018 - 08:43 AM

This is what the subframe looked like when I pulled it away.The corrosion was only on the lower part of the chassis so I guess I must be relatively lucky. I ended up moving the subframe further away to properly get in and clean things but then got it all back together with new bolts from deroure (and plenty of duralac). Only thing left to to plates wise is to get the car back on it's wheels and tighten up the rollover bar supports.

Posted ImageUntitled by Tom Peach, on Flickr

If you haven't done the subframe shims yet on your car and you're planning on keeping it for a while, well worth doing.

Also managed to snap this up off ebay. An as new standard turbo ubend!

Posted ImageUntitled by Tom Peach, on Flickr

Just waiting on my brake lines from Hel as they sent out the wrong ones originally. Should be here in the post today otherwise I've got a load of little jobs to do while I wait.

Edited by sford, 29 March 2018 - 08:44 AM.


#47 sford

sford

    Billy No Mates

  • PipPipPipPipPip
  • 1,435 posts
  • Gender:Male
  • Location:Stratford-upon-Avon

Posted 29 March 2018 - 07:10 PM

The HEL lines turned up today so set about fitting them.

Posted ImageUntitled by Tom Peach, on Flickr

The job is pretty straight forward but as with everything vx, really fiddly. You need to take the sill covers and dash off. You will also need the wheel arch liners out and access to the wheel well.

I would recommend feeding the lines through the sills first and getting them into position. Passenger side is easier that the drivers side. This is where I made my big mistake, more on that at then end.To feed them through I used some plastic plumbers tubing that was slightly larger than the hose and pushed that through with the braided line inside. You can pass the line through the hole in the bulkhead at the front that the clutch line goes through.

Crack both ends of the existing hard line to make sure they undo, don't want to do one end and then unable to do the other.

Disconnect the the front end first and connect it up. You will lose a small amount of fluid but not much. Be sure to bend the old line up to stop it leaking more. I then let the brake fluid run through and catch the drips in a container at the end. Once the fluid comes through, connect this line up. Then I used a vacuum bleeder to draw the fluid in the old hard hose out. You can then cut the old hard line up and pull it out piece by piece.

This is when I cocked up and chopped the wrong hard line at the front of the car. I cut through the clutch. Having looked at the rear end of this hard line, it's in pretty bad condition so will replace this with braided as well. Every cloud etc etc.

The job list is getting smaller and smaller. Did the oil and filter. Really easy since I have the oil filter housing tool. 5 litres of Halfords finest back in.

Posted ImageUntitled by Tom Peach, on Flickr

All I need now is new studs for the manifold and then it can all go back together! Oh, and the clutch line.

Does anyone know the specifics of the line? Connector sizes front and rear? I'm going to take it from the elbow at the front to the join at the rear of the passenger side. I think haggi wanted to get one made up a while ago but I couldn't find the sizes in his thread. Also, HEL didn't have a clue about it and kept trying to offer me the normal hoses for the four corners.

#48 sford

sford

    Billy No Mates

  • PipPipPipPipPip
  • 1,435 posts
  • Gender:Male
  • Location:Stratford-upon-Avon

Posted 29 March 2018 - 08:29 PM

So messaged Haggi and he came back with the details of the clutch line he used. For the record, 'Its 293cm X1 brake line. Clutch hose is dash 3 with m12 fittings. Its the same size hose line as the brake lines just the fittings are the next size up.'.

#49 sford

sford

    Billy No Mates

  • PipPipPipPipPip
  • 1,435 posts
  • Gender:Male
  • Location:Stratford-upon-Avon

Posted 23 April 2018 - 10:22 AM

Well thanks to HEL sorting out the line for the clutch on friday, I got it all fitted up and bled by close of play that day. Saturday was spent putting the clam back on and getting the car all back together.

The list now looks like this:

Posted ImageUntitled by Tom Peach, on Flickr

Then had a trip out with a friend and my brother to a local cars and coffee meet.

Posted ImageUntitled by Tom Peach, on Flickr

Followed by the MOT today.

Posted ImageUntitled by Tom Peach, on Flickr

Passed and no advisories. Managed to cover a whole 1,300 miles in the last year.

Summary
Changed subframe shims to the new spitfire ones and cleaned mating surfaces, applied duralac as well
Oil and filter change
New Chris Tullett manifold, mated to decat with a turbo U-bend into turbo back box, all new gaskets and manifold studs/nuts
New header tank
Short shifter kit
New brake lines running through the sills supplied by HEL
New clutch line running through the sill from the master cylinder to the join at the rear of the car, supplied by HEL
Brake and clutch bleed with new dot4 brake fluid
New CV boot on the rear as the clips I had put the previous one on with were rubbish

The list of things that I want to do next is already building. Going to move to spitfire toe links and change the fuel lines to something a bit more special, probably along the lines of the rally style kit. At some point I will do the fuel pump but at this stage I just want to get the lines running to the left instead of the right.

#50 sford

sford

    Billy No Mates

  • PipPipPipPipPip
  • 1,435 posts
  • Gender:Male
  • Location:Stratford-upon-Avon

Posted 30 October 2018 - 12:13 PM

So having barely used the car at all this year, I've got a list of the things I want to get done this winter. Had a fleeting moment of possibly selling it as I've done about 1k miles in it in total and no track days. 


Already purchased:


Spitfire toe link kit

Spitfire brace bar

Oil filter seals

Oil filter

Oil


Possible:

Fuel lines - ideally I want a drive in drive out place to do something like on 1cobrav8's car.


#51 sford

sford

    Billy No Mates

  • PipPipPipPipPip
  • 1,435 posts
  • Gender:Male
  • Location:Stratford-upon-Avon

Posted 30 October 2018 - 12:25 PM

44907273284_1359a68393_b.jpg


Edited by sford, 30 October 2018 - 12:33 PM.


#52 sford

sford

    Billy No Mates

  • PipPipPipPipPip
  • 1,435 posts
  • Gender:Male
  • Location:Stratford-upon-Avon

Posted 30 October 2018 - 02:12 PM

In fact, just going through some of the history I saw that 'Benny' from z22se.co.uk carried out the timing chain work in 2011 so on the button for 10 years old. At this rate of ownership I'll be getting them done again once it gets to 2021! How many cars will end up having their chains done twice I wonder? I think the first cars are on an X plate from the first two months of 2001. Mine is a June car if I remember correctly. 


Edited by sford, 30 October 2018 - 02:12 PM.


#53 sford

sford

    Billy No Mates

  • PipPipPipPipPip
  • 1,435 posts
  • Gender:Male
  • Location:Stratford-upon-Avon

Posted 28 November 2018 - 09:41 AM

Spitfire kit has finally arrived, mostly due to me taking forever to decide on what collets to go for on the brace. For my turbo backbox and decat normal pipe I have gone for the middle collets for future reference. The quality really is as everyone says, really high. Even down to the packaging with everything pre-assembled and sealed individually. 


31147184527_38f305c595_b.jpg


31147184537_b5d000bb2a_b.jpg


So good that the wife didn't get cross with me putting them on the new carpet! 


#54 Mani

Mani

    Scary Internerd

  • PipPipPipPipPipPip
  • 3,665 posts
  • Gender:Male
  • Location:Staffordshire

Posted 30 November 2018 - 08:25 PM

First time I have come across your thread. It's a great read. You are certainly looking after the car!

I wish I had the time and skill to maintain the vxr myself. I had a suspension refresh two years ago. The cars just been serviced a few weeks back by mmg. Next job in spring is the subframe.

Only drove the car 400 miles this year. I must get out more.

Mani


Sent from my SM-G935F using Tapatalk


#55 sford

sford

    Billy No Mates

  • PipPipPipPipPip
  • 1,435 posts
  • Gender:Male
  • Location:Stratford-upon-Avon

Posted 14 March 2019 - 01:37 PM

I'm starting on my winter job list ready to bring the car out of hibernation. I've used it a couple of times over the past few weeks to go to the local Caffeine and Machine car hotspot (https://www.instagra...dmachine/?hl=en) but this just reminded me how rattly some of the interior is compared to a normal car.


 The job list ended up looking like:


Spitfire toe link kit - purchased

Spitfire brace bar - purchased

Oil filter seals - purchased

Oil filter - purcahsed

Oil - purchased 

Fuel lines - being made

Spitfire fuel pump - still to purchase

OMP steering wheel - already got

Eliseparts steering boss - to buy


As I am going to the effort of changing the fuel lines, I figured it was probably worth doing the pump as well. I will enlarge the inspection hatch ala JG and make a cover for it. The fuel lines are currently being made up to be the same as Mr Webb's ones as I think that is the best solution without going overkill on the AN fittings and braided hosing. 


I started to fit the spitfire toelink kit, getting things all lined up to drill the holes for the double shear brackets. Everything goes together really well on it all. In fact, everything is also coming undone without issue so looks like the refurb was worth doing all that time ago. The powdercoating on the wishbones is holding up well, no sign of any chips in it. I will give everything a wipe down and clean while I have the wheels off. Even the discs/pads look reasonable. 


I'm going to be taking the steering wheel off and fitting an OMP one I have (https://www.demon-tw...l-ompod1990blk/) with the eliseparts (https://www.eliseparts.com/products/show/49/1823/late-type-steering-wheel-adaptor/) steering wheel adapter. I have the resistor ready for this, just need to work out how I'm going to attach it. 


#56 sford

sford

    Billy No Mates

  • PipPipPipPipPip
  • 1,435 posts
  • Gender:Male
  • Location:Stratford-upon-Avon

Posted 15 April 2019 - 10:44 AM

The toe link kit was fitted over an evening, really easy and straight forward thanks to the instructions sent by Gaz. Didn't take any photos unfortunately but they look like any other spitfire toe links. The brace bar fits with loads of room with a decat and standard back box. 


Once it was all back together I took a trip across to HPE for a geo. Was treated to a nice coffee and a chat. There were some nice vehicles there as well, a 340R with a Rotrex and sequential, a bright (scandal?) green S160 plus a couple of others. Dan got stuck straight in and started the geo, turned out I had quite bad toe out on the rear!


47560058662_d43b80a59c_z.jpg


He weighed the car too. Car spec is;


Standard 'stage 2' SC with charge cooler

Decat with turbo back box and tullet manifold

TD1.2's with federal RSR tyres

Normal discs

7/8ths anti roll bar

Nitron Street Series 2 dampers

Splitter and diffuser

Harnesses and seat belts

Standard carpets

Full tank of fuel less what was needed to drive the 20 miles to get to Dan

All fluids


892.5kgs


46697432425_943322e2a6_z.jpg


I said as long as it was under 900kgs I was happy. 


Then on the sunday I took a trip over to my brother's to help out with his turbo conversion.


47560058672_8fba37d85c_z.jpg


This was engine out, sump off and plumbing in an oil return, new clutch/flywheel and engine refit. Was a pretty good car orientated weekend! 


#57 sford

sford

    Billy No Mates

  • PipPipPipPipPip
  • 1,435 posts
  • Gender:Male
  • Location:Stratford-upon-Avon

Posted 28 May 2019 - 01:02 PM

I tackled what was to me, a daunting task yesterday. Playing with explosives. I removed the standard steering wheel to be replaced with an OMP one I had from another car. 


First part was to remove the battery, I did this a few days before to make sure the system was fully discharged. Bonus, I found the 10mm spanner I lost under the front bonnet ages ago when taking out the washer bottle.


Next was to undo the two allen head bolts either side on the steering wheel.


47950710028_452cf41b9c_z.jpg


This allowed me to remove the airbag unit. It came out really easily with no pulling or swearing at all. In fact, I received zero self inflicted wounds from do this whole task.


47950737366_5fac4c50b7_z.jpg


Removing the airbag plug was the really daunting part, made rather easy by the fact you just pull the yellow tab up and then the connector straight off the back. 


47950737411_6a13d0c385_z.jpg


Then I removed the horn connector and the steering wheel by the four allen bolts holding it to the hub. I replaced the steering wheel with the elise parts https://www.elisepar...-wheel-adaptor/


47950737416_3d64ec5da0_z.jpg


Once this was on, I fitted the resistor to the yellow/blue plug by simply inserting a leg of each side into the holes (it doesn't matter which way around) and put some heatshrink over the entire plug to hold it on. Fully reversible should I need/want to in the future. This only left for the steering wheel to be attached. Six bolts and away we go. I'm still waititng for the horn pusher to arrive so once that does, I'll add that in and then it's all done. Steering wheel is a little further away than before but I haven't yet fitted a quick release adaptor so that will bring it a bit closer. Looking at one of the N-G ones, when I get round to it. Impending arrival of baby means I probably won't get chance for a while. 


47950709998_ea09718109_z.jpg


#58 pete-r

pete-r

    I never drive faster than I can see

  • PipPipPipPipPipPip
  • 2,771 posts
  • Gender:Male
  • Location:South Wales

Posted 28 May 2019 - 04:03 PM

Wheel looks great, I did the same a while ago to fit a Reverie. Find now though the wheel is a bit too far away but I'm a short arse.

I want to look at adding a longer or second adapter.

Good thread.

#59 sford

sford

    Billy No Mates

  • PipPipPipPipPip
  • 1,435 posts
  • Gender:Male
  • Location:Stratford-upon-Avon

Posted 28 May 2019 - 04:53 PM

You could take the adaptor you have to a local engineering place and get them to turn you one up on a lathe that's a bit longer. Should be pretty easy to do. 


#60 sford

sford

    Billy No Mates

  • PipPipPipPipPip
  • 1,435 posts
  • Gender:Male
  • Location:Stratford-upon-Avon

Posted 22 August 2019 - 11:26 AM

So I bought one of the carbon fuel caps recently which turned out to be nice and easy to fit.


48598820567_4885da6278_z.jpg


I know it's only aesthetic but my aluminium one was starting to look a bit old and tired. The surround was easy to remove, undo bolts and then used a bit of fishing wire to run between it and the car. It isn't stuck on but 18 years of grime meant it didn't want to move.Removed the cork backing with a stanley knife and applied it to the rear of the carbon outer. I also bought some aluminum bolts that were anodised black. Had to make sure none of the crud went down the filler hole whilst doing all this. The cover on the cap itself took a bit more work. First stuck the key in the lock, then removed the retaining clip off of the back. This means the lock mechanism slides out. Gave it all a good clean and ensured I didn't lose the two o-rings inside here. The aluminium cover is a friction fit and takes some force to remove but bit by bit I managed to get it off. Strrooooonnnggg double sided tape was used to attach the cover and it now looks like this. Ignore the grubby fingerprints.


48598681461_9a435dcb21_z.jpg


Edited by sford, 22 August 2019 - 11:31 AM.


0 user(s) are reading this topic

0 members, 0 guests, 0 anonymous users