Jump to content


Photo

Brake Lines - Mot Failure


  • Please log in to reply
80 replies to this topic

#61 TheStotts

TheStotts

    Need to get Out More

  • PipPipPipPip
  • 1,130 posts
  • Location:Northampton

Posted 13 June 2017 - 09:18 AM

Thanks for the quick reply Imnotworthy


The flexis come ready covered in heatsleeve so I'm hoping this will offer the right protection. Would you put the flexi straight through without using a conduit? I've got a length of silicone hose that I could use to give a bit of extra protection.


Oh and thanks for the vacuum bleeder recommendation - would an Eezibleed be up to the job or am I better off with a vacuum kit like this one?


http://www.halfords....ke-bleeding-kit


Good to hear that the plastic is easily drilled too  :)


#62 fezzasus

fezzasus

    Whipping Boy

  • PipPipPipPipPipPipPip
  • 7,689 posts
  • Gender:Male
  • Location:Oxford

Posted 13 June 2017 - 09:49 AM

Halfords link is better, Eezibleed is a pressure bleeder which doesn't work as well (in my opinion) as has potential to introduce air.


#63 TheStotts

TheStotts

    Need to get Out More

  • PipPipPipPip
  • 1,130 posts
  • Location:Northampton

Posted 13 June 2017 - 09:56 PM

Stepped drill bit and vacuum bleeder ordered :)

#64 haggi961

haggi961

    1cobrav8 is my god

  • PipPipPipPipPipPipPip
  • 6,003 posts
  • Gender:Male
  • Location:Richmond, N.Yorks
  • Interests:Keeping fit and in shape, and pretty much anything to do with an engine.

Posted 13 June 2017 - 10:27 PM

Nope the hole doesn't need to be englagred under the windscreen Into the front, as I got both through the hole at the same time. Best is to fit all the new lines following the old lines. Once it's all in then disconnect the old lines and reconnect the new straight away. This will limit the loss of fluid and not corrode your alloy. I then put a pipe over the old lines and blew down it with a container at the other end to catch the fluid stuck in the lines. Then cut it into little sections and pull out of the various holes. This way I didn't spill one drop of fluid anyway and bleeding was simple also.

#65 haggi961

haggi961

    1cobrav8 is my god

  • PipPipPipPipPipPipPip
  • 6,003 posts
  • Gender:Male
  • Location:Richmond, N.Yorks
  • Interests:Keeping fit and in shape, and pretty much anything to do with an engine.

Posted 13 June 2017 - 10:32 PM

Thanks for the quick reply Imnotworthy   The flexis come ready covered in heatsleeve so I'm hoping this will offer the right protection. Would you put the flexi straight through without using a conduit? I've got a length of silicone hose that I could use to give a bit of extra protection.   Oh and thanks for the vacuum bleeder recommendation - would an Eezibleed be up to the job or am I better off with a vacuum kit like this one?   http://www.halfords....ke-bleeding-kit   Good to hear that the plastic is easily drilled too  :)      

I would cover in a heat sleeve through the sills as the lines rest on the coolant pipes in places. Eezibleed Is what I use and never let me down. Just make sure to have no more then 12-15 psi through it.

#66 TheStotts

TheStotts

    Need to get Out More

  • PipPipPipPip
  • 1,130 posts
  • Location:Northampton

Posted 14 June 2017 - 11:52 AM

Nope the hole doesn't need to be englagred under the windscreen Into the front, as I got both through the hole at the same time. Best is to fit all the new lines following the old lines. Once it's all in then disconnect the old lines and reconnect the new straight away. This will limit the loss of fluid and not corrode your alloy. I then put a pipe over the old lines and blew down it with a container at the other end to catch the fluid stuck in the lines. Then cut it into little sections and pull out of the various holes. This way I didn't spill one drop of fluid anyway and bleeding was simple also.


Thanks for the quick reply Imnotworthy
 
The flexis come ready covered in heatsleeve so I'm hoping this will offer the right protection. Would you put the flexi straight through without using a conduit? I've got a length of silicone hose that I could use to give a bit of extra protection.
 
Oh and thanks for the vacuum bleeder recommendation - would an Eezibleed be up to the job or am I better off with a vacuum kit like this one?
 
http://www.halfords....ke-bleeding-kit
 
Good to hear that the plastic is easily drilled too  :)


I would cover in a heat sleeve through the sills as the lines rest on the coolant pipes in places.

Eezibleed Is what I use and never let me down. Just make sure to have no more then 12-15 psi through it.


Thanks for all the advice :)


Did you pre-fill the flexi with brake fluid before running it through the sills, after or not at all?


Like yours mine came covered in silver heat sleeve so I'm hoping that'll reduce the heat transfer risk.


Posted Image


Thanks too for the tip about the hole - I'll see if I can squeeze the line through. With regards to the hard line in the sill did you have any problems pulling this back through the clips?


Oh one more thing (sorry) what padding material did you use when tying the flexi to the coolant pipe? Bit worried about creating another corrosion risk  :unsure:


Cheers and thanks again  chinky chinky


#67 vocky

vocky

    Moderator

  • 11,969 posts
  • Gender:Male
  • Location:Earth

Posted 14 June 2017 - 03:31 PM

I would not attempt to add any brake fluid before fitting the new lines.


#68 TheStotts

TheStotts

    Need to get Out More

  • PipPipPipPip
  • 1,130 posts
  • Location:Northampton

Posted 14 June 2017 - 04:12 PM

I would not attempt to add any brake fluid before fitting the new lines.


Thanks vocky  thumbsup


Do you think it's best to swap over at the ABS or caliper end first? With or without the brake fluid reservoir cap on etc.? Apart form changing the rear calipers I've never considered how best to minimise introducing air into the system.


Will have a search on here and Google but would welcome advice  :)


#69 vocky

vocky

    Moderator

  • 11,969 posts
  • Gender:Male
  • Location:Earth

Posted 14 June 2017 - 07:12 PM

I would start installation at the rear and work your way forwards, but only connect the new line after running it along the car.


Also worth making sure the old brake connections can be undone easily, they do tend to rust up at the rear connection.


a top tip - use some electrical conduit and insert the new brake line inside it, then push the conduit along the sill, once it reaches the front of the sill pull the brake line a little further forward, attach it to something and then remove the conduit. Makes life so much easier.


Once the new line is run, connect it at the front, then the fluid will head towards the rear. Which gives you just enough time to connect the rear.


#70 TheStotts

TheStotts

    Need to get Out More

  • PipPipPipPip
  • 1,130 posts
  • Location:Northampton

Posted 14 June 2017 - 08:03 PM

Thanks for taking the time to document an approach Vocky - really appreciated :)

#71 TheStotts

TheStotts

    Need to get Out More

  • PipPipPipPip
  • 1,130 posts
  • Location:Northampton

Posted 16 June 2017 - 09:07 AM

Had a productive night and managed to get the flexi line in situ ready for the switch over  :)


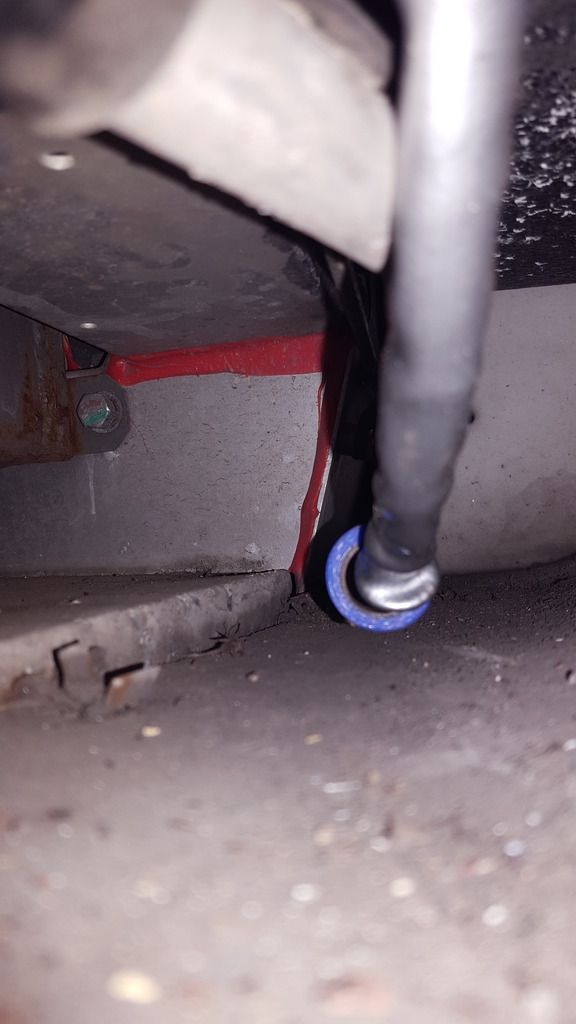
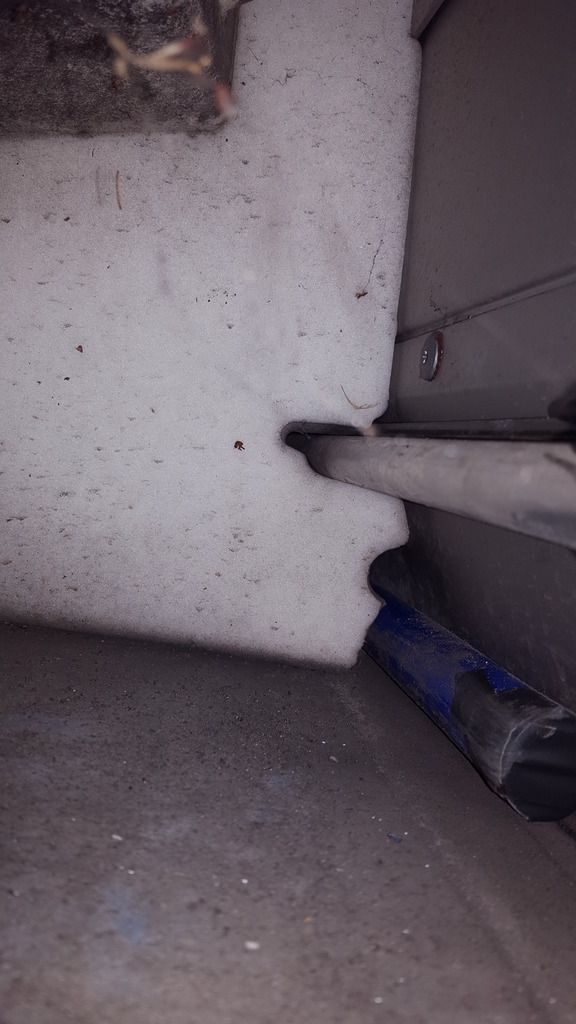
Approach was to slip the flexi into a 1m length of silicone pipe, push that through the sill from the back, pull out from the front and leave the flexi in place.


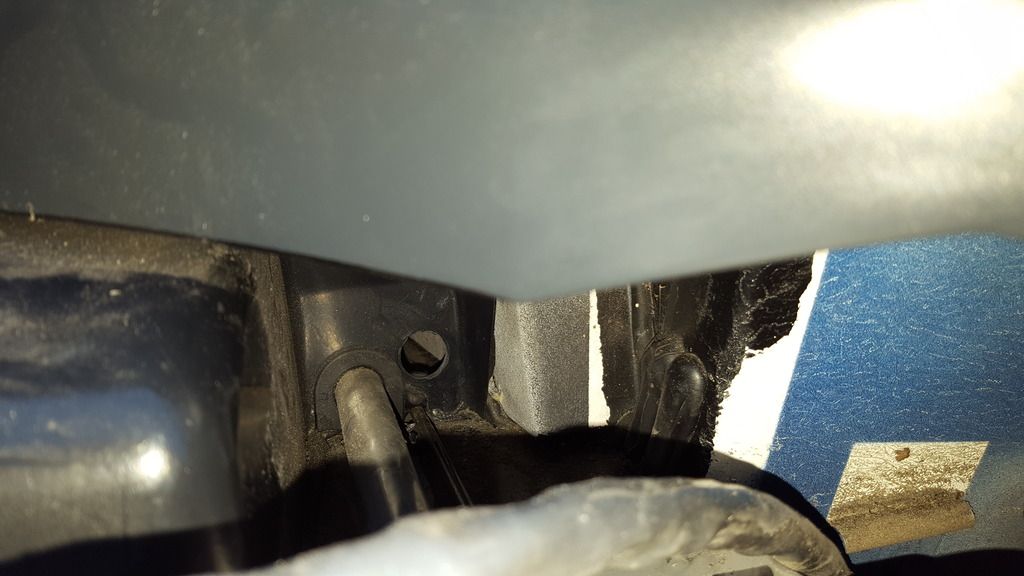
View from back of sill looking forward


Posted Image


View from front of sill looking back
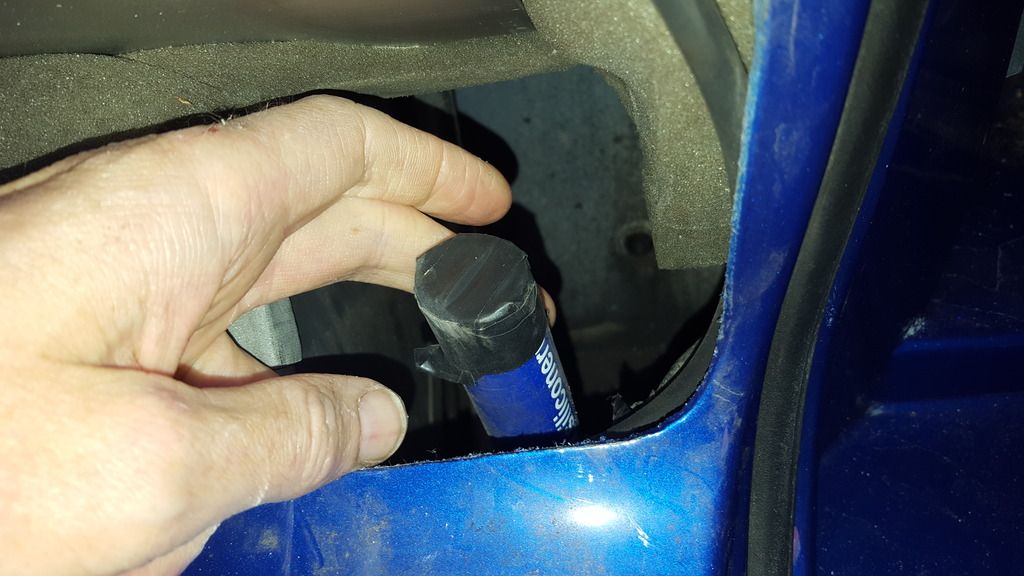
 

Posted Image


Front access panel


Posted Image


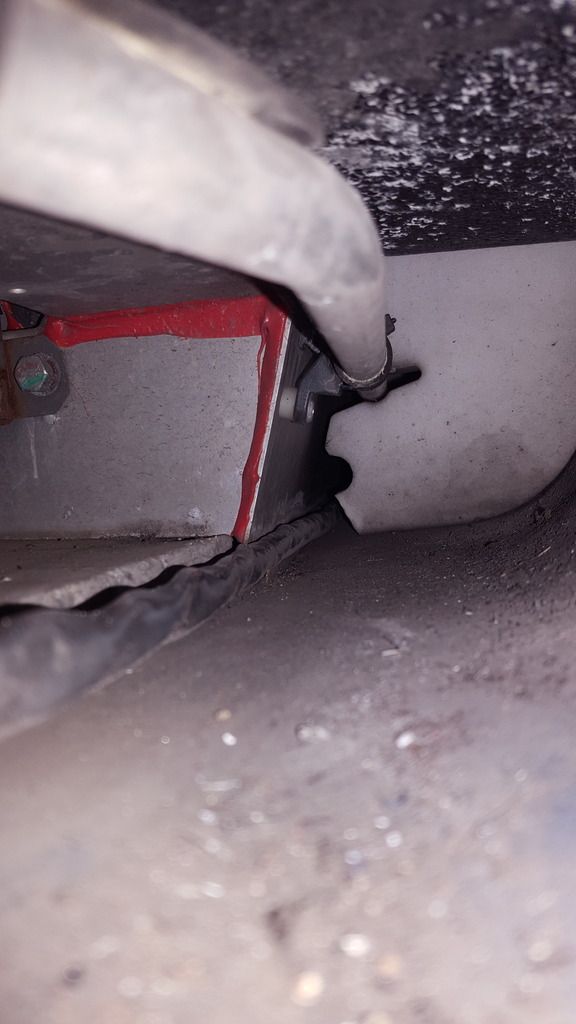
Flexi in place (yet to be tied up to coolant pipe!)


Posted Image


As per Haggi's advice I tried to force the flexi through to the bonnet using the same hole as the hard pipe but the grommet surrounding the hard pipe wouldn't shift  :beat:


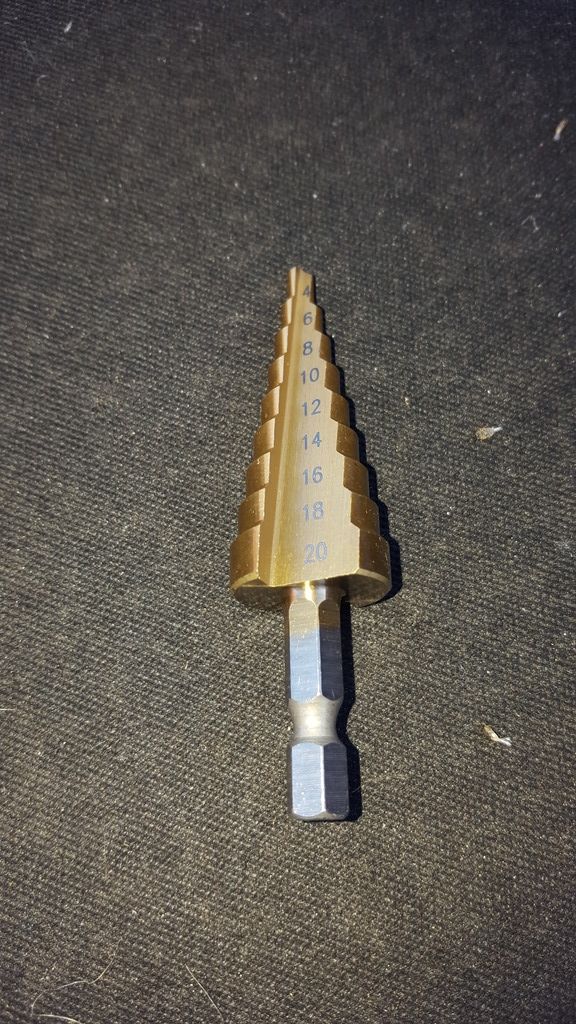
So a new hole was drilled using a step bit and small electric screwdriver (access is quite restrictive!)


Posted Image


Posted Image


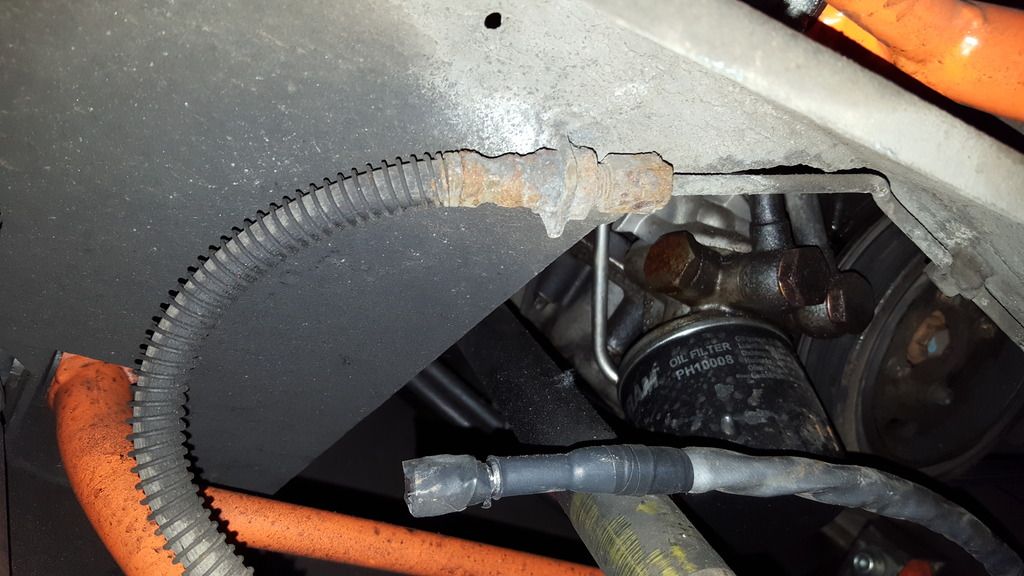
The connector at the back where the hard pipe meets the existing flexi looks pretty crusty but straight forward to switch over (fingers crossed!)


Posted Image


I'm not sure yet if the clips holding on the existing hard pipe (top right of pic above) will be good for the flexi. Has anyone with flexi in this area managed to reuse the existing clips or successful replace with new ones? Ran out of time light last night to see how the existing clips attach to the car.


With respect to the front connector does anyone have any tips as to how to undo this as quickly as possible?


Posted Image


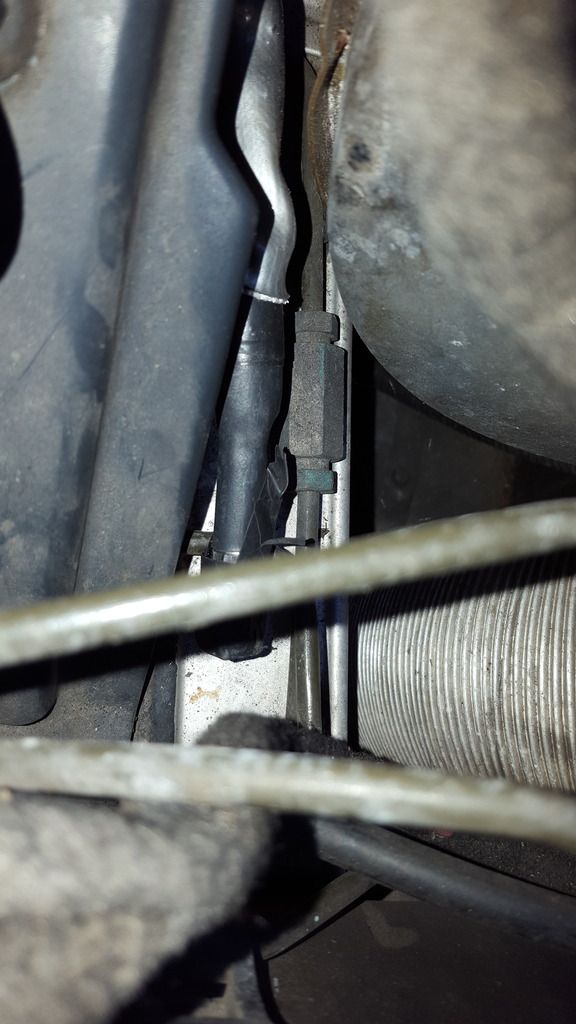
Am I right in thinking that the nut nearest the ABS (blue one in pic above) will spin freely on the hard line once released? So holding the union and undoing the blue nut is the best approach? I'm guessing it'll be best to try and unclip the hard line first so it's easier to move out of the way.


As ever any advice gratefully received  :)


#72 TheStotts

TheStotts

    Need to get Out More

  • PipPipPipPip
  • 1,130 posts
  • Location:Northampton

Posted 21 June 2017 - 11:54 AM

Progress! Ken popped over on Saturday morning and we managed to connect up the flexi line. Due to limited access and the lubricating qualities of brake fluid the front connection was a challenge but otherwise quite straightforward.


In preparation we loosened off the connectors at the front and rear, unclipped the hard lines near to the connectors, lined the front area with absorbent towel and screwed in a blanking plug at the caliper end of the flexi. Ken valiantly placed a grommet around the flexi where it enters the bonnet area - this was later pulled through into the bonnet area as we needed a bit more flexi through  :beat:


Below is a rough step-by-step guide to swapping over the line - it might not be the best approach but worked for us.

  • Undo rear connector (13mm) and bend down hard line to start draining off the fluid.
  • Undo front connector (13mm union, 11mm ABS side nut) and lever old section of hard line out of the way.
  • Connect flexi (12mm) to existing hard pipe. This was a bit fiddly as the clip for the old hard line sits exactly where the flexi needs to be. In retrospect we should have removed this clip before disconnecting the two lines. We (or rather me!) thought it would be possible to connect the two sides one handed and effectively blind but failed miserably! In the end it required two people – one on either side of the connection to get the necessary alignment and pressure to connect them up.
  • Remove the fluid reservoir cap to allow fluid to flow through the flexi keeping a careful eye on the fluid level to ensure it doesn’t drop below the minimum level.
  • As soon as the fluid is flowing connect the flexi at the rear.


Job done  - remarkably we didn’t introduce any air into the system so no need to bleed  :)


Yesterday I cable tied the flexi into place under the dash and at the front of the sill. Removed the rear section of hard pipe (9) and the section from the front of the sill to the rear (part of 11). This involved unclipping the line at the front of the sill and using a pipe cutter (https://www.toolstod...e-pipe-cutter-1) to chop out sections. The hard line was surprisingly easy to pull through the clips inside the sill. I wasn’t sure what to do with the front section so have left that in place for now. Refitted the dash and sill cover. Removed the hard clips at the rear in prep for attaching the flexi. I’ve got some flexi hose p-clips in the post and hope to attach these using industrial trim clips.


Thanks again to everyone for their help – almost ready for the restest  :groupjump:


A few pics…


Biscuit power


Posted Image


Front connection


Posted Image


Under dash tie


Posted Image


Front sill tie


Posted Image


Rear connection


Posted Image


Rear clips (before and after application of chisel!)


Posted Image


Posted Image


#73 Wolfstone

Wolfstone

    Iceman

  • PipPipPipPipPipPipPipPip
  • 12,984 posts
  • Gender:Male
  • Location:Jordan (The country. Not Katie Price)
  • Interests:Northants Pedantic Crew global domination of the media.

Posted 21 June 2017 - 12:12 PM

Well done Dave. Top job! You'd done most of the hard work before I came to lend a hand. So there was very little for me to do (or rather 'fook up' as we like to call it in the NPC :lol:).

#74 TheStotts

TheStotts

    Need to get Out More

  • PipPipPipPip
  • 1,130 posts
  • Location:Northampton

Posted 21 June 2017 - 01:56 PM

Thanks Ken  :)


I certainly don't need any assistance fooking things up... more than capable of that! I'm seriously considering taking the dash and sill cover back off tonight and removing the section of pipe that runs from the sill to the bonnet - why didn't I do that yesterday  :beat:


It's good just to get a second opinion on things and a sanity check on the approach. Plus that San Miguel wasn't doing anything useful in my garage  chinky chinky


Hope the move plans are going well  thumbsup


#75 fezzasus

fezzasus

    Whipping Boy

  • PipPipPipPipPipPipPip
  • 7,689 posts
  • Gender:Male
  • Location:Oxford

Posted 21 June 2017 - 02:38 PM

You can get fir tree cable ties to attach the cable to the now empty subframe holes which held the hard brake line clips.


Posted Image


#76 robin

robin

    Scary Internerd

  • PipPipPipPipPipPip
  • 3,810 posts

Posted 21 June 2017 - 09:11 PM

you not replacing the old flexable lines to calipers seems a shame to do all new sill lines

and to leave the rusty original lines.


#77 TheStotts

TheStotts

    Need to get Out More

  • PipPipPipPip
  • 1,130 posts
  • Location:Northampton

Posted 21 June 2017 - 09:17 PM

You can get fir tree cable ties to attach the cable to the now empty subframe holes which held the hard brake line clips.
 
Posted Image

Thanks for the suggestion. I've ordered these https://www.amazon.c...g?ie=UTF8&psc=1 The p clips fitted but my fir tree clips are either too big or too small.

you not replacing the old flexable lines to calipers seems a shame to do all new sill lines
and to leave the rusty original lines.

Job for another day... although agree it does look a bit pants now!

Managed to get the last bit of hard pipe out from under the dash section tonight. Pulled as much through into dash section, cut it and the pushed the remained through. Bit of a faff but worth it :)

#78 TheStotts

TheStotts

    Need to get Out More

  • PipPipPipPip
  • 1,130 posts
  • Location:Northampton

Posted 26 June 2017 - 01:27 PM

MOT passed :) 


Thanks to everyone who contributed to the topic - I really appreciate your help and suggestions  :groupjump:


#79 ChrisS1

ChrisS1

    Club OEM

  • PipPipPipPipPipPipPip
  • 8,360 posts
  • Gender:Male
  • Location:South Walers

Posted 26 June 2017 - 01:32 PM

Thanks for keeping us updated.


I have a feeling that all cars will need these replacing before long.


#80 sford

sford

    Billy No Mates

  • PipPipPipPipPip
  • 1,435 posts
  • Gender:Male
  • Location:Stratford-upon-Avon

Posted 14 March 2018 - 03:31 PM

I'm thinking this is a job I need to do prior to my MOT this year. You can't see the pipes but I'm taking the rear clam off for a new manifold and figured I'd add it to the list of jobs. Is this the same kit you all fitted? https://www.ebay.co....18AAOSwmrlUrQUG


0 user(s) are reading this topic

0 members, 0 guests, 0 anonymous users