Jump to content


Photo

Sub Box Build - Ongoing Progress Typre Thread


  • Please log in to reply
33 replies to this topic

#1 mandarinvx

mandarinvx

    King of First Replies

  • PipPipPipPipPipPipPipPip
  • 12,621 posts
  • Gender:Male
  • Location:West Mids / Oxfordshire

Posted 18 November 2007 - 11:57 PM

No :flame: please, I've managed this long with no real tunes in the car, but come to the realisation that music forms part of my driving experience on many occasions, and this appears to be the best way to go about it :)

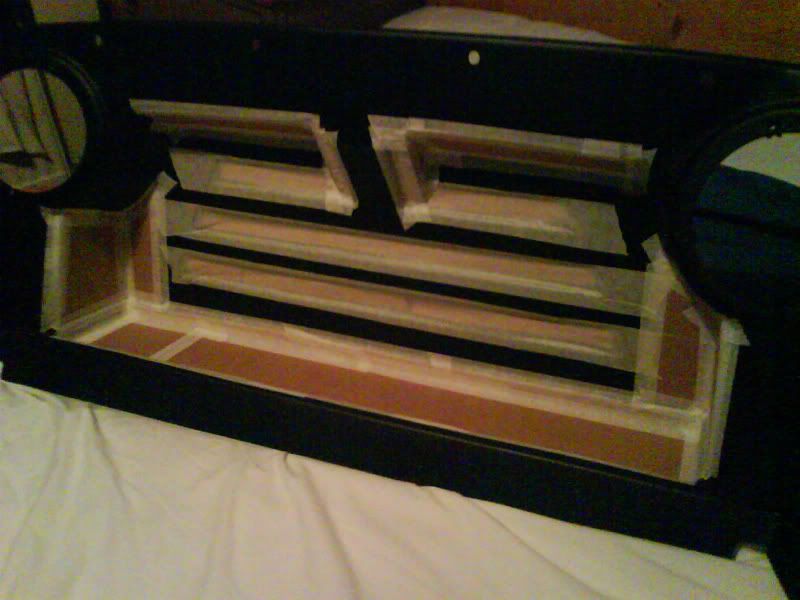
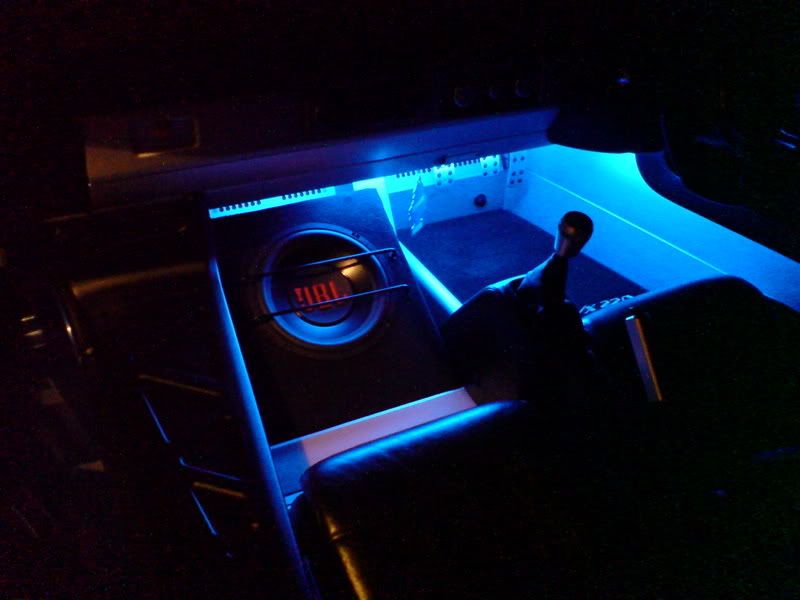
The box will be removable if I'm ever brassic for when I do a track day ;)

This is the sub I plan to use - 10" slimline, 250W rms, but low weight

It needs a box size of '0.5cu.ft ideal' - '0.6 cu.ft. large'; and it seems from my quick calcs that the bulk head panel 'parcel shelf' is around 0.55cu.ft so ideal!

I though I'd start this thread now as I've never used fibreglass (or wood for that matter :rolleyes: ) before so any tips / hints / advice as I'm going along would be great thumbsup

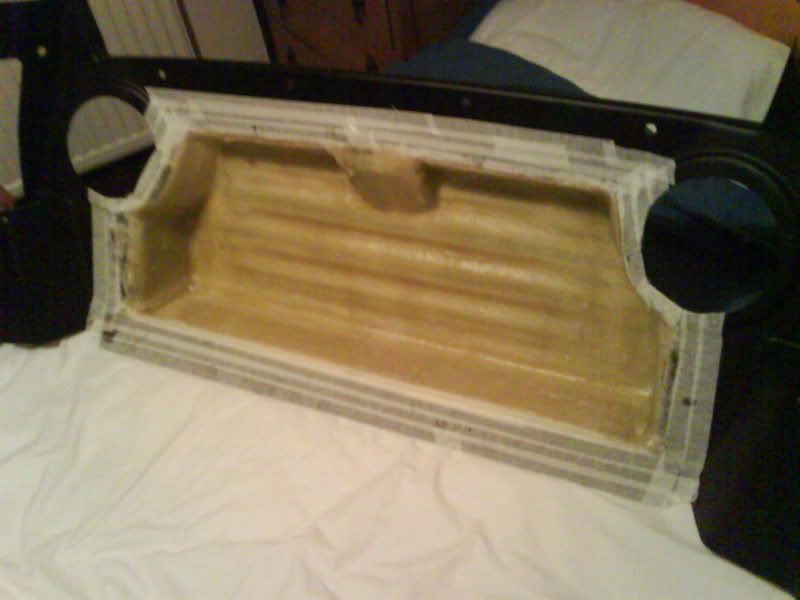
So, here goes - got hold of a bulk head panel to use as a mould.

Then taped some card into the recesses and along the bottom and top edge, hopefully this will alow enough space for the Velcro, and enough to remove the fibreglass from the mould!

Posted Image

1 roll of masking tape later:

Posted Image

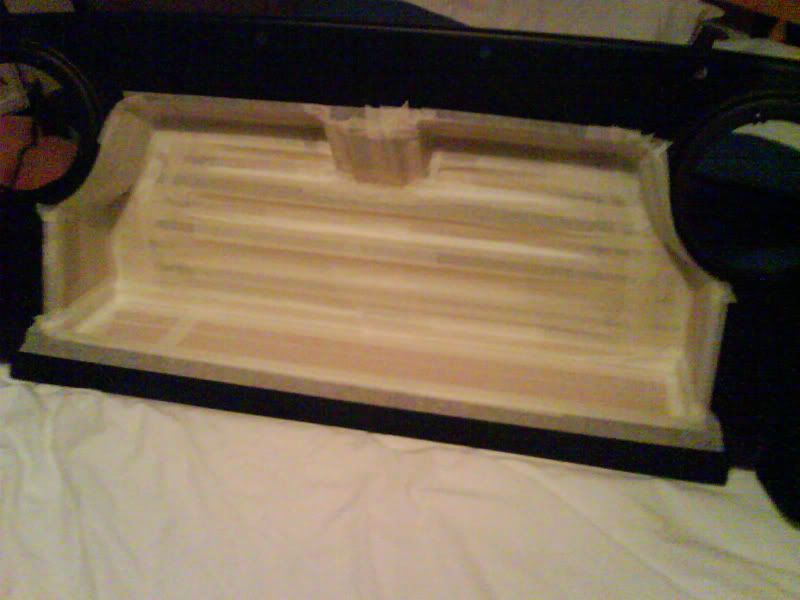
I then plan to give it a good coat of Collinite Carnuba wax to aid release - does this seem like the right kind of start :blink:

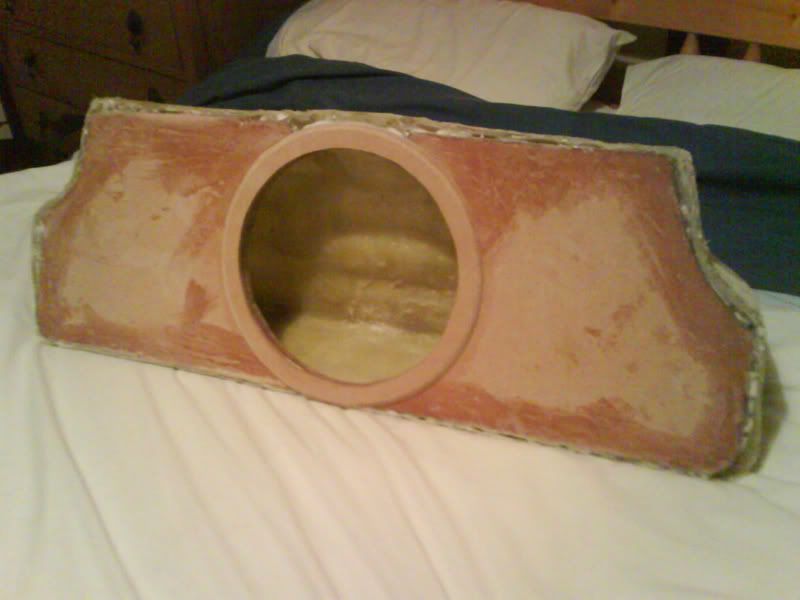
Fibreglass kit should be here in the next few days, so that's when the 'fun' starts :)

#2 Joe-Turbo

Joe-Turbo

    Scary Internerd

  • PipPipPipPipPipPip
  • 4,176 posts
  • Gender:Male
  • Location:Rayleigh, Essex.

Posted 19 November 2007 - 12:03 AM

:rolleyes:

think of all the weight :flame: :saw: :lol: :lol:

Im sure i have some pics of my sub box out of the car if thats any help at all?

good luck with it thumbsup

edit to add : found a link to my original post with fibreglass box on work bench :-)

http://www.vx220.org...opic=16833&st=0

Edited by Joe-Turbo, 19 November 2007 - 12:06 AM.


#3 mandarinvx

mandarinvx

    King of First Replies

  • PipPipPipPipPipPipPipPip
  • 12,621 posts
  • Gender:Male
  • Location:West Mids / Oxfordshire

Posted 19 November 2007 - 12:15 AM

:rolleyes:
think of all the weight :flame: :saw: :lol: :lol:
Im sure i have some pics of my sub box out of the car if thats any help at all?
good luck with it thumbsup
edit to add : found a link to my original post with fibreglass box on work bench :-)
http://www.vx220.org...opic=16833&st=0

That's great mate, cheers Imnotworthy

But... the inevitable questions follow :rolleyes:

What size woofer did you use?
Where are the speaker connection terminals?
Is the front plate MDF, or is the whole box glass fibre?

:)

#4 Joe-Turbo

Joe-Turbo

    Scary Internerd

  • PipPipPipPipPipPip
  • 4,176 posts
  • Gender:Male
  • Location:Rayleigh, Essex.

Posted 19 November 2007 - 05:29 AM


:rolleyes:
think of all the weight :flame: :saw: :lol: :lol:
Im sure i have some pics of my sub box out of the car if thats any help at all?
good luck with it thumbsup
edit to add : found a link to my original post with fibreglass box on work bench :-)
http://www.vx220.org...opic=16833&st=0

That's great mate, cheers Imnotworthy

But... the inevitable questions follow :rolleyes:

What size woofer did you use? it was CDT's eurosport 10", not sure if they have dimensions on there site
Where are the speaker connection terminals? do you mean the cross-overs? these where also in the boot
Is the front plate MDF, or is the whole box glass fibre? as far as i know the whole thing is fibre glass

:)


thumbsup

#5 Code Monkey

Code Monkey

    forum whore

  • PipPipPipPipPipPip
  • 2,425 posts
  • Gender:Male
  • Location:Fleet

Posted 19 November 2007 - 11:27 AM

Do you really need to make the box as large as that? My sub box is about a third of the width of the rear bulkhead, and provided all the volume i needed I chose an 8" square kicker sub same volume as a round 10" so ideal for small space applications.

#6 SteveA

SteveA

    .

  • PipPipPipPipPipPipPip
  • 9,157 posts
  • Gender:Male
  • Location:North East UK

Posted 19 November 2007 - 12:06 PM

If you are planning to use just fibre glass you will need quite a bit. Most people use mdf for the main body of the structure and fibre glass the awkward bits (curves, weird angles etc). If your only using FG, i recon you will need at least 5 layers of matting. Any less and you run the risk of the box exploding when your sub is working away. Subs create positive and negative pressures when working so will need the box to provide the rigidity to withstand these forces. Years ago I was at a sound off and saw a cabinet made from chipboard explode and destroy all three subs that were in it. The subs were REALLY powerful and getting a lot of stick but if they can break chip board (IMO stronger than fibre glass) your going to need to really over do it to avoid these issues.

Edited by SteveA, 19 November 2007 - 12:07 PM.


#7 mandarinvx

mandarinvx

    King of First Replies

  • PipPipPipPipPipPipPipPip
  • 12,621 posts
  • Gender:Male
  • Location:West Mids / Oxfordshire

Posted 19 November 2007 - 07:04 PM

Do you really need to make the box as large as that?
My sub box is about a third of the width of the rear bulkhead, and provided all the volume i needed I chose an 8" square kicker sub same volume as a round 10" so ideal for small space applications.

I was surprised when I worked out the volume of the rear shelf - I thought it would only be about a third of the size and was going to mount it centrally
When I was looking at all the subs available the very minimum sealed size recommended was 0.3 cubic feet, so still over half the back shelf! The one I've chosen has an 'ideal' volume of 0.5 cubic feet, so decided to just use the whole space :)

Edit: just seen the pic in the other thread, look great thumbsup - for some reason I decided I wanted the box flush with the bulk head, not sure why

If you are planning to use just fibre glass you will need quite a bit. Most people use mdf for the main body of the structure and fibre glass the awkward bits (curves, weird angles etc).
If your only using FG, i recon you will need at least 5 layers of matting. Any less and you run the risk of the box exploding when your sub is working away. Subs create positive and negative pressures when working so will need the box to provide the rigidity to withstand these forces.
Years ago I was at a sound off and saw a cabinet made from chipboard explode and destroy all three subs that were in it. The subs were REALLY powerful and getting a lot of stick but if they can break chip board (IMO stronger than fibre glass) your going to need to really over do it to avoid these issues.

I've read a few threads on some audio forums and they recommend around 4-5 layers - each layer (with the 450grm matt I've chosen) should come out about 2mm thick, so a total of 8-10mm, hopefully the shape of the box itself will make it inherently strong, tho I guess I'll have to wait and see :unsure:
It will certainly be a learning curve!
I have ordered a kit that comes with 5 sq meters of 450grm and 5 sq metres of surface tissue. The overall size of the area I need to cover is approx 1m x 0.5m so in theory I should have enough left over to make another (or in case I make a mess of it the first time round :D )

Edited by mandarinvx, 19 November 2007 - 07:12 PM.


#8 Code Monkey

Code Monkey

    forum whore

  • PipPipPipPipPipPip
  • 2,425 posts
  • Gender:Male
  • Location:Fleet

Posted 19 November 2007 - 10:20 PM


Do you really need to make the box as large as that?
My sub box is about a third of the width of the rear bulkhead, and provided all the volume i needed I chose an 8" square kicker sub same volume as a round 10" so ideal for small space applications.

I was surprised when I worked out the volume of the rear shelf - I thought it would only be about a third of the size and was going to mount it centrally
When I was looking at all the subs available the very minimum sealed size recommended was 0.3 cubic feet, so still over half the back shelf! The one I've chosen has an 'ideal' volume of 0.5 cubic feet, so decided to just use the whole space :)

Edit: just seen the pic in the other thread, look great thumbsup - for some reason I decided I wanted the box flush with the bulk head, not sure why


Yeah it wasn't possible with my sub due to depth meant the small dimensions i needed for the box the extra depth gained back on the width. Only thing to check is the excursion depth of the speaker does not clash with the back of the seats

#9 mandarinvx

mandarinvx

    King of First Replies

  • PipPipPipPipPipPipPipPip
  • 12,621 posts
  • Gender:Male
  • Location:West Mids / Oxfordshire

Posted 19 November 2007 - 10:34 PM

Where are the speaker connection terminals? do you mean the cross-overs? these where also in the boot

:)

Should have made that a lot clearer :D - I meant where do you connect the speaker cables to the sub itself - I think my method will invole two 'thumb screw' type connectors sticking out the front of the box :huh:
Like these:Attached File  n46aq.jpg   26.95KB   3 downloads

Yeah it wasn't possible with my sub due to depth meant the small dimensions i needed for the box the extra depth gained back on the width. Only thing to check is the excursion depth of the speaker does not clash with the back of the seats

The sub I've chosen is only 3" deep (without the surround frame) with a single voice coil
I've tried to second guess it, but won't really know if it will fit without a spacer on the front until I've finished the box and made the front board up - fingers crossed!

Edited by mandarinvx, 19 November 2007 - 10:49 PM.


#10 Joe-Turbo

Joe-Turbo

    Scary Internerd

  • PipPipPipPipPipPip
  • 4,176 posts
  • Gender:Male
  • Location:Rayleigh, Essex.

Posted 20 November 2007 - 01:03 AM

ill try to get a pic of the sub out of the enclosure, I remember it being really deep. They had trouble with it hitting the bck of the passenger seat so ended up using a spacer under the the rear of the passeger seat just to give it a bit more space :rolleyes: As you can see from the pic there are no connections at the front of my sub box, they entered from the rear (as the amps were in the boot) Unfortunatly the audio shop that did the install have now closed down but one of the guys that worked there is a member on here and im sure he will try to answer any questions ill send him a pm thumbsup

#11 SteveA

SteveA

    .

  • PipPipPipPipPipPipPip
  • 9,157 posts
  • Gender:Male
  • Location:North East UK

Posted 20 November 2007 - 12:52 PM

You might want to look at internal bracing techniques to add rigidity to the structure. You also might wanna strap it down with a bit more than velcro too. Velcro will stop it sliding about but if you have a front end crash at at decent speed the box will snap your spine. thumbsdown

#12 ORK4

ORK4

    Member

  • Pip
  • 36 posts

Posted 20 November 2007 - 05:17 PM

Hey I'm Tom from Ride On! who did Joe-Turbos install. I have answers to the following questions posted earlier.

What size woofer did you use? - It was a 10" CDT Eurosport Sub. Do you need dimensions?
Where are the speaker connection terminals? - They were run out of the back of the box with a small hole cut in the bottom to run the cable through. It was soldered in place on the sub.
Is the front plate MDF, or is the whole box glass fibre? - The front plate of the box is Birch Ply, MDF is very pourous and when you start to apply fibre glass it will expand the MDF and break. Birch Ply is more money but gives a better job.

I now have my own company doing this sort of thing. Give me a bell if you want some advice.

Cheers,
Tom
07849 415 401

#13 mandarinvx

mandarinvx

    King of First Replies

  • PipPipPipPipPipPipPipPip
  • 12,621 posts
  • Gender:Male
  • Location:West Mids / Oxfordshire

Posted 20 November 2007 - 08:41 PM

Hey I'm Tom from Ride On! who did Joe-Turbos install. I have answers to the following questions posted earlier.
What size woofer did you use? - It was a 10" CDT Eurosport Sub. Do you need dimensions?
Where are the speaker connection terminals? - They were run out of the back of the box with a small hole cut in the bottom to run the cable through. It was soldered in place on the sub.
Is the front plate MDF, or is the whole box glass fibre? - The front plate of the box is Birch Ply, MDF is very pourous and when you start to apply fibre glass it will expand the MDF and break. Birch Ply is more money but gives a better job.
I now have my own company doing this sort of thing. Give me a bell if you want some advice.
Cheers,
Tom
07849 415 401

Thanks for the reply mate :)
:beat: bought a sheet of MDF on the weekend, may have to re-think then
I have invested in a soldering iron (tho a dirt cheap jobbie :rolleyes: ) to solder in all the crimps
Am I going about things the right way :huh:

The sub arrived today:
Posted Image

It's a perfect fit :jump: 
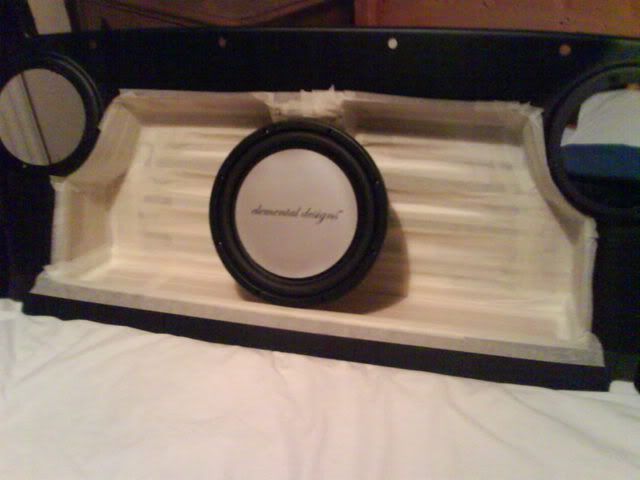
tho will still be 'snug'

Should have the fibreglass tomorrow too


What's the best way to apply it - should I do one 'layer' at a time and leave it to dry in between, or should I do all layers in one go - found a bit of info looking round the 'net, but as ever - it all seems to contradict itself :(

:)

#14 Crazyfrog (Fab)

Crazyfrog (Fab)

    Iceman

  • 22,801 posts
  • Gender:Not Telling

Posted 20 November 2007 - 08:49 PM


one layer at the time and make sure you use plenty resin with a good brush
its good fun and ps wear some gloves (mapa :P :P if you wish)

#15 Kenni

Kenni

    Super Member

  • PipPip
  • 483 posts
  • Location:Worcester

Posted 20 November 2007 - 10:55 PM

Here my sub i made. Ditched it the first day cus it rattled the undertray.

Posted Image

#16 Code Monkey

Code Monkey

    forum whore

  • PipPipPipPipPipPip
  • 2,425 posts
  • Gender:Male
  • Location:Fleet

Posted 20 November 2007 - 11:27 PM


Thanks for the reply mate :)
:beat: bought a sheet of MDF on the weekend, may have to re-think then
I have invested in a soldering iron (tho a dirt cheap jobbie :rolleyes: ) to solder in all the crimps
Am I going about things the right way :huh:


if you already have the mdf put some oil based paint on high gloss thin coat treat both sides at the same time, to prevet warping will seal the outer edge of the mdf and prevent any warping issues as described.

other option is to just get diff wood :D

#17 mandarinvx

mandarinvx

    King of First Replies

  • PipPipPipPipPipPipPipPip
  • 12,621 posts
  • Gender:Male
  • Location:West Mids / Oxfordshire

Posted 20 November 2007 - 11:36 PM

one layer at the time and make sure you use plenty resin with a good brush
its good fun and ps wear some gloves (mapa :P :P if you wish)

Cool B) , can I clean the brushes - white spirit :blink:

My main concern with doing multiple layers and letting it dry in between was that it could end up as a 'laminated' effect - ie the layers could peel apart if not bonded together :unsure: :huh:

Here my sub i made. Ditched it the first day cus it rattled the undertray.

Wow, that's a beast - no idea what rattles will be enhanced, but I have a 20m roll of double sided 1mm foam tape on hand just in case :)

if you already have the mdf put some oil based paint on high gloss thin coat treat both sides at the same time, to prevet warping will seal the outer edge of the mdf and prevent any warping issues as described.
other option is to just get diff wood :D

I have a tube of PVA, so I may try putting some around the front face thumbsup

I looked at various ply options, but the ones in BnQ (and Wickes and Focus) were all reaaly rough finish and the laminate didnt seem to be bonded together very well :wacko:

Presumably I need to leave the sides and back face so the resin will work it's way into the wood a bit to form a good seal (that's actually why I got the wood glue - in case I need a bead around the inside edge when it's all together :huh:

#18 mandarinvx

mandarinvx

    King of First Replies

  • PipPipPipPipPipPipPipPip
  • 12,621 posts
  • Gender:Male
  • Location:West Mids / Oxfordshire

Posted 21 November 2007 - 08:52 PM

Well, the fibreglass kit arrived, and I've put the first two layers on tonight

Im really really glad I didn't do this in situ whilst still in the car - it's very messy and helpful to be able to turn the panel round

Should have opened all the windows earlier on :wacko: - when they say work in a well ventilated area - they mean it :rolleyes:

Seems to have gone on very well - a quick piccie - tho doesn't look much different to the one above I guess :mellow: :

Posted Image

#19 mandarinvx

mandarinvx

    King of First Replies

  • PipPipPipPipPipPipPipPip
  • 12,621 posts
  • Gender:Male
  • Location:West Mids / Oxfordshire

Posted 26 November 2007 - 08:50 PM

Bit of progress

The box now looks very similar to the way I'd pictured it in my mind before I started buiding :D

Posted Image

Posted Image

Only two boo-boo's so far
The relief I added to the bottom of the box was no-where near enough as the speaker protrustions are at 90 degress so it cant be removed from the mould without flexing, which it couldn't do with the front plate in place. So I had to cut the bottom couple of inches off and make the base flush with the top of the front lip :rolleyes:

The speaker didn't quite have enough clearance, instead of bodge it in and risk it not sealing correctly, I added a 6mm MDF spacer plate

Now to fill in all of the gaps and get sanding!

Does anyone know if I can finely chop the matting and add it directly to the resin to make a kind of 'filler' :blink:

#20 Code Monkey

Code Monkey

    forum whore

  • PipPipPipPipPipPip
  • 2,425 posts
  • Gender:Male
  • Location:Fleet

Posted 27 November 2007 - 01:51 PM


Does anyone know if I can finely chop the matting and add it directly to the resin to make a kind of 'filler' :blink:


Is looking good there, not sure on the filler idea, I got some glass re enforced plastic padding, used that as a filler. Once set is a dark green colour but that wont have much difference once it is all trimmed.


1 user(s) are reading this topic

0 members, 1 guests, 0 anonymous users