Yup, retangular is the way forward, you will know how big when you get in there.

Fuel Pumps And Swirl Pots...
Started by
Nev
, Apr 10 2010 04:46 PM
49 replies to this topic
#21

Mike (Cliffie)
-

-

- 13,354 posts
Back in a VX
- Gender:Male
- Location:North Yorkshire
- Interests:Weaving weasels woolly hats.
Posted 12 April 2010 - 05:23 PM
#22
techieboy
-

-

- 22,914 posts
Supercharger of Doom
- Gender:Male
- Location:Bedford
Posted 12 April 2010 - 05:31 PM
I've still got the piece of metal that Vocky cut out of his car and which I subsequently used as a template on my car. As you surmised (and Cliffie confirmed) it's vaguely rectangular, although mine has nice rounded corners courtesy of the nibbler. Can stick it in the post to you, if you want?As far as I can see the current hatch bearly uncovers the edge of the pump, and with an OD of about 150 mm, the hatch would have to be at least 160X160 mm to provide access to withdraw/drop the pump body and mounting flange in and out. A rectangular cut would of course be the easiest solution.
#23
kipper
-

-
- 2,364 posts
Scary Internerd
- Gender:Male
- Location:Devon
-
Interests:Things that rotate.
Smoking various types
of fish.
Posted 12 April 2010 - 06:24 PM
I've still got the piece of metal that Vocky cut out of his car and which I subsequently used as a template on my car. As you surmised (and Cliffie confirmed) it's vaguely rectangular, although mine has nice rounded corners courtesy of the nibbler. Can stick it in the post to you, if you want?
As far as I can see the current hatch bearly uncovers the edge of the pump, and with an OD of about 150 mm, the hatch would have to be at least 160X160 mm to provide access to withdraw/drop the pump body and mounting flange in and out. A rectangular cut would of course be the easiest solution.
Thanks guys, so some careful cutting with angle grinder tonight, a nibbler would be nice, however, a thin SS cutting blade that should do the trick!
Hope my post later will not be on " How do/did you repair the wiring loom"

#24
techieboy
-
-
- 22,914 posts
Supercharger of Doom
- Gender:Male
- Location:Bedford
Posted 12 April 2010 - 06:39 PM
Definitely a case of sticking your hand in the hole first to get a handle on where the loom is. Mine was taped to the underside with gaffer tape and was a proper pain to un-stick. It's in a corrugated plastic tube, so is a bit hard to squeeze out of the way.
Be careful when the comes time to undo the quick fit connectors on the fuel pump housing. The inlet/outlet nozzles are quite fragile and are easily broken, as I found to my cost when the ProAlloy tank was fitted.
#25
kipper
-
-
- 2,364 posts
Scary Internerd
- Gender:Male
- Location:Devon
-
Interests:Things that rotate.
Smoking various types
of fish.
Posted 12 April 2010 - 07:19 PM
Definitely a case of sticking your hand in the hole first to get a handle on where the loom is. Mine was taped to the underside with gaffer tape and was a proper pain to un-stick. It's in a corrugated plastic tube, so is a bit hard to squeeze out of the way.
Be careful when the comes time to undo the quick fit connectors on the fuel pump housing. The inlet/outlet nozzles are quite fragile and are easily broken, as I found to my cost when the ProAlloy tank was fitted.
Tempered my enthusiasm to set to with the angle grinder tonight, instrad ordered a Draper air nibbler..somthing I always wanted now have a good excuse to own one

I see what you mean about the loom routing, it seems to be pretty convelouted and packed in. Got my fingers in and explored the potential routing for the cuts. Yet to figure out how they assembled the entire arrangement in the factory. Must have been easy at one stage!
How do the quick fit connectors disconnect? I guess all will be revealed on nibbling the hole.
Now to get some Rivnuts..off to E-bay!
Dave
#26
Nev
-
-
- 11,587 posts
Nipper's Minion
- Gender:Male
- Location:Bristol
- Interests:Rock climbing, skiing, kayaking, surfing, mountaineering, budgies, chess, practical mechanics.
Posted 13 April 2010 - 06:11 AM
Blimey, using an angle grinder sounds brave !
#27
cnrandall
-

-
- 943 posts
Need to get Out More
Posted 13 April 2010 - 08:05 AM
Actually, I find an angle grinder with 1mm cutting disk great for delicate work... easy to control and large disc means you can cut straight.
That aside, it's really not hard to remove the tank, it's only 4 bolts to the chassis and saves butchering the tub. Also, I've yet to see an upgraded internal pump that's a better solution than external pump and swirl pot. Trouble is, the bigger the internal pump the smaller the surrounding collector.
#28
techieboy
-
-
- 22,914 posts
Supercharger of Doom
- Gender:Male
- Location:Bedford
Posted 13 April 2010 - 08:47 AM
The solution we're fitting is physically fractionally smaller than the OE pump, so there's theoretically a few extra cc's in the OE collector/assembly. It just flows a lot more than a new OE pump, let alone a tired 10 year old pump with a partially clogged inlet filter. At circa £90 for the new pump, compared with at least £250 for the OE assembly it was a bit of no brainer for me. I'd already been through the pain of having the tank replaced with the ProAlloy version a couple of years back and there was no way I was tackling that on my driveway with a few inches of ground clearance.
Although, half way through the job, trying to get the convoluted plastic outlet pipe onto the pump housing, I was about ready to buy a straight replacement. 
Although, half way through the job, trying to get the convoluted plastic outlet pipe onto the pump housing, I was about ready to buy a straight replacement.
#29
kipper
-
-
- 2,364 posts
Scary Internerd
- Gender:Male
- Location:Devon
-
Interests:Things that rotate.
Smoking various types
of fish.
Posted 13 April 2010 - 09:34 AM
Actually, I find an angle grinder with 1mm cutting disk great for delicate work... easy to control and large disc means you can cut straight.
That aside, it's really not hard to remove the tank, it's only 4 bolts to the chassis and saves butchering the tub. Also, I've yet to see an upgraded internal pump that's a better solution than external pump and swirl pot. Trouble is, the bigger the internal pump the smaller the surrounding collector.
I agree with the thin disk sentiment for cutting the apperture. The main problem is disconnecting the fuel pump feeds through the existing circular inspection plate. If you just drop the tank it appears that the feul lines will stop the tank from dropping as they pass horizontally through the fire wall to the rear of the tank.
#30
Mike (Cliffie)
-
-
- 13,354 posts
Back in a VX
- Gender:Male
- Location:North Yorkshire
- Interests:Weaving weasels woolly hats.
Posted 13 April 2010 - 09:47 AM
Actually, I find an angle grinder with 1mm cutting disk great for delicate work... easy to control and large disc means you can cut straight.
That aside, it's really not hard to remove the tank, it's only 4 bolts to the chassis and saves butchering the tub. Also, I've yet to see an upgraded internal pump that's a better solution than external pump and swirl pot. Trouble is, the bigger the internal pump the smaller the surrounding collector.
Here's one...
[attachment=21995:walbro-fuel-pump.gif]
Edited by Cliffie, 13 April 2010 - 10:05 AM.
#31
techieboy
-
-
- 22,914 posts
Supercharger of Doom
- Gender:Male
- Location:Bedford
Posted 13 April 2010 - 09:56 AM
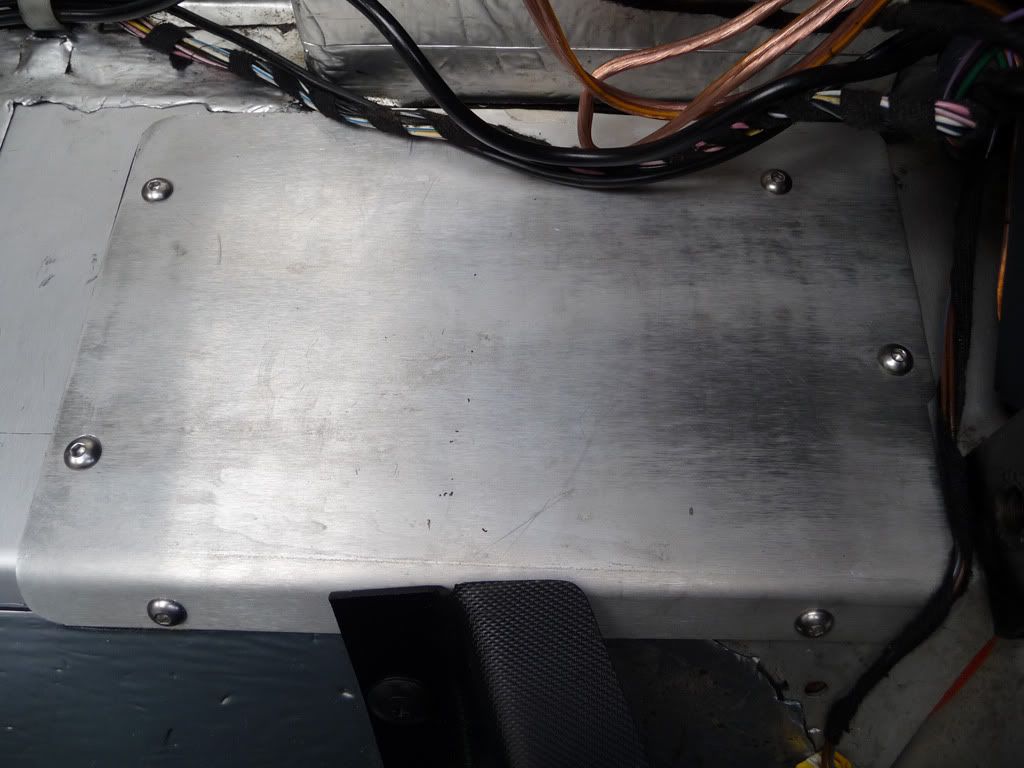
Thought I'd taken some pictures at the time. First one is of the new hole in it's raw state before I broke out the file to neaten up the edges. And the second one with the new cover in place. The two rivnuts on the right of the picture (on the horizontal surface) are the original access hatch fixings.

#32
The Batman
-

-

- 30,267 posts
Super Moderator
- Gender:Male
- Location:FLD mum's bed
Posted 13 April 2010 - 09:58 AM
it has indeed been attacked by a nibbler!
#33
kipper
-
-
- 2,364 posts
Scary Internerd
- Gender:Male
- Location:Devon
-
Interests:Things that rotate.
Smoking various types
of fish.
Posted 13 April 2010 - 10:46 AM
Thought I'd taken some pictures at the time. First one is of the new hole in it's raw state before I broke out the file to neaten up the edges. And the second one with the new cover in place. The two rivnuts on the right of the picture (on the horizontal surface) are the original access hatch fixings.
Thanks Techie,
Give a better picture as to the lay out beneath the inspection cover. Nice, neat, final job. Just a couple of questions what happened to the loom that came through the original round inspection cover? Seems to have disappeared!
Still cannot work out how to disconnect the fuel fittings from the pump. The black slide over clips have a square depressing button on them. I assume that when depressed the coupling just slides off. Have tried with a fair bit of effort but they dont seem to want to budge.
cheers
Dave
#34
techieboy
-
-
- 22,914 posts
Supercharger of Doom
- Gender:Male
- Location:Bedford
Posted 13 April 2010 - 10:58 AM
There wasn't anything that came through the original cover on my car. Just the main loom to the engine bay and the fuel pump loom that remained within the void, underneath the cover. And various other wires that live underneath the rear parcel shelf trim (I've got a couple more there as my oil pressure and temp gauge looms come through the grommet, just to the right of the access hatch.Just a couple of questions what happened to the loom that came through the original round inspection cover? Seems to have disappeared!
Still cannot work out how to disconnect the fuel fittings from the pump. The black slide over clips have a square depressing button on them. I assume that when depressed the coupling just slides off. Have tried with a fair bit of effort but they dont seem to want to budge.
Yep, the quick connect connectors aren't a huge amount of fun. The low pressure return fitting was much easier to undo than the high pressure outlet. It's just a case of persevering with pressing down the clear and blue (on the return) inner sections and trying to pull it off the nozzles. Unfortunately, there are two tabs on each connector (180 degrees apart) that need to be depressed at the same time. They were much easier to access on the return feed than on the outlet. The fuel lines have a bit of give in them but don't be too brutal as they will kink.
#35
slindborg
-
-
- 22,602 posts
The Bishop of Stortford
- Gender:Not Telling
- Location:.
Posted 13 April 2010 - 11:02 AM
dont know how much space is there, but you can buy properly designed pliers for seperating quick connect hoses 
#36
techieboy
-
-
- 22,914 posts
Supercharger of Doom
- Gender:Male
- Location:Bedford
Posted 13 April 2010 - 11:06 AM
I know, I had to convince myself not to buy one. It just wouldn't have fitted on my car, as there'd never have been the room to access the little securing tab which was on the underside of the connector. Fecking Norfolk Farmers having a laugh again.
#37
kipper
-
-
- 2,364 posts
Scary Internerd
- Gender:Male
- Location:Devon
-
Interests:Things that rotate.
Smoking various types
of fish.
Posted 13 April 2010 - 11:43 AM
There wasn't anything that came through the original cover on my car. Just the main loom to the engine bay and the fuel pump loom that remained within the void, underneath the cover. And various other wires that live underneath the rear parcel shelf trim (I've got a couple more there as my oil pressure and temp gauge looms come through the grommet, just to the right of the access hatch.
Just a couple of questions what happened to the loom that came through the original round inspection cover? Seems to have disappeared!
Still cannot work out how to disconnect the fuel fittings from the pump. The black slide over clips have a square depressing button on them. I assume that when depressed the coupling just slides off. Have tried with a fair bit of effort but they dont seem to want to budge.
Yep, the quick connect connectors aren't a huge amount of fun. The low pressure return fitting was much easier to undo than the high pressure outlet. It's just a case of persevering with pressing down the clear and blue (on the return) inner sections and trying to pull it off the nozzles. Unfortunately, there are two tabs on each connector (180 degrees apart) that need to be depressed at the same time. They were much easier to access on the return feed than on the outlet. The fuel lines have a bit of give in them but don't be too brutal as they will kink.
Mine being a Tubby, there might be some difference, there's wiring for the seat belt device, speakers, ultrasonic alarm, and areial, passing through a large grommet in the inspection cover. Going to have to make a semi circular cutout both in the cover plate and tub to close on the grommet.
It was a bit too simple just to depress one part of the quick or not so quick connector, expecting it to release. Those Norfolk farmers must have very long, thin and tactile fingers to work in such confined spaces..wasted on the farm

#38
kipper
-
-
- 2,364 posts
Scary Internerd
- Gender:Male
- Location:Devon
-
Interests:Things that rotate.
Smoking various types
of fish.
Posted 13 April 2010 - 11:47 AM
dont know how much space is there, but you can buy properly designed pliers for seperating quick connect hoses
There seem to be so many different types of connector securing devices on our cars, you would be overwhelmed with specialist tools.
It seem to me that when ever the parts bin runs empty..just get in something simmilar but not the same

#39
techieboy
-
-
- 22,914 posts
Supercharger of Doom
- Gender:Male
- Location:Bedford
Posted 13 April 2010 - 11:52 AM
How strange. All of those cables in mine are internal to the car and not within the void. The wiring grommet goes through the bulkhead to the engine bay just to the rear of the seatbelt reel.Mine being a Tubby, there might be some difference, there's wiring for the seat belt device, speakers, ultrasonic alarm, and areial, passing through a large grommet in the inspection cover. Going to have to make a semi circular cutout both in the cover plate and tub to close on the grommet.
This might show the quickfit connectors a little better

#40
Nev
-
-
- 11,587 posts
Nipper's Minion
- Gender:Male
- Location:Bristol
- Interests:Rock climbing, skiing, kayaking, surfing, mountaineering, budgies, chess, practical mechanics.
Posted 13 April 2010 - 12:10 PM
Wow, excelent thread this. Thanks for the piccies Techie. I will attempt this once I am healed from my skiing accident. Will palce an order for the replacement pump (assuming it can provide upto 500 BHP's worth of fuel).
One question though, do you need a different hand tool to insert rivnuts (as opposed to a normal hand riveter) ?
Edited by Nev, 13 April 2010 - 12:34 PM.


1 user(s) are reading this topic
0 members, 1 guests, 0 anonymous users

