
Think nev was asking about the cv joints themselves rather than the rubber boot? I wondered this myself especially when high power conversions are putting lots of torque through them?Nev, the rubber perishes as it ages so it's mainly age dependant rather than milage, however both stress the boot. To give you an idea, mine has just failed (and been replaced with a Kia Sedonia one) and it's 12 years old and done 86k.How often do the CV joints wear out? Does anyone know of one doing so please?

*How To* Passenger Side Inner Cv Boot Replace
Started by
slindborg
, Sep 06 2010 09:11 AM
50 replies to this topic
#21

Steve.i.am
-

-

- 990 posts
Need to get Out More
- Gender:Male
- Location:Sussex
- Interests:Bends
Posted 09 October 2013 - 08:39 PM
#22
fezzasus
-
-
- 7,689 posts
Whipping Boy
- Gender:Male
- Location:Oxford
Posted 09 October 2013 - 08:40 PM
I inspected mine before I put the boot back on, no sign of wear at all.Think nev was asking about the cv joints themselves rather than the rubber boot? I wondered this myself especially when high power conversions are putting lots of torque through them?Nev, the rubber perishes as it ages so it's mainly age dependant rather than milage, however both stress the boot. To give you an idea, mine has just failed (and been replaced with a Kia Sedonia one) and it's 12 years old and done 86k.How often do the CV joints wear out? Does anyone know of one doing so please?
#23
Silent Steve
-

-

- 2,000 posts
Tit
- Gender:Male
- Location:Essex
Posted 10 October 2013 - 06:12 PM
Took a few pics to compliment Stuart's post:
No pics, just words... someone else can clean up even 5 mins and take pics
I just wanted to get the job done.
Parts needed
GM inner CV boot kit (contains boot, clips/springs and grease)
The CV boot straps that have holes in rather than the smooth ones included in the kit.
Tools needed
What ever you use to take the undertray off with.
Ball joint seperator (either fork/hammering type or the posh one with the bolt to lever open)
'external' circlip pliers
smallish flat blade screwdriver
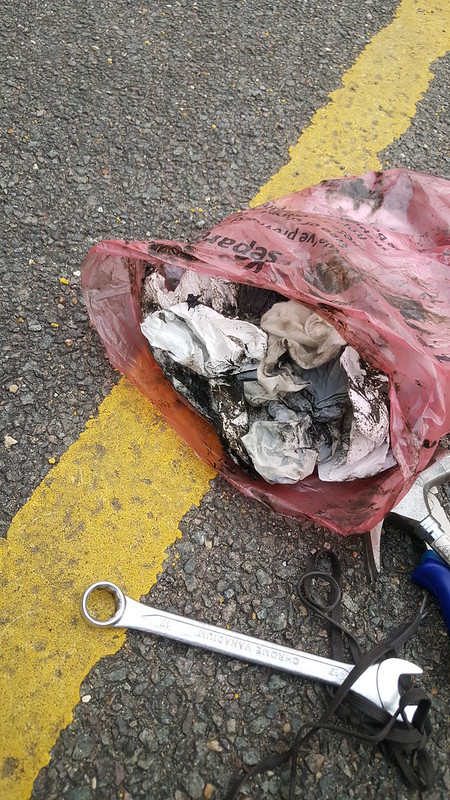
rag/paper towel, LOTS AND LOTS of it!!!!!
10mm socket/spanner
17mm socket/spanner for brake caliper
19mm Open/Ring spanner (sorry ratchet wont fit)
15mm (I think) open ended spanner for the outer toe link joint
N/A
12mm socket(I think, could have been 13mm) for toe link nut
tubby
19mm (possibly) socket for toe link nut
5mm allen key
6mm allen key
Sharp knifepliers
Side cutters, and or nail pincers (wood working stylee)
Hammer! (always needed
I shall forego the jacking/ taking wheel off, but add, this time I wussed out and put axel stands under the pax side as there was a lot of hammering/pulling going on prior to realising exactly how to do it.
Remove the 'middle' undertray, although we did it with the full tray out.
Car in gear! Handbrake off!
With the wheel off
Take the handbrake cable out of the caliper, undo the nut on the P clip that holds the cable on the wishbone. Undo the bolt holding the brake fluid pipe on the other side of the wishbone.
Undo the 17mm bolt holding the top of the caliper in place.
drift the pin holding the pads in, out.
remove the front pad and rotate the caliper to remove the rear pad, undo the lower bolt with the 6mm allen key, place the caliper on the floor or anywhere with NO strain on the hose.
undo the 5mm locating screw on the disc.
take disc off (might need a hammering if its been on a long time)
There is no need at all to ...... Take the damper out, two bolts, 15mm nut and 17mm bolt..
undo the upper and lower ball join nuts, split the upper and lower joints but leave on the studs to hold while you remove the toe link from the knuckle (you will probably need to slip a spanner in under the knuckle to stop it spinning while undoing).
Now for the messy bit
slice the inner CV boot away from the shaft, remove as much (all) of the boot as possible start removing the old grease to make life easier (this stuff sticks like cat shoite so be careful).
With the wishbones lifted up the insides of the joint should plunge towards the gearbox, jack or helper to hold the assembly up while you gently prize out a clip from a groove about 5mm from the outer edge of the "cup" of the CV joint.
With that removed, lower the wishbones/take the hub off the balljoint studs and slide it all out, catch and ball bearings that fall.
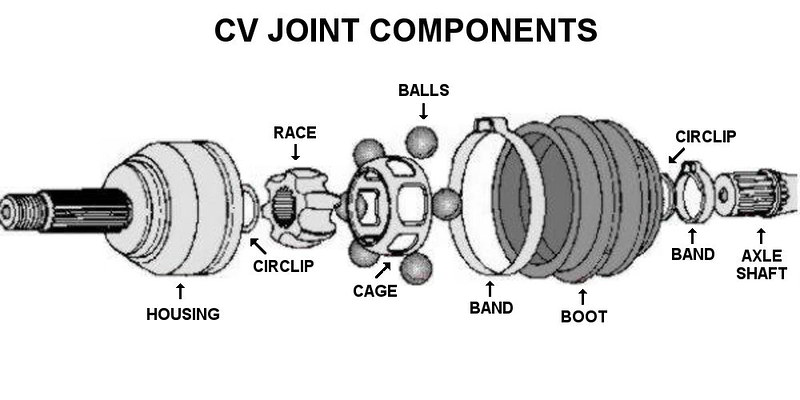
You will now have a messy end of a shaft with a 'cage' 6 large ball bearings and an inner 6 toothed 'gear' (for want of a better term).

Clean up the balls and place to one side
The cage will drop down the shaft so expect that
There is a circlip on the end of the shaft, remove this.
Remove the 'gear' from the shaft. Clean everything up, remove the cage too.
Clean the old grease from the cup thats left in the gearbox.

Slide the CV joint clip onto the shaft, slide the CV boot (with a LITTLE) grease in it down the shaft (small end first).
Slide the cage onto the shaft (I did a few checks and it looks like its NOT directional), refit the 'gear' to the shaft (note that there is a 3-5mm Smooth section inside the gears splines, this goes to the bottom of the shaft).
Fit the NEW circlip to the shaft to hold the 'gear' in place.
Grease time.
Apply grease to all faces of the 'gear', slip the cage up and get it lined up so that you can fit the bearings, 'glue' the bearings into the holes in the cage/'gear'. Apply grease to the 6 grooves in the cup (on the car), apply grease all over the cage/bearings (careful not to let any fall out).
Place the larger CV boot clip over the cup.
Gently slip the freshly greased innards into the cup, get a helper (or jack) to hold the knuckle/hub side while you fit a NEW clip into the groove in the cup to retain the joint.
Place the knuckle onto the ball joint studs again.
Do the CV clips up firm/tightly.
Slotted strap method.
Get as much tension on the strap as possible, even use the old large spring clip to wiggle through the 'teeth' into the next set of holes and lever along. use side cutters or preferably nail pincers crimp up the small part of the strap thats raised. (even better use the right tool
Do this to the little and large ones.
Refit the wishbone nuts + spacer washer for lower one.
Refit the toe linke joint + relevant spacers etc.
Refit brake disc
Refit caliper + pads
Refit handbrake cable
Refit the P clips
Refit Wheel
Refit undertray
DONE
Any glaring mistakes etc then shout.


#24
slindborg
-
-
- 22,602 posts
The Bishop of Stortford
- Gender:Not Telling
- Location:.
Posted 11 October 2013 - 11:30 AM
Think nev was asking about the cv joints themselves rather than the rubber boot? I wondered this myself especially when high power conversions are putting lots of torque through them?
Nev, the rubber perishes as it ages so it's mainly age dependant rather than milage, however both stress the boot. To give you an idea, mine has just failed (and been replaced with a Kia Sedonia one) and it's 12 years old and done 86k.How often do the CV joints wear out? Does anyone know of one doing so please?
given the fairly 'easy' life the actual joint gets, I wouldnt be worried about killing the mechanical part of it.
Consider in a FWD vehicle that the joint gets suspension movement AND steering movement coupled with handling torque.
Chances are you could get away with a normal UJ shaft on the VX 
#25
Stevie Dubyah
-

-
- 1,534 posts
Billy No Mates
- Gender:Male
- Location:South East
- Interests:Invasive Operations
Posted 07 November 2014 - 03:20 PM
Haggi tells me that the OEM Kia Part Number for the boot is [color=rgb(40,40,40);font-family:helvetica, arial, sans-serif;]KIA: 0K552-22-540[/color]
[color=rgb(40,40,40);font-family:helvetica, arial, sans-serif;]Just for future reference....[/color]
#26
Andrew aka Stuwy
-

-
- 8,731 posts
Made In England
- Gender:Not Telling
- Location:At Sea
- Interests:most things are intersting
Posted 02 March 2015 - 02:50 PM
fcuk that too messy to do on a drive in Feb...
que call to BOT
#27
slindborg
-
-
- 22,602 posts
The Bishop of Stortford
- Gender:Not Telling
- Location:.
Posted 02 March 2015 - 04:14 PM
fanny 
#28
gaffer1986
-
-
- 4,408 posts
Scary Internerd
- Gender:Male
- Location:Colchester
Posted 01 August 2016 - 09:00 AM
Here is a link to a post containing more information to replacing the CV boot.
http://www.vx220.org...int-boot/page-5
#29
gaffer1986
-
-
- 4,408 posts
Scary Internerd
- Gender:Male
- Location:Colchester
Posted 01 August 2016 - 09:07 AM
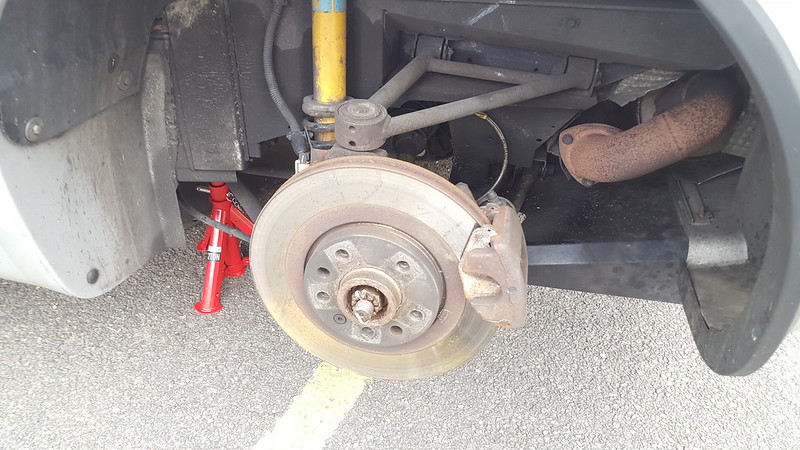
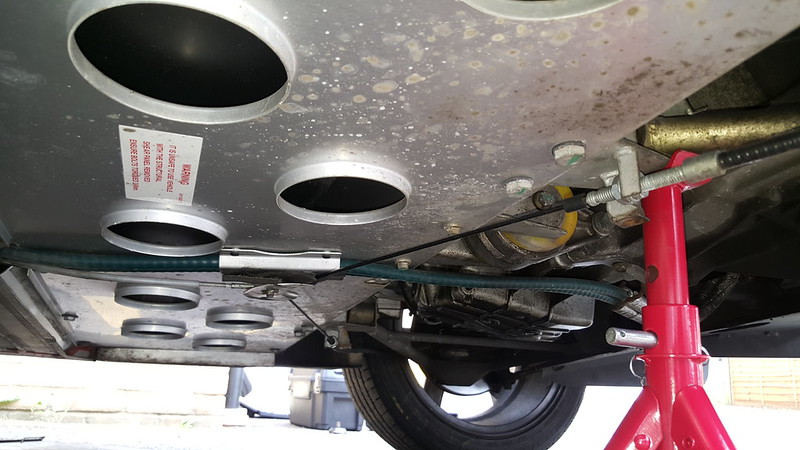
Good axle stand point:
 20160730_143758 by Richard Fanders, on Flickr
With car jacked up and supported remove handbrake cable:
 20160730_143742 by Richard Fanders, on Flickr
 20160730_144551 by Richard Fanders, on Flickr
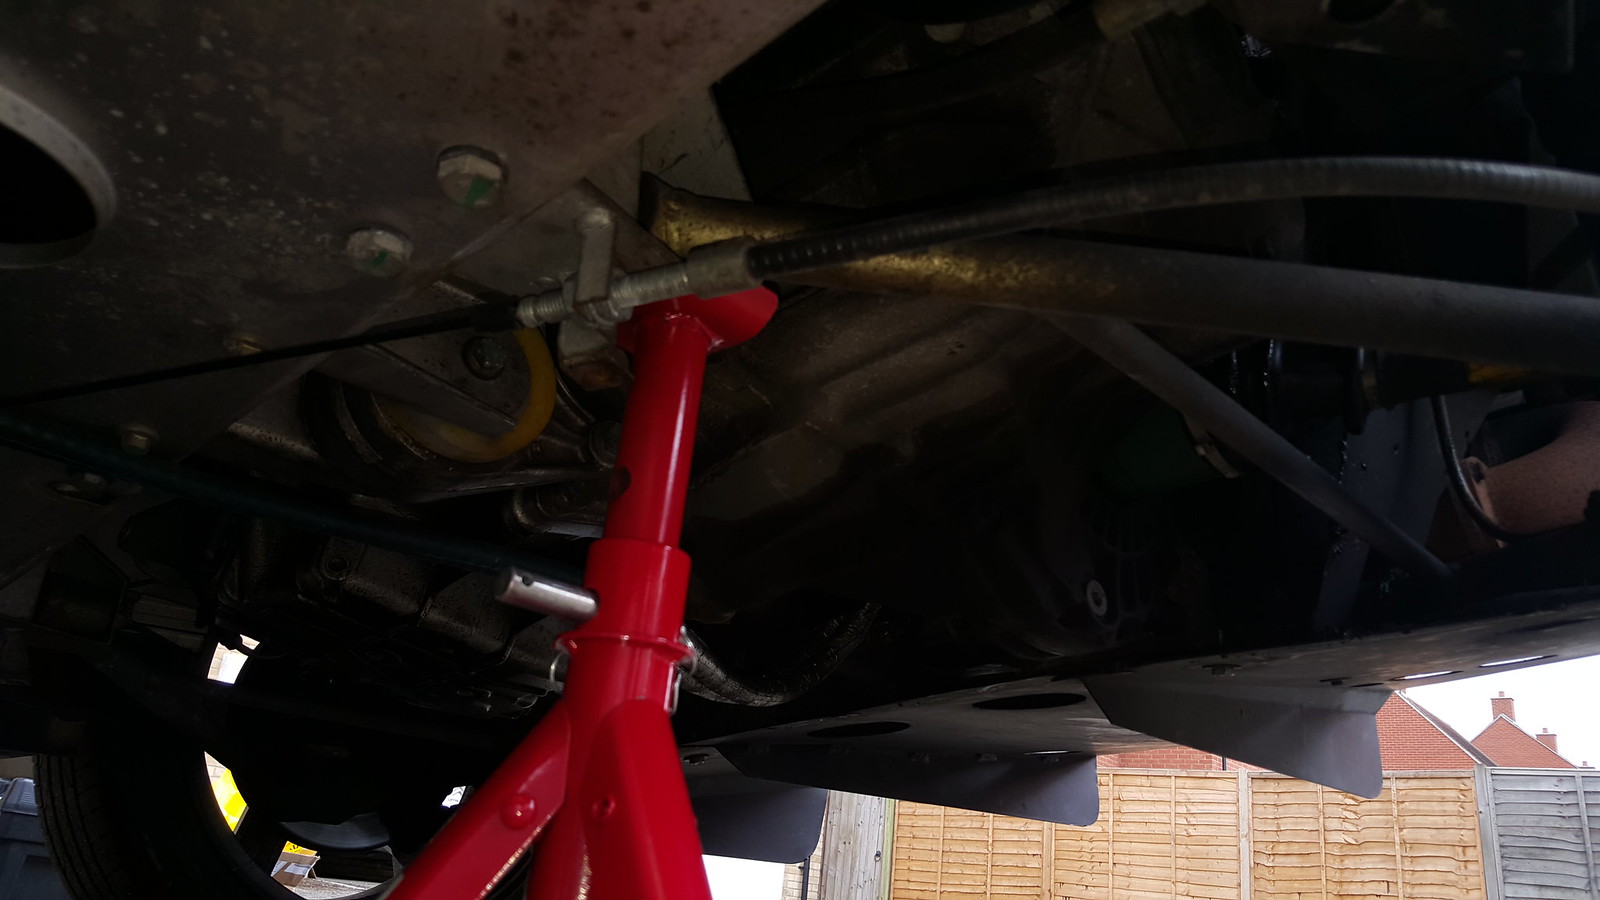
You may need to loses the 17mm nuts on the handbrake cable near the red axle stand in this photo to loosen the handbrake cable:
 20160730_143807 by Richard Fanders, on Flickr
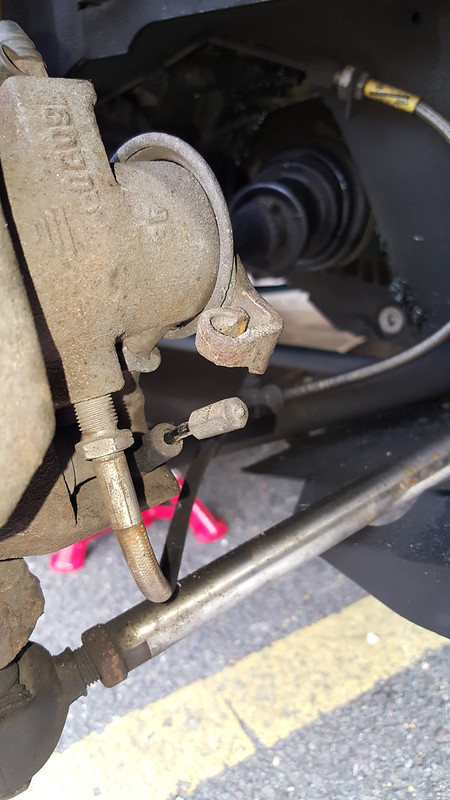
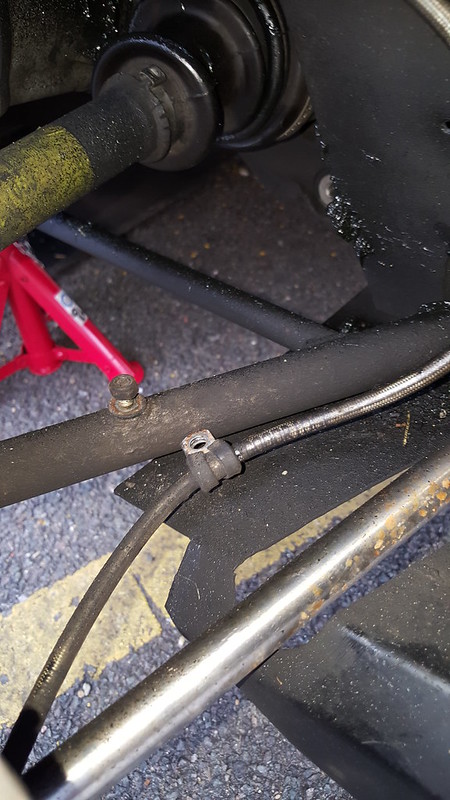
Remove handbrake p clamp and move handbrake cable out of the way:
 20160730_144558 by Richard Fanders, on Flickr
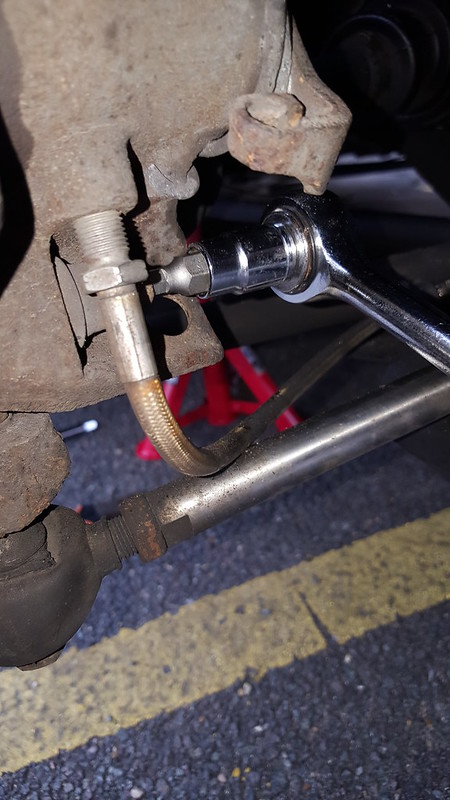
Also remove brake hose p clamp:
 20160730_152841 by Richard Fanders, on Flickr
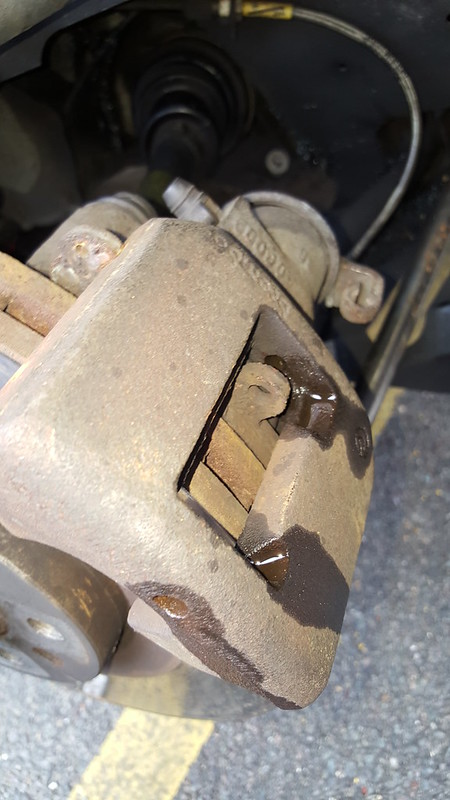
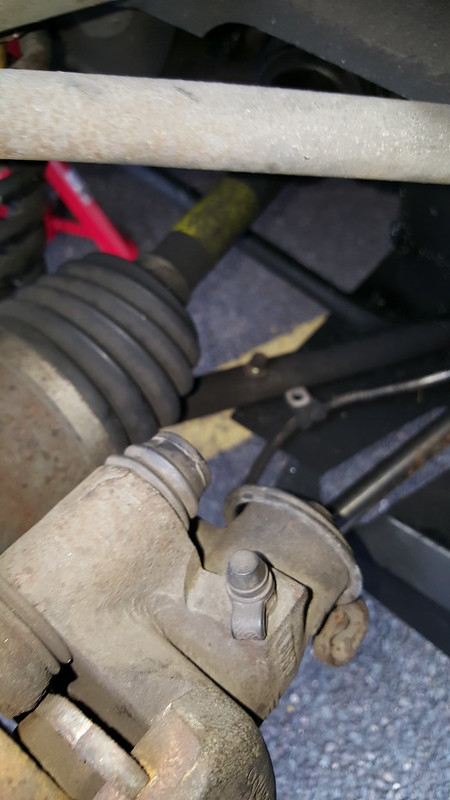
Take pin and clip out of the caliper:
 20160730_152844 by Richard Fanders, on Flickr
#30
gaffer1986
-
-
- 4,408 posts
Scary Internerd
- Gender:Male
- Location:Colchester
Posted 01 August 2016 - 09:11 AM
Remove top caliper bolt, remove front brake pad, pull back on slider, push forward on caliper and pivot the caliper away from the disc and remove rear caliper. Then undo bottom 6mm hex bolt for the caliper, this will allow you to take the caliper off and put it somewhere with out straining the brake hose:
 20160730_152848 by Richard Fanders, on Flickr
 20160730_155630 by Richard Fanders, on Flickr
Undo disc retaining screw to remove disc, as slindborg says, you may need to wack it with a rubber hammer:
 IMG-20160730-WA0000 by Richard Fanders, on Flickr
#31
gaffer1986
-
-
- 4,408 posts
Scary Internerd
- Gender:Male
- Location:Colchester
Posted 01 August 2016 - 09:12 AM
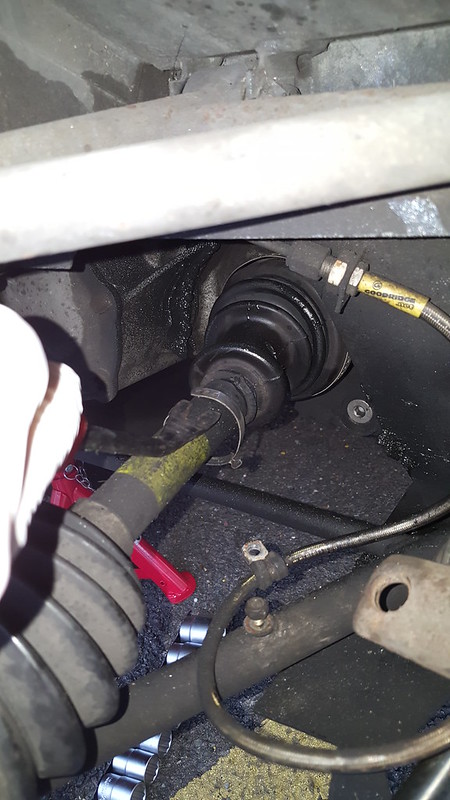
Undo toe link, good time to check condition of your toe link stud or bolt:
 20160730_160447 by Richard Fanders, on Flickr
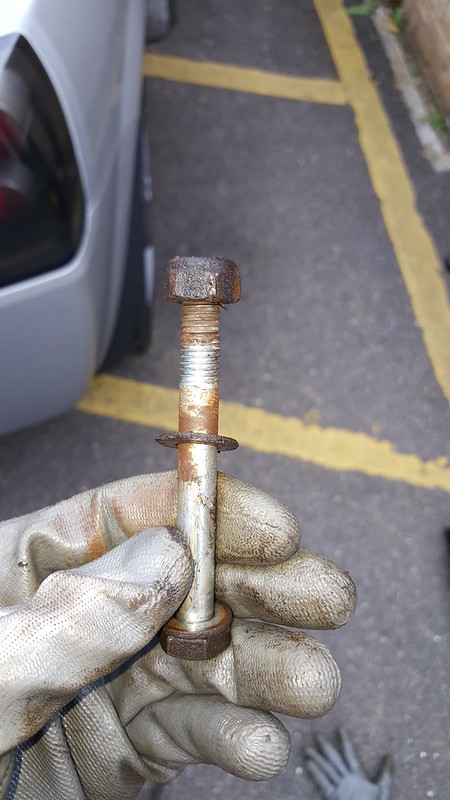 20160730_160559 by Richard Fanders, on Flickr
#32
gaffer1986
-
-
- 4,408 posts
Scary Internerd
- Gender:Male
- Location:Colchester
Posted 01 August 2016 - 09:15 AM
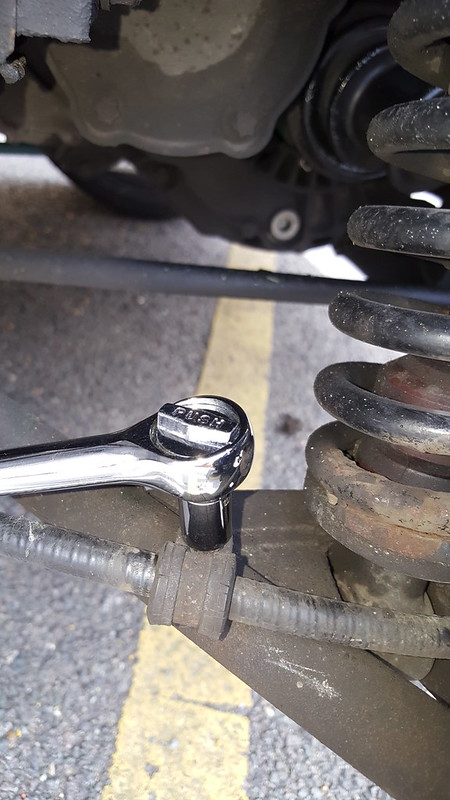
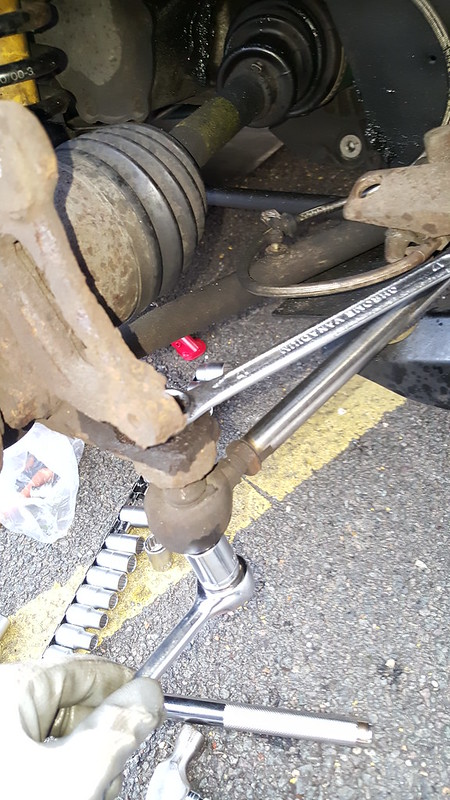
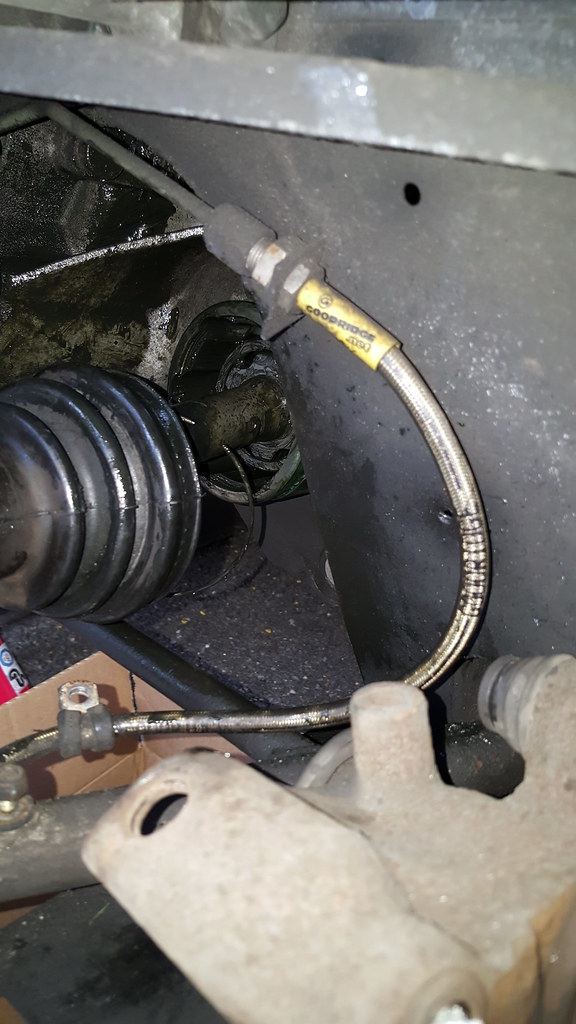
I was unable to get enough swivel on the hub to remove the drive shaft with only the toe link removed, so I had to remove the lower ball joint as per these photos:
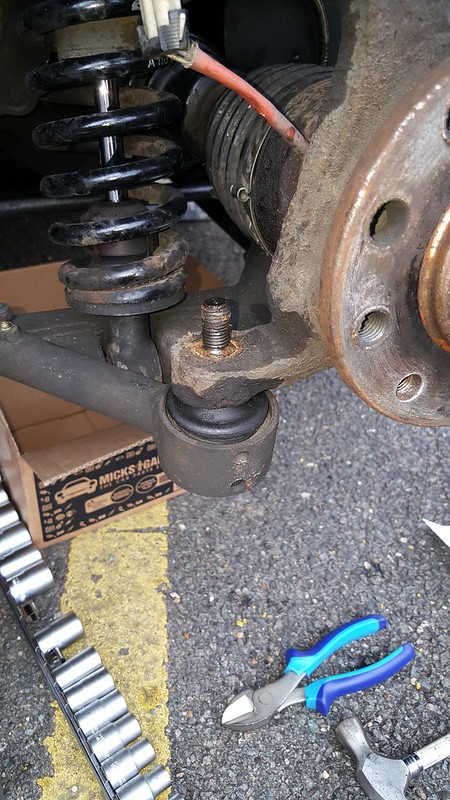 20160730_163905 by Richard Fanders, on Flickr
Bang on this tool with a hammer:
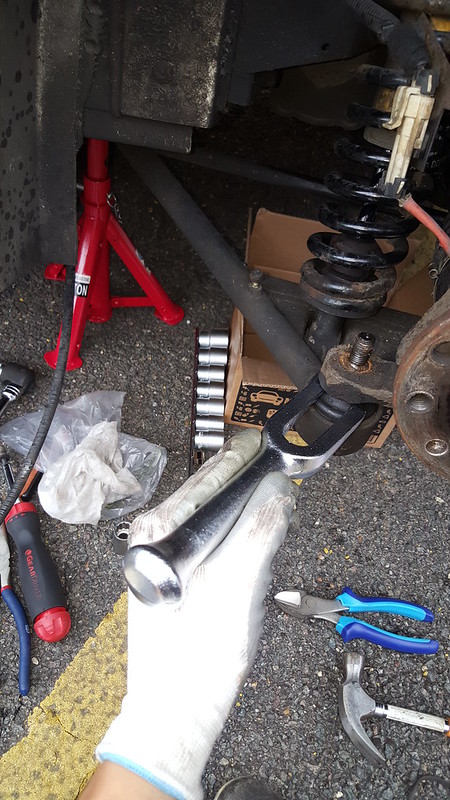 20160730_163930 by Richard Fanders, on Flickr
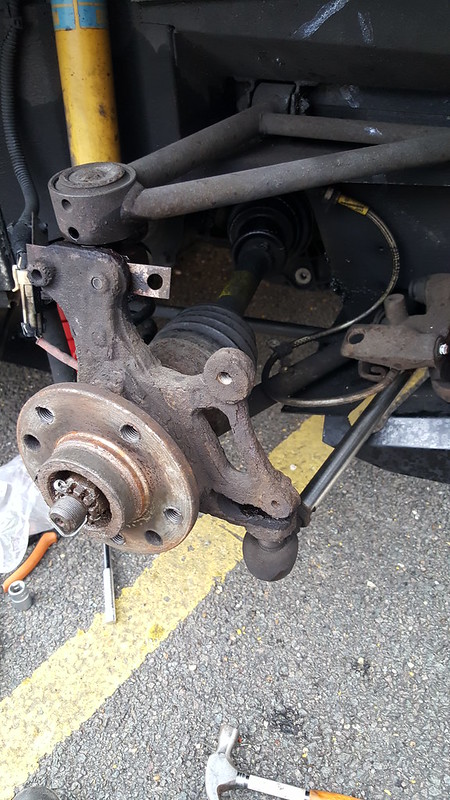
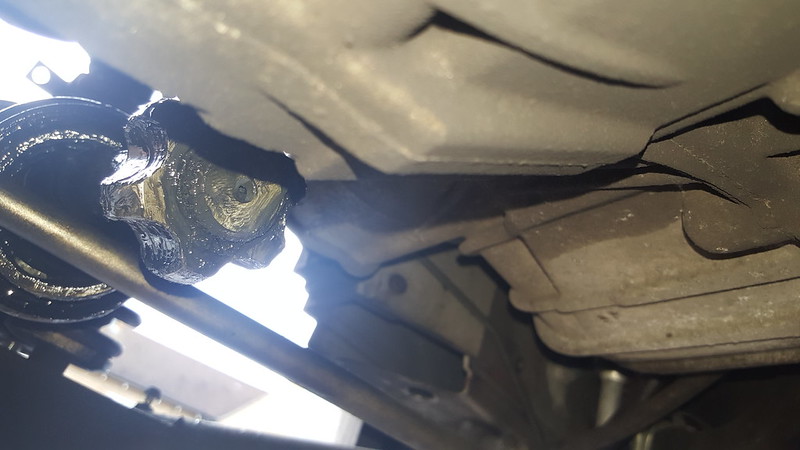
Now you can lift the hub off the ball joint and will have enough room to remove the drive shaft from the CV "housing". You will leave the CV housing connected to the diff so no oil spillage:
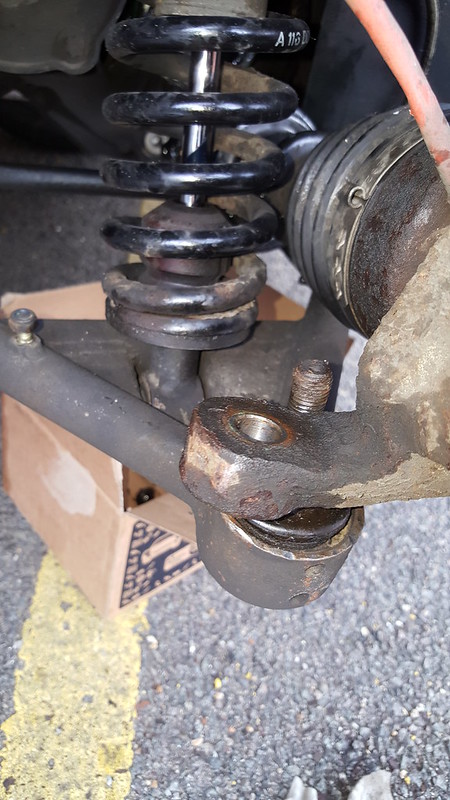 20160730_165911 by Richard Fanders, on Flickr
#33
gaffer1986
-
-
- 4,408 posts
Scary Internerd
- Gender:Male
- Location:Colchester
Posted 01 August 2016 - 09:17 AM
Off to work, more to come soon.
#34
gaffer1986
-
-
- 4,408 posts
Scary Internerd
- Gender:Male
- Location:Colchester
Posted 01 August 2016 - 12:19 PM
No you can take the boot straps off, pull the boot back so that it is clear of the CV joint, clean as much of the grease off as possible and removing the ball bearing retainer clip which is just inside the CV housing, this is quite small to find but easy to remove once you find it.
 20160730_161314 by Richard Fanders, on Flickr
In this photo you can see the clip dangling after I've removed it:
 20160730_163134 by Richard Fanders, on Flickr
Back to work again. Will post more soon.
Edited by gaffer1986, 01 August 2016 - 12:20 PM.
#35
gaffer1986
-
-
- 4,408 posts
Scary Internerd
- Gender:Male
- Location:Colchester
Posted 02 August 2016 - 04:27 PM
Pull the drive shaft out of the CV housing catching the 6 large balls.
 20160730_170107 by Richard Fanders, on Flickr
Take the circlip off the end of the drive shaft using circlip pliers, then the CV joint "race" will slide off the drive shaft. Then you can slide the cage off the drive shaft making note of it's orientation for re-installation.
 20160730_170743 by Richard Fanders, on Flickr
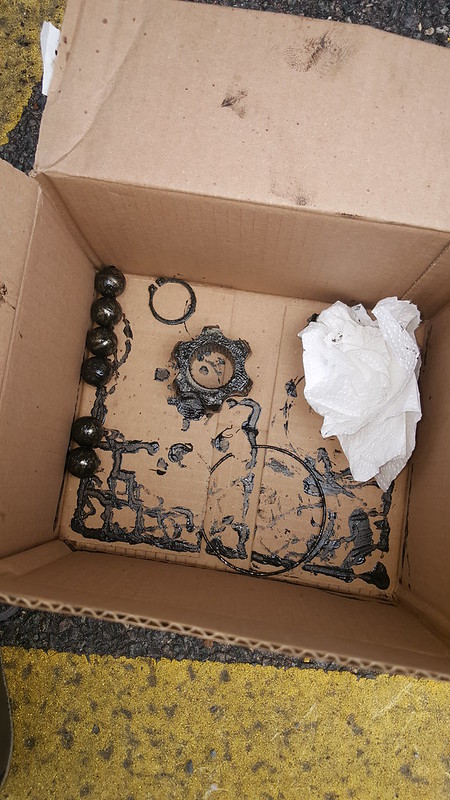 20160730_171205 by Richard Fanders, on Flickr
 cv_joint by Richard Fanders, on Flickr
#36
gaffer1986
-
-
- 4,408 posts
Scary Internerd
- Gender:Male
- Location:Colchester
Posted 02 August 2016 - 04:28 PM
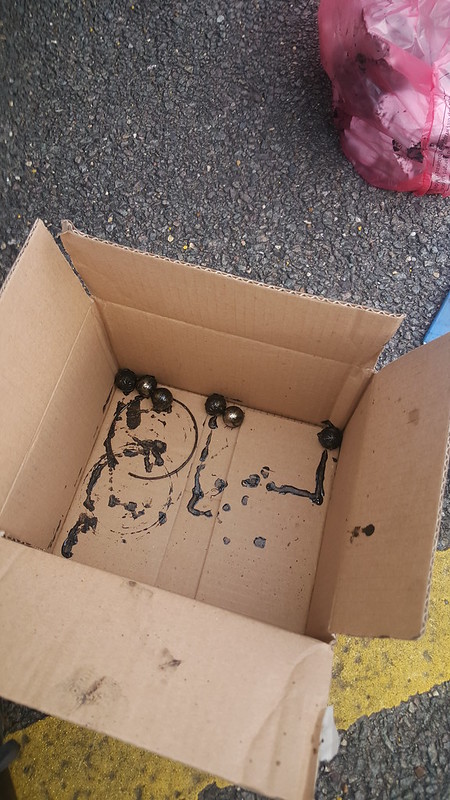
Slide the old boot off, slide the new boot on with the clips loosely attached.
The clean the balls, cage, race and circlips.
 IMG-20160730-WA0002 by Richard Fanders, on Flickr
#37
gaffer1986
-
-
- 4,408 posts
Scary Internerd
- Gender:Male
- Location:Colchester
Posted 02 August 2016 - 04:32 PM
Then re-install is reverse to dismantling.
Make sure the race circlip is properly seated and the race goes as far as it can on the shaft, you will feel a click when it's in place.
Use plenty of grease on the balls, if you use enough grease the balls will stay in the cage without falling out giving you a chance to push the assembly back into the CV housing. Then add more grease inside the CV housing.
A total of around 150 grams of grease should be used.
Make sure you remember to re-install the circlips before the boot goes back on. Slindborg did recommend replacing the circlips but as I didn't have any new ones I used the old but it may be a good idea to get new if you if you can.
Edited by gaffer1986, 02 August 2016 - 04:34 PM.
#38
gaffer1986
-
-
- 4,408 posts
Scary Internerd
- Gender:Male
- Location:Colchester
Posted 02 August 2016 - 04:35 PM
Push boot back on the the CV housing making sure both side of the boot are in their grooves and tighten the CV band with the special tool. I used hose pliers.
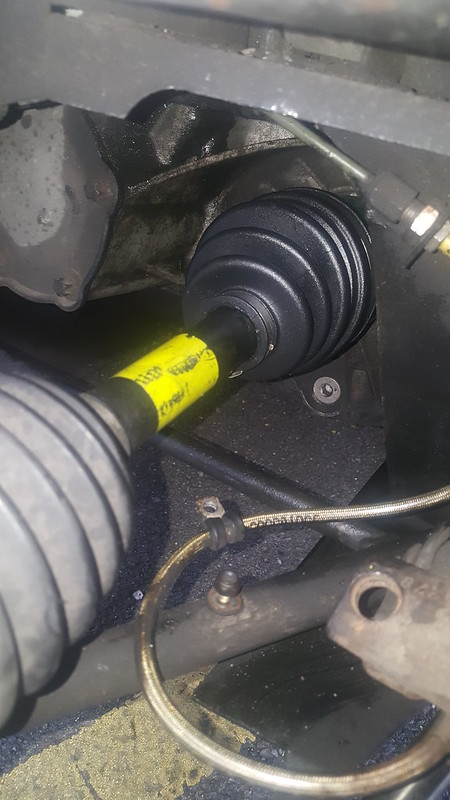 20160730_183216 by Richard Fanders, on Flickr
#39
gaffer1986
-
-
- 4,408 posts
Scary Internerd
- Gender:Male
- Location:Colchester
Posted 02 August 2016 - 04:36 PM
Clean up the rest of the grease and put the car back together.
#40
swast4
-
-
- 416 posts
Super Member
- Gender:Male
- Location:Heswall, UK
- Interests:Trackdays
Posted 20 June 2018 - 04:59 AM
Great write up here guys, thanks.
Had first track day on Monday and this boot had split.
Is there any other gear that can be used to help deal with the heat better for use with a high powered track vx or should the stiff in the kit surfice?
Adam
Sent from my LG-H815 using Tapatalk
Had first track day on Monday and this boot had split.
Is there any other gear that can be used to help deal with the heat better for use with a high powered track vx or should the stiff in the kit surfice?
Adam
Sent from my LG-H815 using Tapatalk


1 user(s) are reading this topic
0 members, 1 guests, 0 anonymous users

