Jump to content


Photo

£200 Chargecooler Build


  • Please log in to reply
82 replies to this topic

#1 JohnTurbo

JohnTurbo

    SuperScruff

  • PipPipPipPipPipPip
  • 3,635 posts
  • Gender:Male
  • Location:wigan
  • Interests:Performance cars!

Posted 27 March 2012 - 10:14 PM

Ok so I'm a firm believer in spending less and making my life much much more difficult as a result. For this reason I have:-

-Astra front wheels with 2nd hand A048's fitted instead of buying TDs
-Home-made decat instead of a 100cell sports cat
-2ND hand ECU from a writeoff instead of paying for a CS remap
-Other basically good value stuff, such as GGPros from Mr Cliffie, and his old Hi-Spec four pots. - In fact the GGPros are the only new tuning item I have fitted thus far.

So in a similar vane to this thread:-

http://www.vx220.org...-charge-cooler/

(Which shows charge cooler best practice, in terms of product quality, fitting care and thorough write-up)

Here is the 1st installment of my *alternative* approach - in all areas.

1) Find random chargecooler parts on ebay, e-mail the seller demanding to know sizes - whilst not having done any research to find the correct sizes.
- Get response in 'inches' - try and convert this into metric. Realize you still don't know how much space you have even in metric.

2) Measure the space for heat exchanger to be about 2 palms vertically and 1 palm square in the other dimensions by stuffing your hand behind partially secured wheelarch liner.
- Think about radiator, remember its held in with rusty bolts, decide to take a swag at the available space for an easy life.

Go for it - buy the random parts on ebay. - Then persuade the seller to get a mate to lug them up the M6 in a HGV. Meet him in a motorway services at night so that you look like you are doing an elicit drug deal. Try and give him money for his help, then watch him take a p*ss on the HGV of another sleeping trucker.

Posted Image

3) Measure water outlet sizes and guess that you need 3/4" pipe. Fail to find an easy local source. Seriously underestimate the required amount to be roughly 5metres. Buy nylon air hose from a pneumatics shop.

Realise your mistake. Buy 3m 100bar hydraulic hose from Pirtek. Later you will realize you still don't have enough, and buy 3 more metres of pneumatic hose. Buy hoseclips, a holesaw you don't have a mandrel for, a hacksaw with only one blade which you brake immediately and some coolant.

4) Get a willing, yet totally unsuspecting mate to help. Ply him with a breakfast barbeque.
Take clam off, and rad surround. You don't need me to tell you about this. Obviously its easy as bolts never stick, and captive nuts don't know what spinning is.

Posted Image


5) Acknowledge that the pre-rad seems to be a suitable size by laying it over the radiator, but that you have no way of holding it in place, especially since it fouls the fan. Drill the fan off and try again.

Posted Image

6) Screw the fan to the crashbox using a mix of old and new brackets. Use tiny screws so that fan doesn't equal death due to changing the cars crash dynamics. Attack the random aluminium that is welded to your pre-rad with a jigsaw and bend it in such a way that it can be attached to the crashbox also - in the right place or as close as you can easily attain.

Posted Image

7) Run hoses round to the driverside rear corner of the rad surround and mod it slighly with sharp things so that the hoses can escape.
Screw the surround back on after bodging the foam strips back in. Use new bolts for the sake of sanity when all this goes wrong. Use a jubilee clip to retain the pipes to the ABS pump bracket. - You will later realize the area is the system high-point and make allowances for bleeding the system.

Posted Image

8) Using a mandrel which is the wrong size, cut a hole (in a position deemed by careful pipe curvature experiments) in the sill, and stuff pipes through. Make a foam gromet thing from sticky back foam scrap from when you worked at that place that made it 10 years ago.

Posted Image

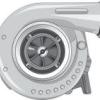
9) Remove old IC, break the ducting, remove the turbo ear. Again this is easy, don't worry at all, the car isn't basically built onto the IC...honest.
Discover the sill is blocked with foam things! Cry a little.
Fashion a meathook from some thick wire and 'Freddy Kruger' a hole in the foam. Push hoses through.

10) Look at the heat exchanger. Trial fit it into the sidepod.
Be pleased - it fits. Your careful measurement paid off.
Be sad - the pipes face in stupid directions. - This is no help at all.

Posted Image

11) Hack one of the tubes off.

Posted Image

12) Fashion it into the correct shape, get it welded back on, and the hole plated up.

Posted Image

13) Make a bracket to hold it in pace using existing mounts.

Posted Image

14) Try and fit it. - Discover the top hose is never going to go on at that angle...................


To be continued....

#2 Anarchy

Anarchy

    Scary Internerd

  • PipPipPipPipPipPip
  • 2,237 posts
  • Gender:Male
  • Location:W yorks

Posted 27 March 2012 - 11:03 PM

Good progress

#3 redvts

redvts

    Billy No Mates

  • PipPipPipPipPip
  • 1,472 posts
  • Gender:Male
  • Location:south shields

Posted 28 March 2012 - 05:53 AM

excellent, I look forward to the next episode! and the results....

#4 Darcini

Darcini

    There must be some way outa here

  • PipPipPipPipPipPip
  • 2,508 posts
  • Gender:Male
  • Location:Macclesfield

Posted 28 March 2012 - 06:37 AM

:yeahthat: Quality, particularly like the tiny screws in the crash box theory :lol:

#5 darronwall

darronwall

    Scary Internerd

  • PipPipPipPipPipPip
  • 2,706 posts
  • Gender:Male
  • Location:out rawcliffe
  • Interests:the older i get the more my genitals look like jeremy clarkson

Posted 28 March 2012 - 07:10 AM

Get it ready for oulton on the 13th april

#6 siztenboots

siztenboots

    RaceMode

  • 26,614 posts
  • Gender:Not Telling
  • Location:Surrey
  • Interests:french maids

Posted 28 March 2012 - 07:15 AM

I'm surprised nobody has thought about just reusing the standard intercooler , but bodging it to have water flow across the fins and just encasing it in a cheap , low pressure plastic water jacket.

#7 mbes2

mbes2

    Someone say Plasti Dip?

  • PipPipPipPipPipPipPip
  • 8,516 posts
  • Gender:Male
  • Location:Feering, Essex
  • Interests:"Keep it standard"
    "Yes, I built it"

Posted 28 March 2012 - 07:37 AM

Looks good John, but test of time will tell. Keep up the good work.... Ive also been looking at other intercooler / CCooler options, so will keep an eye on this post. Group buy :borg: Hmm I wonder... or very bad news... http://www.ebay.co.u...=item1e6c5d2e0d

Edited by mbes2, 28 March 2012 - 07:45 AM.


#8 slindborg

slindborg

    The Bishop of Stortford

  • PipPipPipPipPipPipPipPip
  • 22,602 posts
  • Gender:Not Telling
  • Location:.

Posted 28 March 2012 - 08:17 AM

Is this a joke? I can't work out if its serious or not with the tiny screws idea and other odd/crazy bits...

#9 Mike (Cliffie)

Mike (Cliffie)

    Back in a VX

  • PipPipPipPipPipPipPipPip
  • 13,354 posts
  • Gender:Male
  • Location:North Yorkshire
  • Interests:Weaving weasels woolly hats.

Posted 28 March 2012 - 08:33 AM

Looking at the pics, I reckon it is serious but written in a comedy style. Go for it John, it may just work.

#10 14500rpm

14500rpm

    Super Member

  • PipPip
  • 381 posts
  • Gender:Male
  • Location:Sidcup - sorted.
  • Interests:Boobs, Cars. Motorcycles.

Posted 28 March 2012 - 09:15 AM

Group buy :borg:


2. 14500rpm :lol:

Good work so far, interested to see how it works out.

I still fancy using a large oil cooler as the water rad and putting it in front of the drivers side air intake with a tubby ear when I SC my NA. This is because:

1) I'm tight
2) Taking the front clam off and drilling holes in bits gives me teh fear

Posted Image

3) I don't like spending money.

Edited by 14500rpm, 28 March 2012 - 09:17 AM.


#11 Mozen

Mozen

    Member

  • Pip
  • 120 posts
  • Gender:Male
  • Location:Gothenburg, Sweden
  • Interests:Cars, music, photo etc.

Posted 28 March 2012 - 09:27 AM

I have been thinking on something like this as well but has not gone for it. Great to read about your progress. Keep us informed!

#12 JohnTurbo

JohnTurbo

    SuperScruff

  • PipPipPipPipPipPip
  • 3,635 posts
  • Gender:Male
  • Location:wigan
  • Interests:Performance cars!

Posted 28 March 2012 - 12:27 PM

Well it WILL be finished this week. - I'm going to the rolling road with it on avec monsier Duncan VXR. That should give him a good laugh.

Is it all a joke? - No, not at all. I expect to go back to a few areas to do a little re-finishing however!
I'm certain it will work - I'll make it.

Spends:-
£100 Stainless header tank, pre-rad, heat exchanger, pump
£61 Tubing (£20+£23+£18)
£10 Assorted clips
£10 Copper pipe elbows
£20 Welding
£12 Coolant

Expected:- £15 Extra welding

Total:- £228

#13 SteveA

SteveA

    .

  • PipPipPipPipPipPipPip
  • 9,159 posts
  • Gender:Male
  • Location:North East UK

Posted 28 March 2012 - 12:29 PM

Pikey :lol:

#14 Nev

Nev

    Nipper's Minion

  • PipPipPipPipPipPipPipPip
  • 11,587 posts
  • Gender:Male
  • Location:Bristol
  • Interests:Rock climbing, skiing, kayaking, surfing, mountaineering, budgies, chess, practical mechanics.

Posted 28 March 2012 - 02:10 PM

I love seeing intuitive have a go things like this. One word of warning though, be wary of letting the water circuit penetrate into the air side of the matrix (can only happen off-boost obviously). If it does and water/heavy steam gets into the combustion chambers you will blow your pistons + rings. Best to pressure test the matrix first if I were you, to be sure this won't happen.

#15 siztenboots

siztenboots

    RaceMode

  • 26,614 posts
  • Gender:Not Telling
  • Location:Surrey
  • Interests:french maids

Posted 28 March 2012 - 02:13 PM

I love seeing intuitive have a go things like this. One word of warning though, be wary of letting the water circuit penetrate into the air side of the matrix (can only happen off-boost obviously). If it does and water/heavy steam gets into the combustion chambers you will blow your pistons + rings.

Best to pressure test the matrix first if I were you, to be sure this won't happen.


I've often thought about this, but then considered just how much cc you would get from a water / meth injection system. Having seen the extensive damage a diesel engine had from ingesting water from a flooded road, maybe a low comp engine would fair better?

#16 Rosssco

Rosssco

    Scary Internerd

  • 4,185 posts
  • Gender:Male
  • Location:Aberdeen

Posted 28 March 2012 - 02:15 PM

Yeah, why not, if it works, it works.. Another CC option I was thinking might work is a Celica GT4 chargecooler. Cheap second hand, good for around ~400bhp, has integrated water / header tank, although it sits above the cam cover, hence I doubt it would fit without one of those extended engine covers..

#17 siztenboots

siztenboots

    RaceMode

  • 26,614 posts
  • Gender:Not Telling
  • Location:Surrey
  • Interests:french maids

Posted 28 March 2012 - 02:18 PM

nothing wrong with bolting the CC directly to the engine block, it acts as a mass damper

#18 Duncan VXR

Duncan VXR

    Scary Internerd

  • PipPipPipPipPipPip
  • 5,284 posts
  • Gender:Male
  • Location:Lincolnshire
  • Interests:Anything to do with making cars faster and better than the original

Posted 28 March 2012 - 07:17 PM

Look forward to testing it sunday John, my ocd cant look at it too much but fair play love this kind of stuff ;-) I have a focus rs cc I was thinking about using and or build a DG spec cc but just dont have the time and a trade off for a tested known working item. So im out on making a cc atm. Could s a few minor tweaks to improve I suspect but if it works at that price monstet bonus DG

#19 Dashwood

Dashwood

    Super Member

  • PipPip
  • 494 posts
  • Gender:Male
  • Location:London
  • Interests:discussion

Posted 28 March 2012 - 07:22 PM

Strangely enough I was looking at a mk1 rs focus chargecooler today. I haven't as yet found any dimensions but it looks about right from the photos I've seen. Is the one one being used here a clad air/air intercooler?

#20 JohnTurbo

JohnTurbo

    SuperScruff

  • PipPipPipPipPipPip
  • 3,635 posts
  • Gender:Male
  • Location:wigan
  • Interests:Performance cars!

Posted 28 March 2012 - 08:49 PM

Ooh I'm glad I've written something interesting for once!

My first thought was to look at Focus RS chargecoolers, with a view to using one, but the pipe locations aren't ideal. I know from friends that they are good for well over 300bhp with a bigger pre-rad. There was also a Subaru one I looked at as i recall - but the kit with all the bits was a tempting start point; even if I end up exchanging 1-2 bits for better items, upgrading on-the-fly. This kit was previously fitted to a rover 800 turbo running best part of a couple of bar, and the core looks in good nick - I shouldn't imagine it will turn my cylinders into duck-ponds. The core itself looks less restrictive than the stock IC, the channels are bigger and there is more of them. It may have started life as an air-air but its done quite well. I'll just have to evaluate its performance with a digital thermometer. Sorry for making your OCD itch Duncan! Like I said, I expect to do some refinishing when I'm happy with it.

Small update then:-

14) Cont...
Return heat exchanger to the welder - being careful to reassure you're not back to 'complain'.

15) Meanwhile, evaluate header tank:-

Posted Image

16) Try the pump! - Sunny days are ideal if you make it look like you pissed yourself as I did. - It drys fast.

Posted Image

17) Drill holes in the clam in the only suitable location (the boot wall). - This is liberating, enjoy it. The clam deserves revenge for all the chunks it has dropped and all the osmosis it breeds. Trial fit tank.

Posted Image

18) Do your finest Mario Bros impression and plumb in the pipes. Logic dictates to me that the header should feed the pump in order to remove air from the system automagically. The pump then forces water into the heat exchanger...then through the Pirtek hose which is higher temperature/pressure rated to the pre-rad, then back to the header tank side port. Exciting this bit!

Posted Image

19) Bolt the assembly onto the clam, and route the hoses round the back of the engine. Eagerly await the finished heat exchanger!

Posted Image


To be continued....


1 user(s) are reading this topic

0 members, 1 guests, 0 anonymous users