Jump to content


Photo

Track Day Air Intake Modification

crash box radiator cowl max

  • Please log in to reply
157 replies to this topic

#1 MAXR

MAXR

    I’m jealous of Batman’s driving skills

  • PipPipPipPipPipPip
  • 2,719 posts
  • Gender:Male
  • Location:Hampshire/Berkshire
  • Interests:Tennis, Golf, classic Ferrari's

Posted 27 September 2018 - 12:28 PM

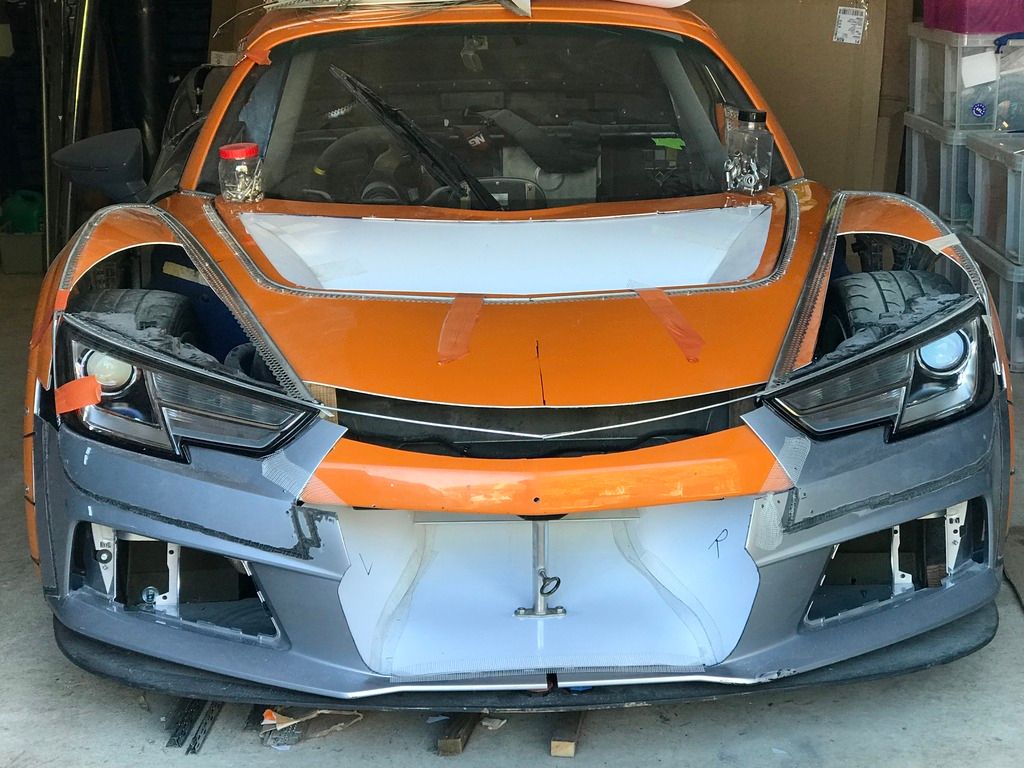
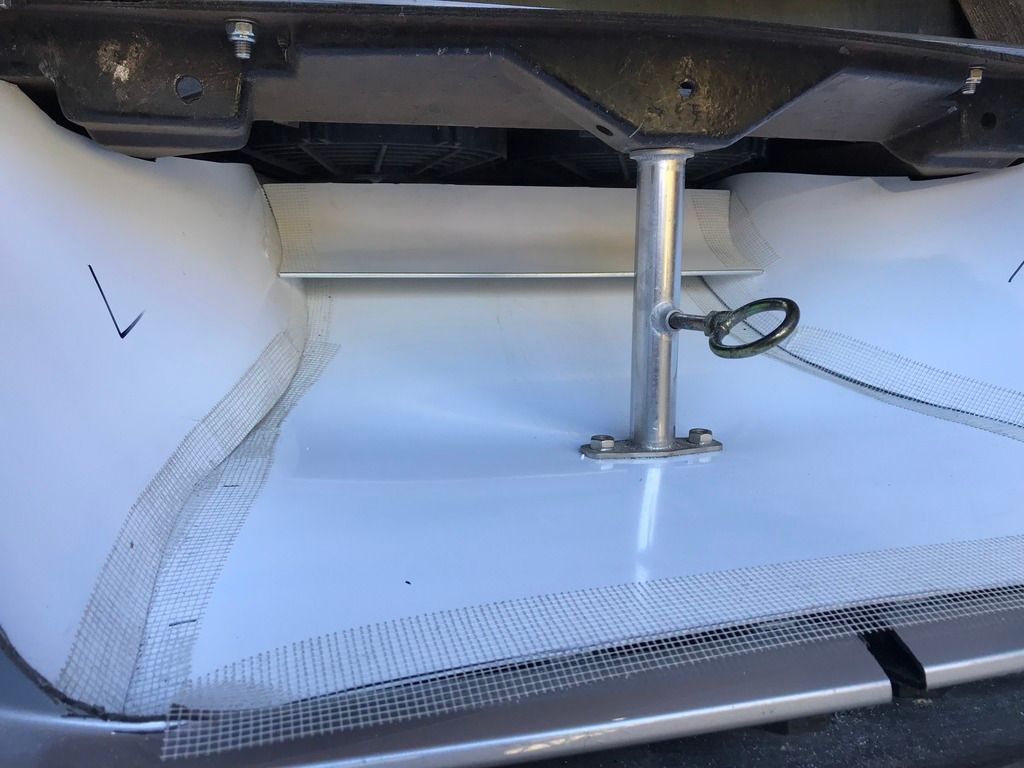
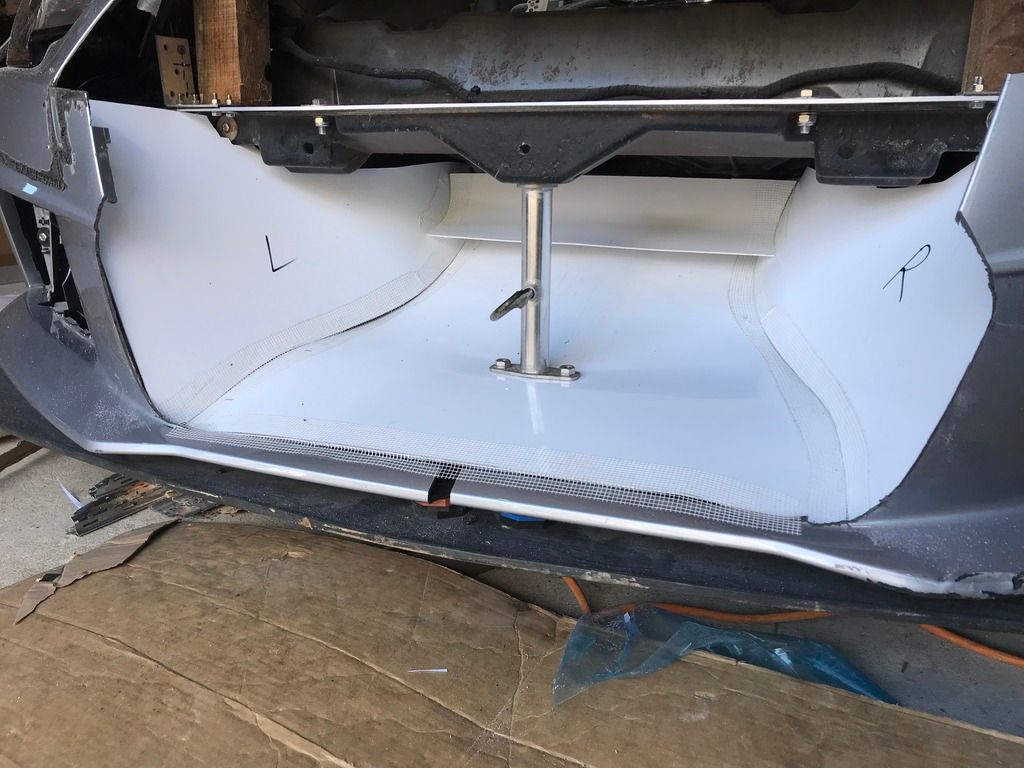
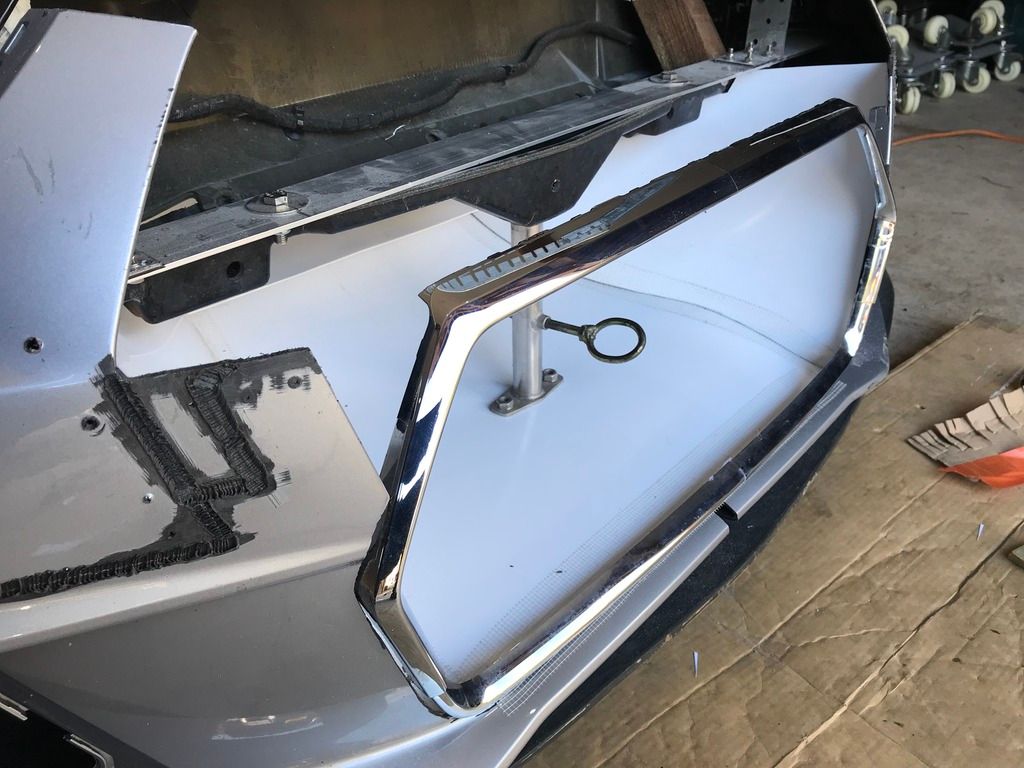
I have been asked to expand on how I produced the crash box intake walls and internal diffuser using the PVC plastic sheet and show how I actually formed the shapes. As I have already made the crash box diffuser/ walls, I have documented how I produced the bonnet air exit cowl that will eventually be produced in carbon fibre. The procedure was the same.


Clearly, there are numerous ways to cook an omelette. There may be a quicker alternative, which I have yet to uncover? Anyway, this is how I produce the sculptured cowl.


Materials used: 

1.5mm PVC plastic sheet

Scrim tape

End stop plaster beads


Tools used:

Multi-speed Dremel

Paper and masking tape to make templates

Stanley knife

Hot air gun

150mm metal pipe

Permanent marker pen

Sandpaper

Soft Black rubber spreader


Step 1: 

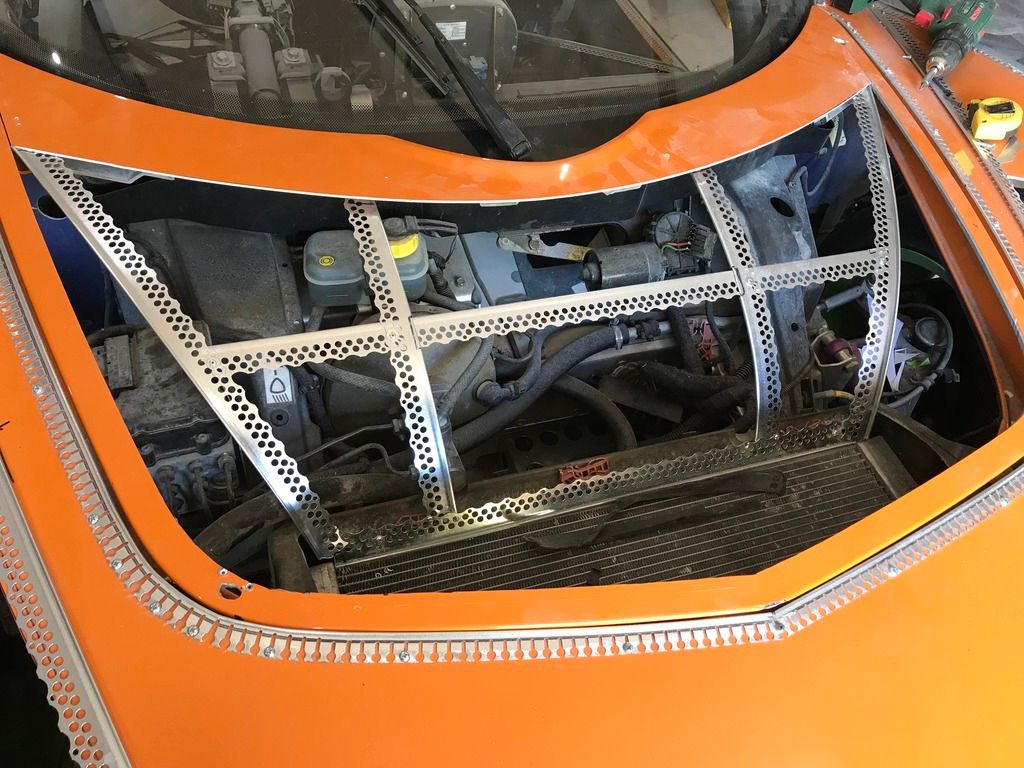
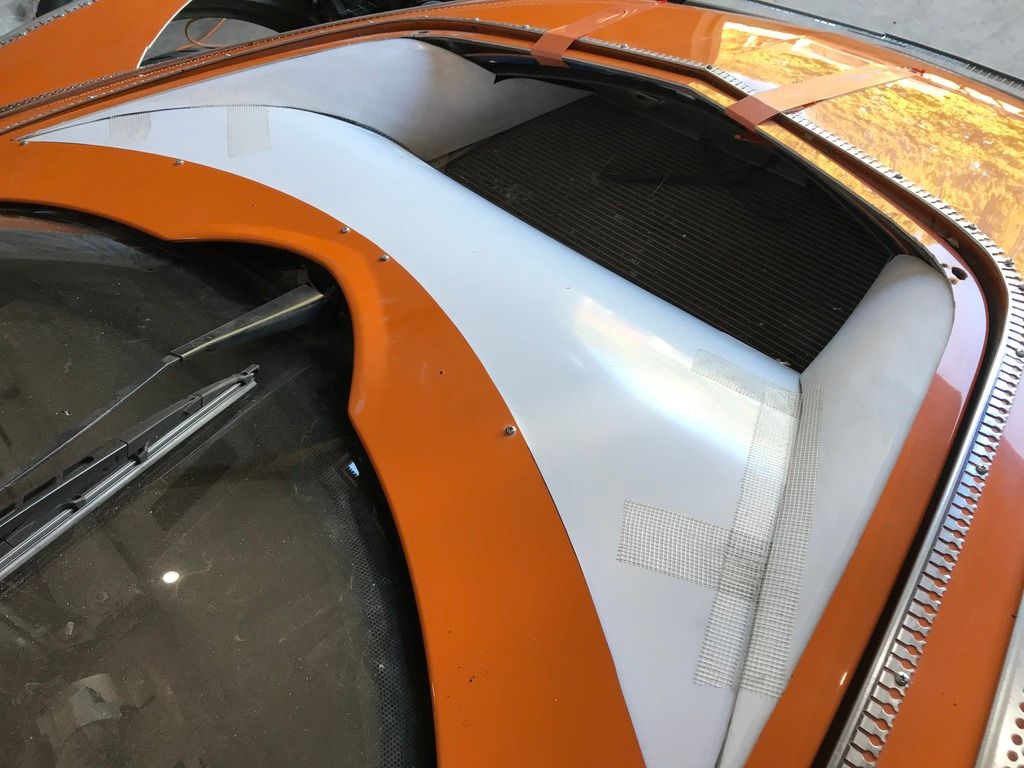
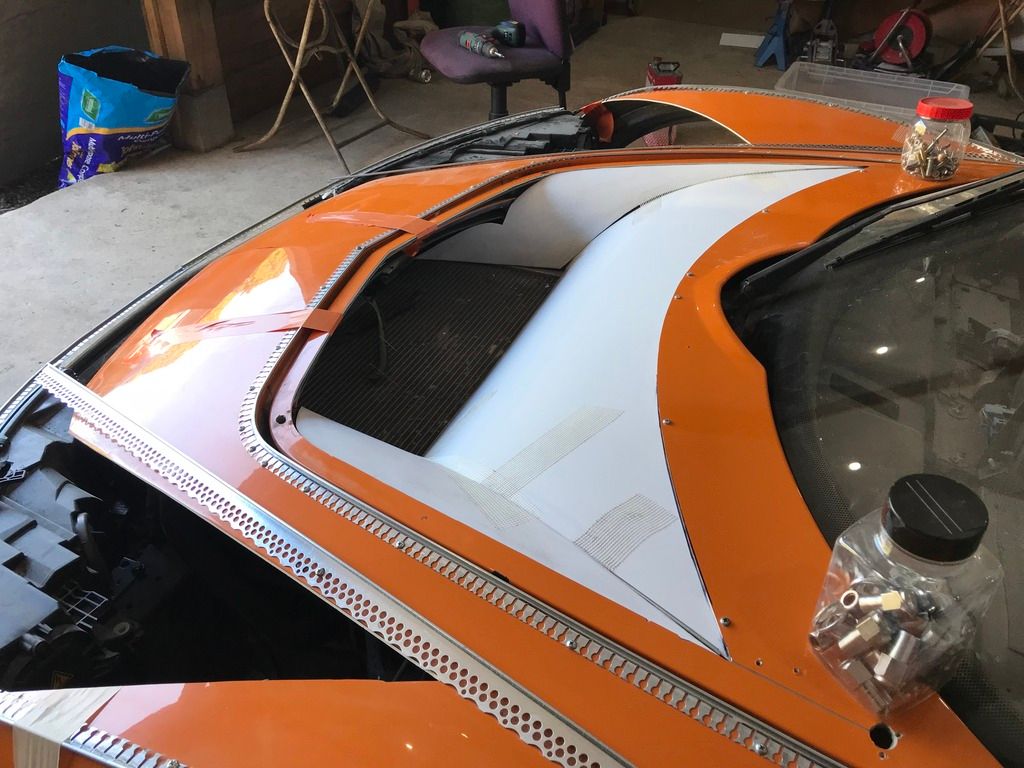
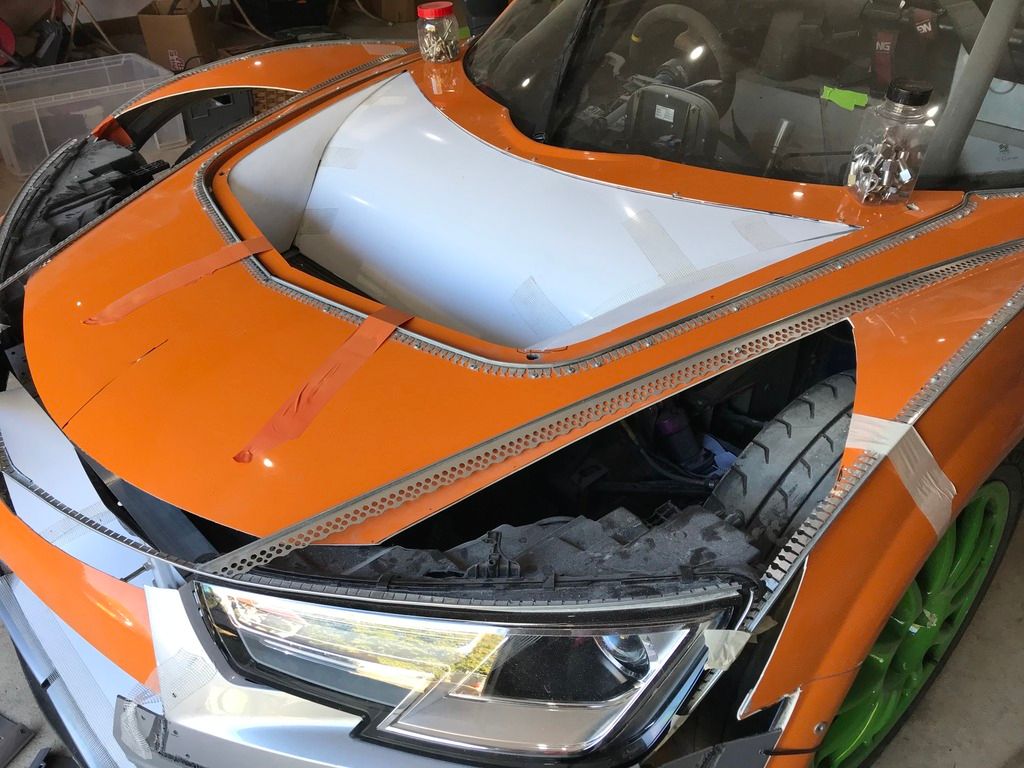
I used plaster end beads cut and fitted to form the basic shape see below. Make sure the plaster beads are fitted and rigid. I've screwed the beads to the OEM radiator cowl and to the bonnet. You can use a hot glue gun or similar adhesive. You need the beads to be fixed well for when you make the templates later.


IMG_6781_zpsgucdzyh9.jpg


Step 2:

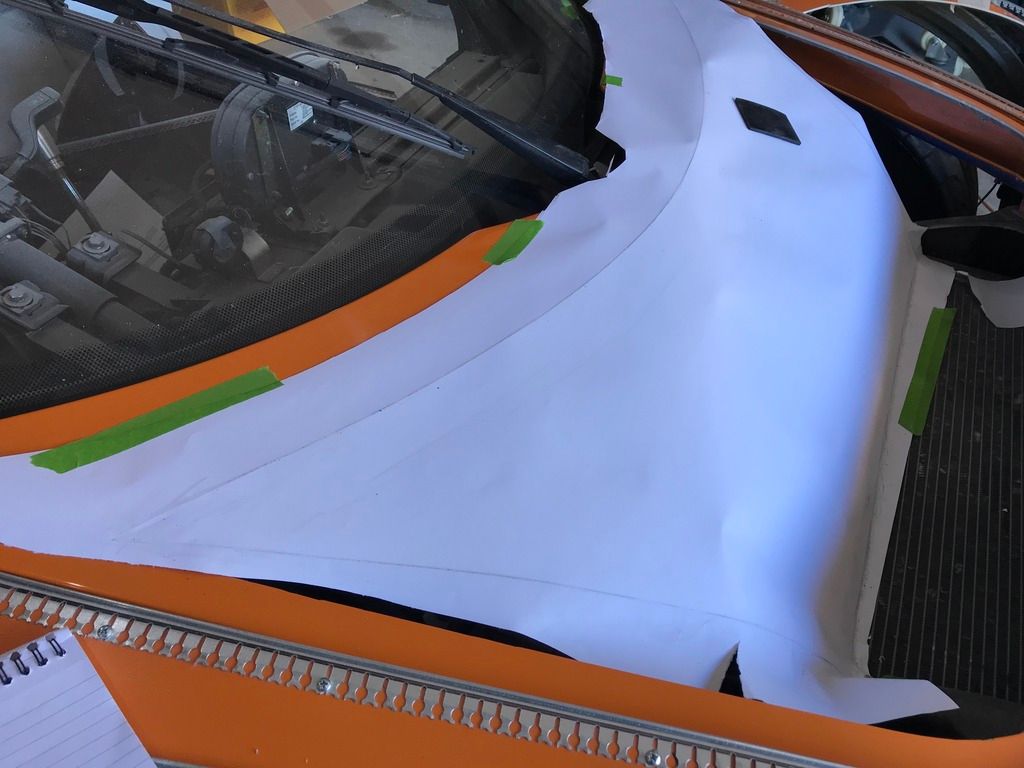
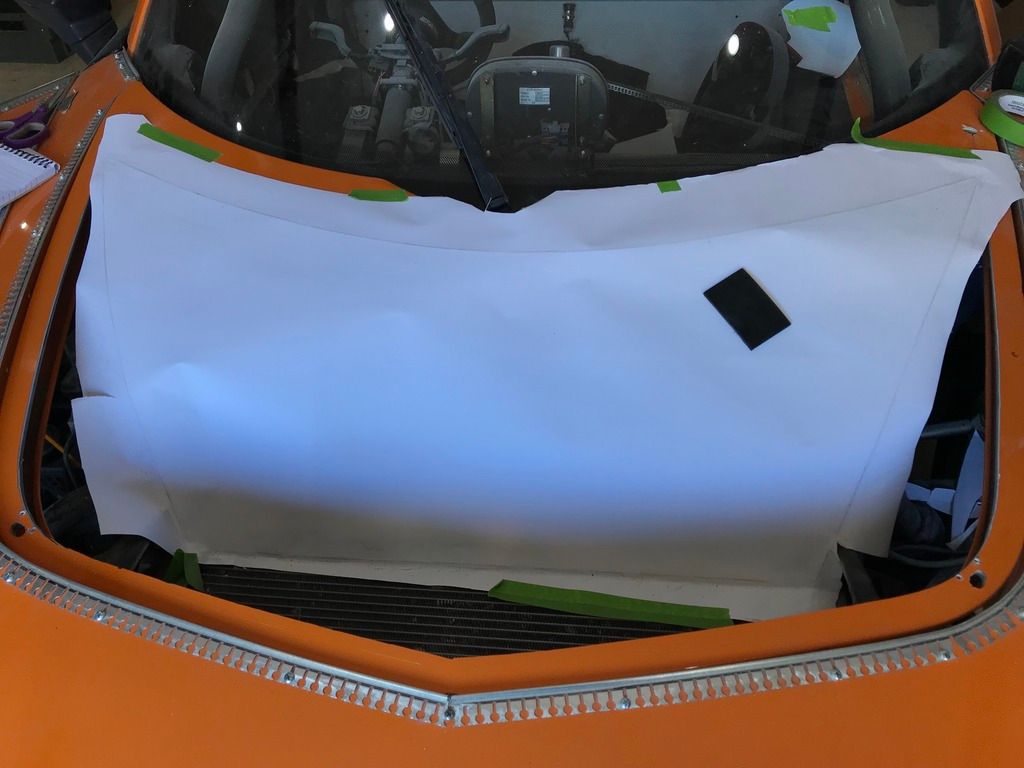
Make the back curved surface by cutting a piece of paper and taping it over the plaster beads. Then using the soft black rubber spreader, rub through the paper against the bead edges. This will leave an accurate line where the bead edges are, hence why the beads need to be well fitted.


IMG_6783_zpsq9nose6o.jpg


IMG_6782_zpswrdbhoaj.jpg


Step 3:

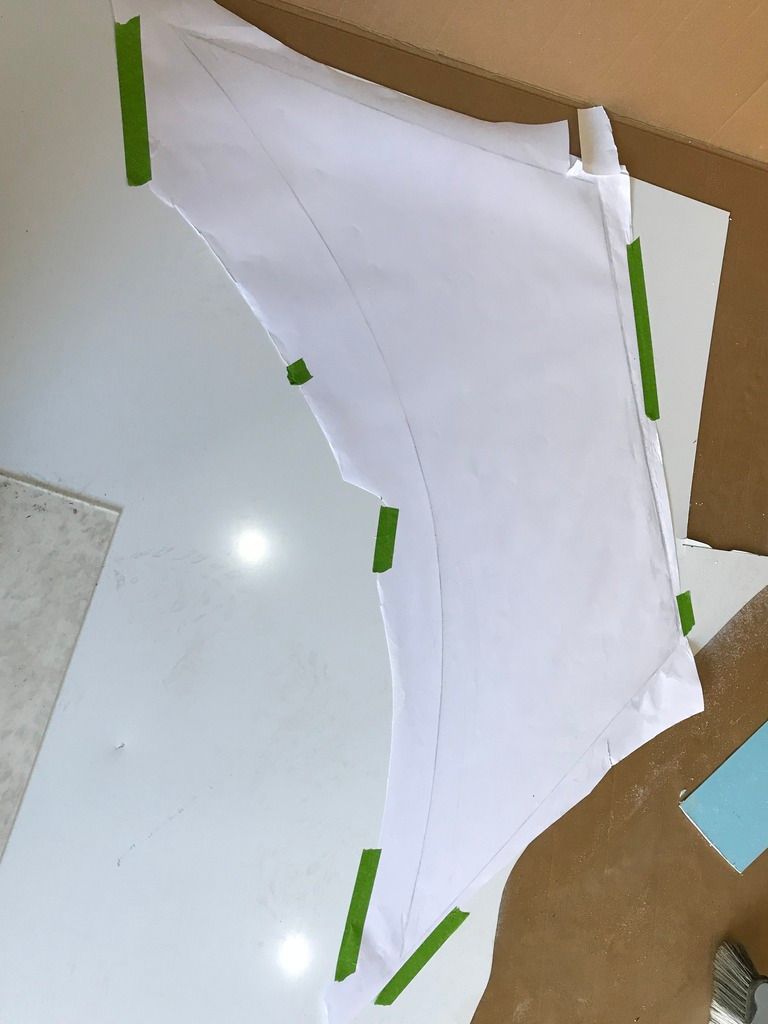
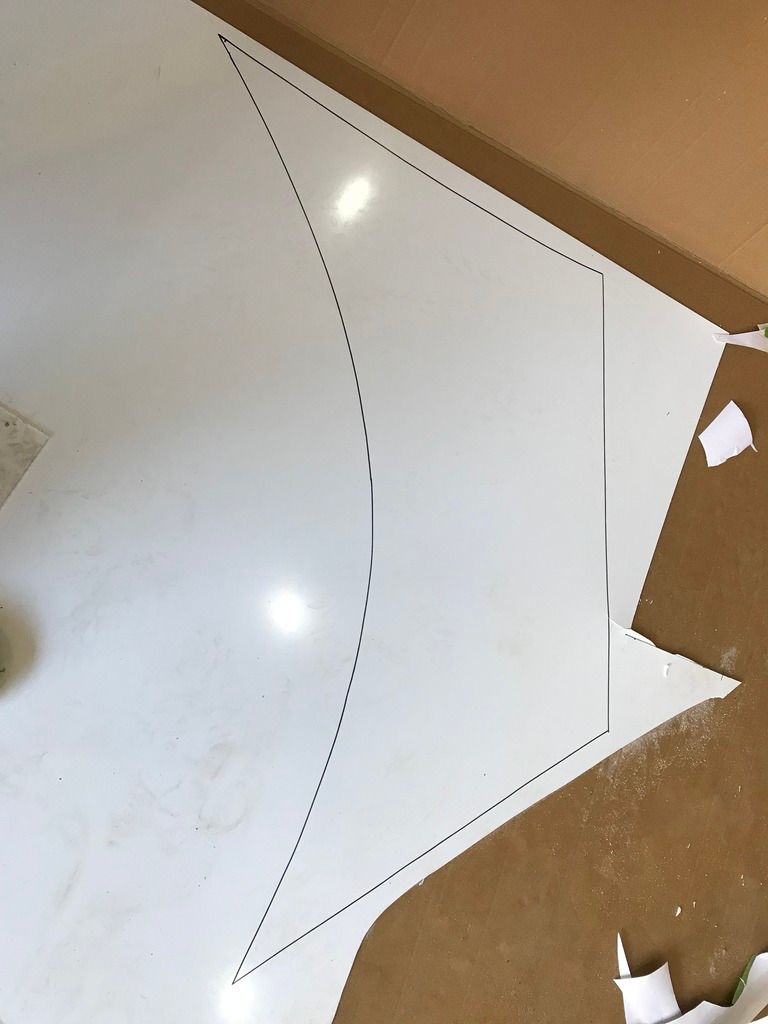
Stick the paper onto the PVC sheet and tape done with masking tape, don't try and cut it out with scissors, it won't be accurate enough.


IMG_6784_zps67izjm6b.jpg


Now using a Stanley knife cut through the paper with enough force to just cut into the PVC sheet. You will now have a faint accurate line on the PVC sheet. Using the sharpie permanent marker pen draw over the faint scored outline. The pen will follow the groove without deviating.


IMG_6785_zps3xfjg2w9.jpg


Step 4:

Using the Dremel with 16mm diamond disc on low speed, cut out to the outside edge of the black line. Lightly sand the edge as this will fit into the bead edge.


Step 5:

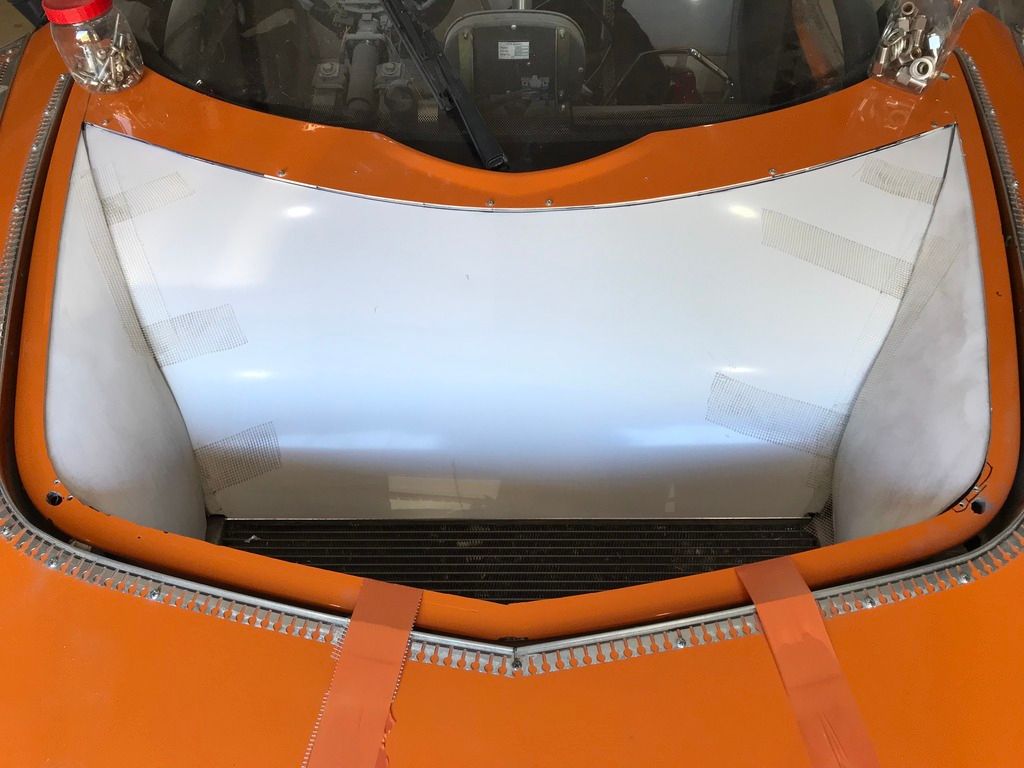
Fit in the cut PVC panel into the plaster bead outline. The panel should fit perfectly into the groove on the bead and stay in place.


Step 6 (Curved side panels):


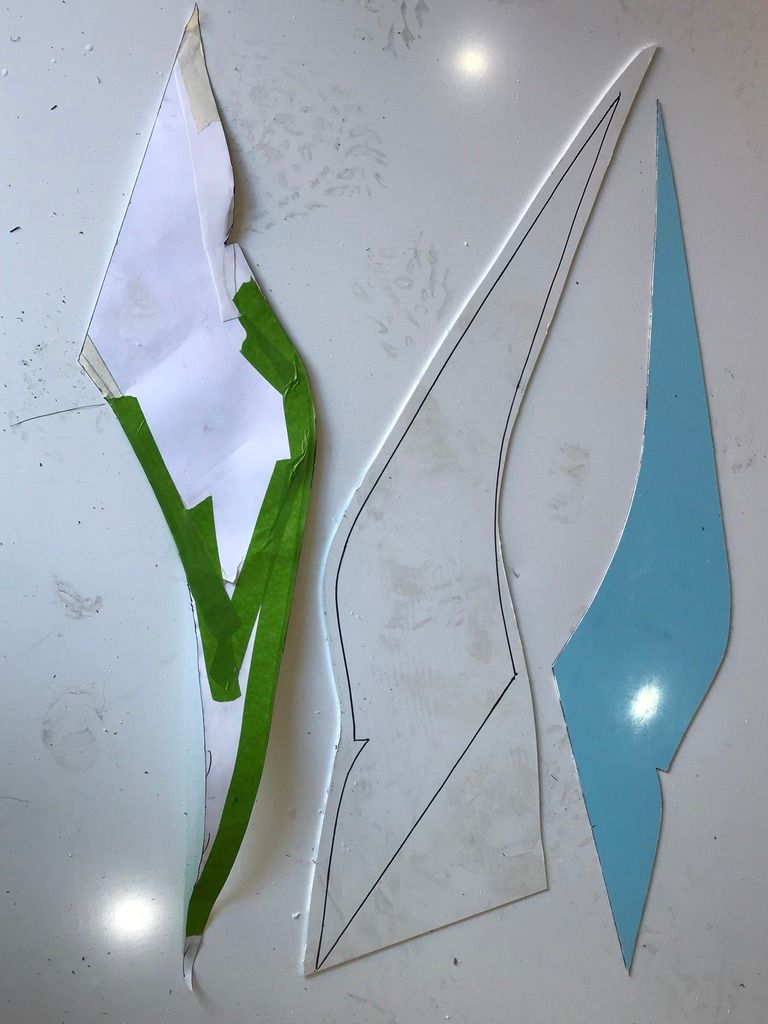
Using paper, cut an approx shape of what you think the curved sides should look like. Keep adding pieces of paper or cutting away areas until you have a close approximation of the panel you want to make. Now use narrow masking tape to build up the edges so that your paper stuck together pieces becomes far more accurate.


IMG_6780_zpshp8lfk6o.jpg


Step 7:

Stick the made-up template onto the PVC sheet and trace around with the marker pen and cut out with the Dremel as before


Step 8:

Gently heat up the cut-out shape over any object or form that has similar contours to what you want to achieve. I used a section of log burner flue and also an old silencer. You can smooth out the shape with your hands, obviously wear gloves! Have a hand sprayer with cold water in to spray the plastic to harden the shape. Gently heating the plastic over a pipe or silencer will make the plastic take the shape of the pipe or silencer, without any additional manipulation. If you get wrinkles, just gently heat again and they will relax and disappear. You will obviously need to trial fit often to see if your changes are getting better or worse!


You can heat and cool as many times as you like. I also used the side of my lawn mower, which had curves on the bodywork. It may take a little practice, but it gets easier with each attempt. 


Step 9:

Sand any minor imperfections out with 80 grit, then finer paper to remove any scratches.


Step 10:

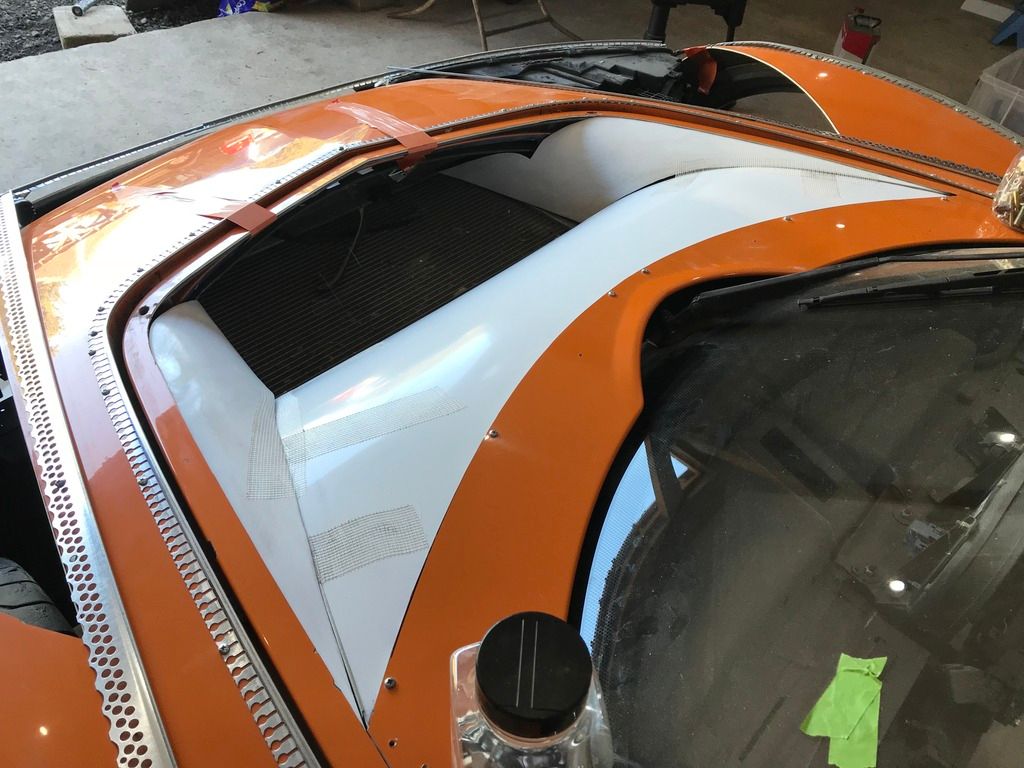
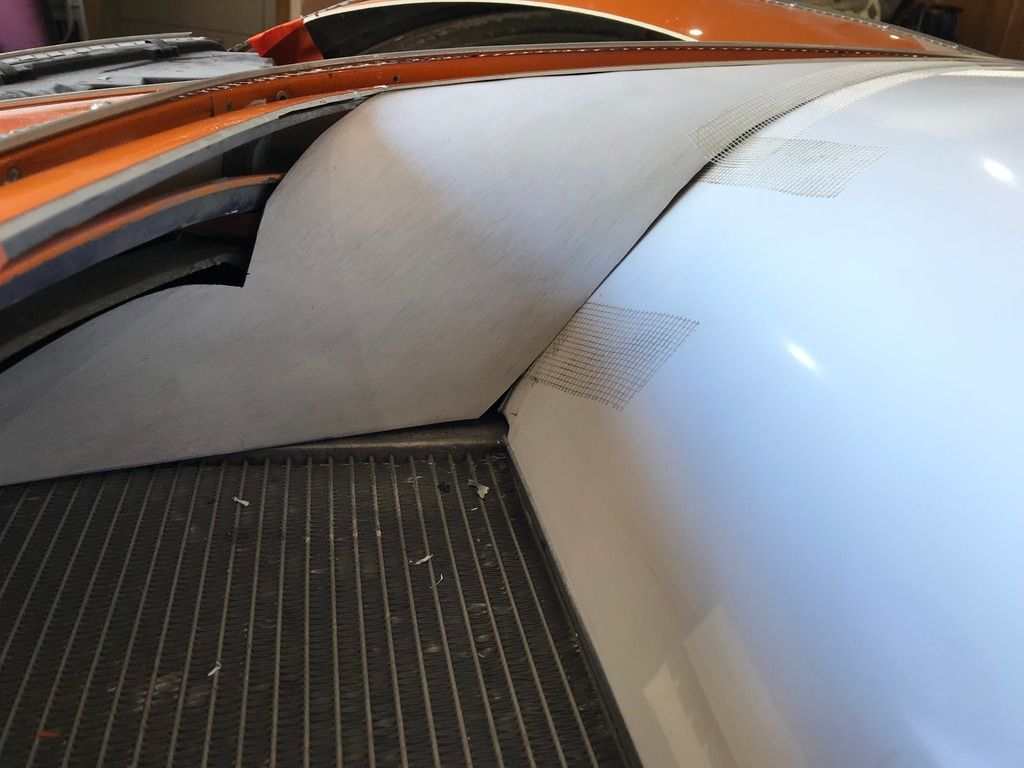
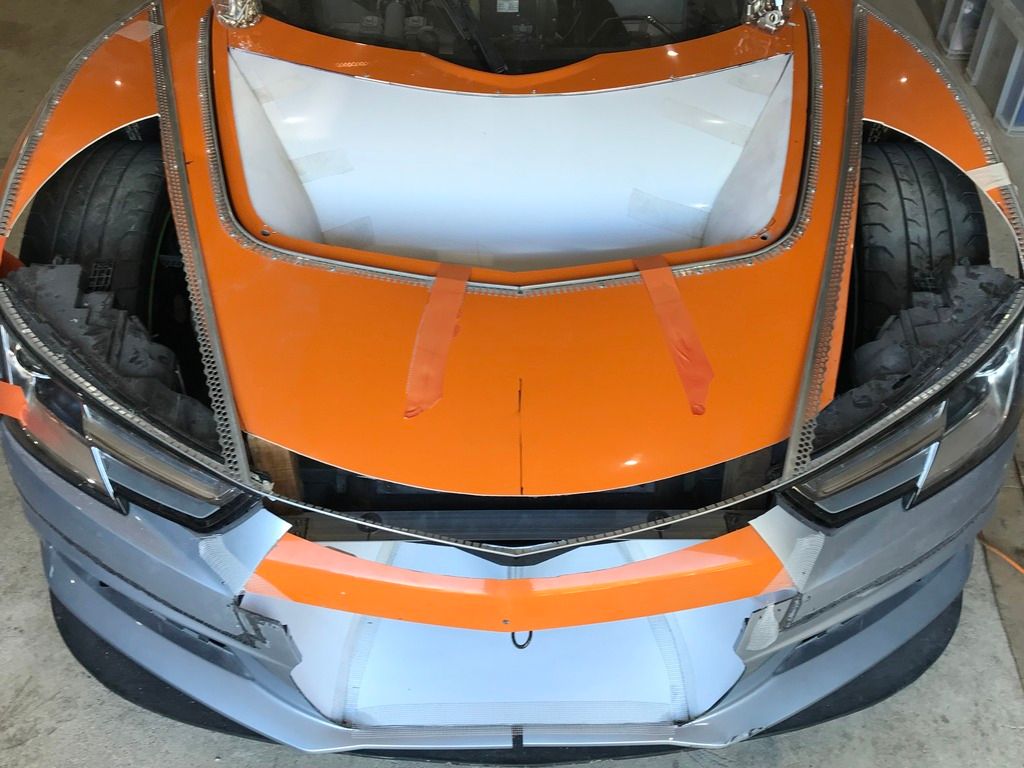
Fit into place with scrim tape or mastic, hot glue gun or using plaster beads. (See photo below)


Step 11:

Fill and sand to achieve a perfect surface. Then use as a mould or wet lay CF over. Remove when hardened and improve.


IMG_6788_zpszrtaz2zj.jpg


IMG_6789_zpsjlbvsgko.jpg


IMG_6790_zpsdpkgyb3r.jpg


IMG_6791_zpsqasql6fh.jpg


IMG_6792_zpskpbngk4k.jpg


IMG_6793_zpssdaolap2.jpg


IMG_6794_zpsarebcssj.jpg


IMG_6795_zpsjvu1m3vv.jpg


IMG_6797_zpsmepj1iz9.jpg


IMG_6787_zpstrp36ogm.jpg


IMG_6767_zpsapmab1t2.jpg


IMG_6774_zpsmizsisrl.jpg


The radiator exit cowl does fit perfectly, but due to the flex in the sides, I will have to seal it properly in position. 


Do you think I should make the radiator air cowl part of the bonnet or as a separate panel? The front bumper will be a separate section.


Anyway, I hope this was useful. I must say, the PVC plastic is very forgiving and easy to use. I may also do an enclosed air filter housing using the PVC to form a cowl, then wet lay CF over.


#2 Nev

Nev

    Nipper's Minion

  • PipPipPipPipPipPipPipPip
  • 11,587 posts
  • Gender:Male
  • Location:Bristol
  • Interests:Rock climbing, skiing, kayaking, surfing, mountaineering, budgies, chess, practical mechanics.

Posted 27 September 2018 - 04:36 PM

Jeeze, this must be the most involved bodywork hack-around I've seen on a VX, you must be putting some serious time into it. :)


Missed a few calls from you I think - try again - will endeavour to pick up !


#3 MAXR

MAXR

    I’m jealous of Batman’s driving skills

  • PipPipPipPipPipPip
  • 2,719 posts
  • Gender:Male
  • Location:Hampshire/Berkshire
  • Interests:Tennis, Golf, classic Ferrari's

Posted 27 September 2018 - 04:54 PM

Jeeze, this must be the most involved bodywork hack-around I've seen on a VX, you must be putting some serious time into it. :)

Missed a few calls from you I think - try again - will endeavour to pick up !


Hi Nev,

I'll drop you a line tomorrow, I'm busy producing a couple of CAD drawings for a commercial conversion project and they are need in the morning, so it'll be a late one tonight!

Well, it's broken down into small chunks and I only spend a maximum of 2 hours per day in the afternoons or evenings. To make the crashbox diffuser and radiator cowl as per the photos was no more than 4.5 hours in total.

But, if it keeps my car cooler and out on track longer, then it'll be worthwhile. Most of what I'm doing is pretty clean work with minimal grafting. That's the sort of work I prefer! 😁

#4 Bargi

Bargi

    Scary Internerd

  • PipPipPipPipPipPip
  • 4,483 posts
  • Gender:Male
  • Location:London

Posted 27 September 2018 - 06:34 PM

That white PCV will show off bugs and dirt nicely ;)


#5 chris_uk

chris_uk

    I Fancy Joe

  • PipPipPipPipPipPipPip
  • 10,060 posts
  • Gender:Male
  • Location:Leeds UK

Posted 27 September 2018 - 06:36 PM

Looks good does that.

#6 MAXR

MAXR

    I’m jealous of Batman’s driving skills

  • PipPipPipPipPipPip
  • 2,719 posts
  • Gender:Male
  • Location:Hampshire/Berkshire
  • Interests:Tennis, Golf, classic Ferrari's

Posted 28 September 2018 - 04:26 AM

That white PCV will show off bugs and dirt nicely ;)


Lol! It would if it was being used as the final finish and it would also melt from the heat from the radiator!

No, It's obviously just being used as moulds. All panels will be made out of CF and left naked or painted in a contrasting Viper green.

#7 ginek

ginek

    Member

  • Pip
  • 119 posts

Posted 28 September 2018 - 08:11 AM

It's impressive work - thumbs up! (looking at the other threads as well)


I like how these little "plastic shitboxes" can be transformed completely into a new car and still keep all the sublime handling.


#8 MAXR

MAXR

    I’m jealous of Batman’s driving skills

  • PipPipPipPipPipPip
  • 2,719 posts
  • Gender:Male
  • Location:Hampshire/Berkshire
  • Interests:Tennis, Golf, classic Ferrari's

Posted 28 September 2018 - 12:44 PM

It's impressive work - thumbs up! (looking at the other threads as well)


I like how these little "plastic shitboxes" can be transformed completely into a new car and still keep all the sublime handling.


That's exactly my point. I love my VX as a no nonsense, no frills, cheap to run, sorted track car. But, I've kind of got bored with it's looks now and my car was particularly unloved and tired.


Some say I'm converting my car into another Lotus lookalike and that I should perhaps, just buy the real thing. Personally, other Lotus cars don't do it for me, apart from the Exige S1. If I did buy a Europa or similar, I would have to spend ten's of thousands to get it close in track performance terms and fun as my VX. so, It's cheaper just to transform my car.


My aim is to keep my car weight the same or hopefully less. I think I will easily manage that even after all alterations and painting have been completed.


#9 Duncan VXR

Duncan VXR

    Scary Internerd

  • PipPipPipPipPipPip
  • 5,273 posts
  • Gender:Male
  • Location:Lincolnshire
  • Interests:Anything to do with making cars faster and better than the original

Posted 28 September 2018 - 05:06 PM

Starting to come together Max :) some good tips shared also ;)

#10 OneYet

OneYet

    Billy No Mates

  • PipPipPipPipPip
  • 1,348 posts
  • Gender:Male
  • Location:Huskvarna, Sweden

Posted 28 September 2018 - 06:42 PM

This knife and paperwork was really brilliant. 

Simple and clever. 

I would have done a much more complicated way.  :lol:


#11 MAXR

MAXR

    I’m jealous of Batman’s driving skills

  • PipPipPipPipPipPip
  • 2,719 posts
  • Gender:Male
  • Location:Hampshire/Berkshire
  • Interests:Tennis, Golf, classic Ferrari's

Posted 28 September 2018 - 07:41 PM

I'm just using materials that I'm used to. I honestly have no idea how other people work. Although I did do a search on Youtube, only to view a guy unloading literally a ton of clay on his garage floor. He then started sculpturing a rear diffuser, which looked bloody awful and looked so wavy. I didn't watch to see the final painted item.


If you can make accurate templates, then that's half the problem solved. I even held the new skoda light (actually I hung from a scaffold trestle close to the car corner) with a bright multi led flood light from a distance back. This cast a sharp, vivid shadow onto the curved clam corner and I just traced the shadow outline with a marker pen & cutaway & it worked really well. You really can't make a paper template of the light unit because it is noticeably 3 Dimensional. Wrapping paper over it would not have been the be correct shape when opened up & cut out. Again, I just thought this would method would work and it did! just thinking outside the box!


Anyway, the PVC plastic sheet method works really well with a heat gun and plaster beads. It is also fantastic for making indestructible, reusable & accurate templates, which is easy to trace around.


#12 Autobahnkurier

Autobahnkurier

    Member

  • Pip
  • 19 posts
  • Location:Munich

Posted 15 October 2018 - 02:36 PM

wow that looks damn sexy! Do u have a page of the whole car?


#13 MAXR

MAXR

    I’m jealous of Batman’s driving skills

  • PipPipPipPipPipPip
  • 2,719 posts
  • Gender:Male
  • Location:Hampshire/Berkshire
  • Interests:Tennis, Golf, classic Ferrari's

Posted 15 October 2018 - 04:11 PM

FRONT:
http://www.vx220.org...d-vx-front-end/


SIDES:
http://www.vx220.org...de-air-intakes/


REAR:
http://www.vx220.org...vised-rear-end/

#14 MAXR

MAXR

    I’m jealous of Batman’s driving skills

  • PipPipPipPipPipPip
  • 2,719 posts
  • Gender:Male
  • Location:Hampshire/Berkshire
  • Interests:Tennis, Golf, classic Ferrari's

Posted 04 April 2020 - 04:03 PM

Ok, I’ve no excuses why I can’t find time now to complete what I started all those months ago. My work projects have now been put on hold. So, I’ll try and complete the front and sides, then post once finished as I can’t be bothered to post more often.

The rear will take more thought as I’m not happy with the mock up I came up with.

#15 Aerodynamic

Aerodynamic

    Billy No Mates

  • PipPipPipPipPip
  • 1,455 posts

Posted 04 April 2020 - 07:18 PM

No pressure.

But we are some a whole bunch of ppl waiting to see the result.  :-)


Ok, I’ve no excuses why I can’t find time now to complete what I started all those months ago. My work projects have now been put on hold. So, I’ll try and complete the front and sides, then post once finished as I can’t be bothered to post more often.

The rear will take more thought as I’m not happy with the mock up I came up with.


#16 OneYet

OneYet

    Billy No Mates

  • PipPipPipPipPip
  • 1,348 posts
  • Gender:Male
  • Location:Huskvarna, Sweden

Posted 10 April 2020 - 08:53 AM


No pressure.

But we are some a whole bunch of ppl waiting to see the result.  :-)


Ok, I’ve no excuses why I can’t find time now to complete what I started all those months ago. My work projects have now been put on hold. So, I’ll try and complete the front and sides, then post once finished as I can’t be bothered to post more often.

The rear will take more thought as I’m not happy with the mock up I came up with.


Yep we are!!


#17 aquilaproejct

aquilaproejct

    Super Member

  • PipPip
  • 267 posts
  • Location:Australia

Posted 10 April 2020 - 11:48 AM

Nuthin else to do!

#18 MAXR

MAXR

    I’m jealous of Batman’s driving skills

  • PipPipPipPipPipPip
  • 2,719 posts
  • Gender:Male
  • Location:Hampshire/Berkshire
  • Interests:Tennis, Golf, classic Ferrari's

Posted 11 April 2020 - 01:06 PM

I’ve only just started again and I’m getting bored.

We are having a family BBQ this afternoon! I better find the charcoal and clean the grill. Oh, I may grab a cold beer, so I’m finishing for the day.

Ok, I’ve simplified the side conversion, couldn’t be bothered to do anymore. I just need to finish the air intake sides. Fit my oil cooler in position, make new wheel arch liners, align and fit everything into place before filling and sanding the sides.

The rear coupe back buttress looks big. I may resort to making engine meshed areas along the top, near the engine lid and retain a buttress shape like the original VX, but continue it to the rear deck.

The PVC form turned out well. I wasn’t expecting a perfect finish, just a good guide that was 80% correct. The edges however had to be spot on, which they are due to the plaster trims.

The engine lid fits ok, I need new boot seals first.

As I said many months ago, this is totally outside my comfort zone and I’m just making decisions and solving issues as I go along.

It may look crap when finished! But, I do have spare (shitty) old clams that Batman sold me, just in case!


Photos of recent progress:

https://photos.app.g...eYyeZyr39PoJiH9

#19 techieboy

techieboy

    Supercharger of Doom

  • 22,914 posts
  • Gender:Male
  • Location:Bedford

Posted 11 April 2020 - 02:15 PM

Jesus, Max, you're a mentalist. :D


You must have been thoroughly bored when you kicked this project off. Now you've got all the time in the world to complete it and the work itself is boring you. :lol:


Somehow totally missed this thread but love the way you're using any old stuff you can find in the garage or the storage shed to support random bits of bodywork. Good luck with whatever the next stage is....


Enjoy the BBQ, we're doing the same this evening. thumbsup


#20 MAXR

MAXR

    I’m jealous of Batman’s driving skills

  • PipPipPipPipPipPip
  • 2,719 posts
  • Gender:Male
  • Location:Hampshire/Berkshire
  • Interests:Tennis, Golf, classic Ferrari's

Posted 11 April 2020 - 08:31 PM

Nice to hear from you Matt. Good to hear from one of the oldies!

Well, it seemed like a good idea at the time. Anyway, I’m hoping I can stick with it and get it finished.


Also tagged with one or more of these keywords: crash box, radiator cowl, max

0 user(s) are reading this topic

0 members, 0 guests, 0 anonymous users