My heat shield has melted (n a model) so need to get a new one. Does anyone know the vauxhall part number for the rubberised standrad one, or soes anyone have a better suggestion.
I dont think I can use exhaust wrap as its one of the Thorney 4-1 manifolds and would be very hard to wrap. There are many types of heat screen in Demon tweeks, would any of those be ok, or is the rubber backing also needed for some reason?
Martin s

Heat Shield Melting
Started by
MartinS
, Jun 02 2008 07:57 AM
74 replies to this topic
#1

MartinS
-
-

- 5,173 posts
I only bought it for one summer. 14 years ago and now its gone&#
- Gender:Male
- Location:Rustington, West Sussex
-
Interests:Track days
Pubs
Sausages
Posted 02 June 2008 - 07:57 AM


#3
MartinS
-
-
- 5,173 posts
I only bought it for one summer. 14 years ago and now its gone&#
- Gender:Male
- Location:Rustington, West Sussex
-
Interests:Track days
Pubs
Sausages
Posted 02 June 2008 - 08:14 AM
Thats one of the ones in demon tweeks, looks fairly rigid, gues it has to be glued on.
Will try and find out the cost of te original vx one today.
Martin s
#4
luna_s
-

-

- 1,934 posts
Billy No Mates
- Gender:Male
- Location:North East Of England
Posted 02 June 2008 - 08:47 AM
remember the oem manifold had a heatshield on it, the bulkhead one is there to reflect any heat
i binned mine and glued a lot of this stuff (i got it cheaper on ebay) http://www.cbsonline...tmat-1567-p.asp
all over the boot section of the clam when i fitted my weapon R
i binned mine and glued a lot of this stuff (i got it cheaper on ebay) http://www.cbsonline...tmat-1567-p.asp
all over the boot section of the clam when i fitted my weapon R
#5
MartinS
-
-
- 5,173 posts
I only bought it for one summer. 14 years ago and now its gone&#
- Gender:Male
- Location:Rustington, West Sussex
-
Interests:Track days
Pubs
Sausages
Posted 02 June 2008 - 09:48 AM
Thanks Luna. Do you think that stuff would be ok, just stuck on the boot bulhead?
Why does the original have a thick rubber backing as well?
Martin s
#6
siztenboots
-
-

- 26,614 posts
RaceMode
- Gender:Not Telling
- Location:Surrey
- Interests:french maids
Posted 02 June 2008 - 10:11 AM
Sorry Martin at the meet I just thought you were talking about the tailpipe heat shield.
So this is the exhaust manifold presumably its tight packaging to fit in the space and there is not enough airflow / airgap . A shield should stop the radiated heat, and if possible you could bend / fold something similar to the turbo which as a chimney venting through the boot lid.
Try Merlin Motorsport ( based on site at Castle Combe )
http://www.merlinmot..._475/index.html
Edited by siztenboots, 02 June 2008 - 10:12 AM.
#7
luna_s
-
-
- 1,934 posts
Billy No Mates
- Gender:Male
- Location:North East Of England
Posted 02 June 2008 - 10:26 AM
i stuck mine on with glue, and its not fell off yet
thick rubber is probably there just to add further heat absorbtion
this is how mine looks


still gets warm in the boot where the cutout is tho
thick rubber is probably there just to add further heat absorbtion
this is how mine looks
still gets warm in the boot where the cutout is tho
#8
Winstar
-

-
- 4,264 posts
Scary Internerd
- Gender:Male
- Location:Chesterfield
Posted 02 June 2008 - 10:30 AM
Thanks Luna. Do you think that stuff would be ok, just stuck on the boot bulhead?
Why does the original have a thick rubber backing as well?
Martin s
Having looked at how techiboys fits on z22se there enough space to fasion a heat sheild from heat shield material like above and mount it from the same holes as the std heat sheild.
It's far better to have an air gap on either side of the heat shielding as the air acts as another layer of insulation.
Did TMS not notice the heat problems, while it doesn't need the clam cutting to fit thin walled stainless steel will conduct and get a lot hotter than a cast manifold and that has a heat sheild as std.
#9
techieboy
-

-

- 22,914 posts
Supercharger of Doom
- Gender:Male
- Location:Bedford
Posted 02 June 2008 - 10:37 AM
Will be watching this with interest, Martin.
I reckon I've got 1.5" clearance between the manifold and the heat shield, at it's closest point. I am a little concerned about the engine compartment cover and was thinking about fitting some form of shielding on the central GRP divider between the mesh vents. It looks like somewhere that might trap some of the rising heat.
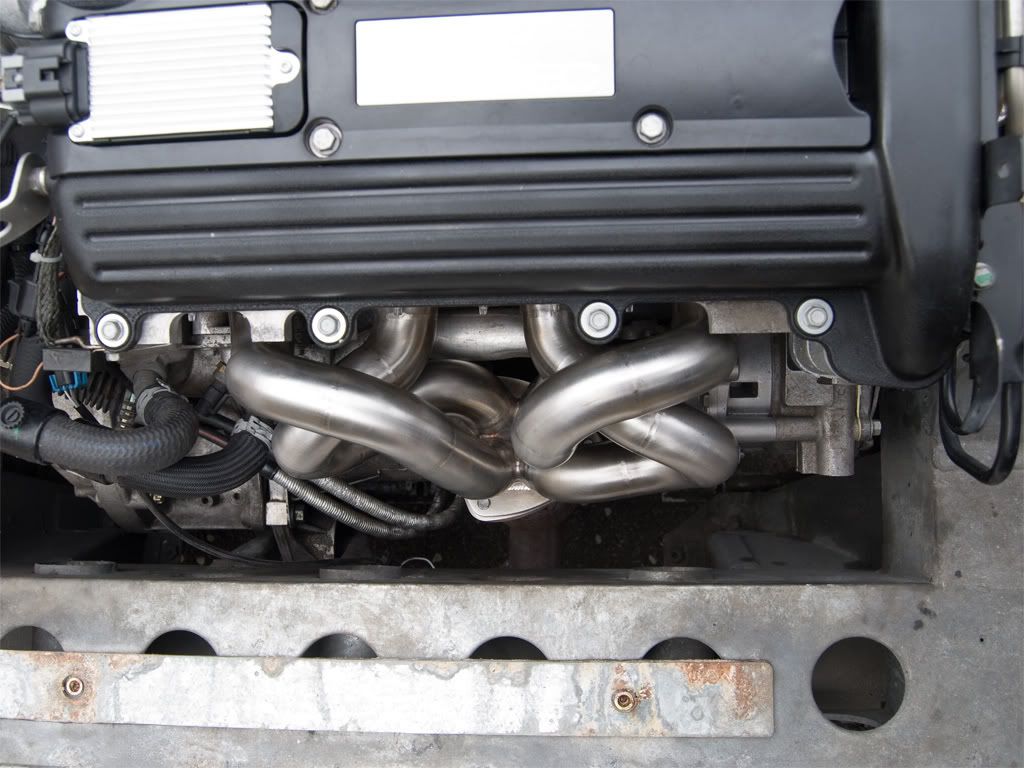

It's hard to see the clearance from the angle of this picture, due to the uppermost piece of heatshield sagging a bit and overhanging the manifold .

I reckon I've got 1.5" clearance between the manifold and the heat shield, at it's closest point. I am a little concerned about the engine compartment cover and was thinking about fitting some form of shielding on the central GRP divider between the mesh vents. It looks like somewhere that might trap some of the rising heat.
It's hard to see the clearance from the angle of this picture, due to the uppermost piece of heatshield sagging a bit and overhanging the manifold .
#10
luna_s
-
-
- 1,934 posts
Billy No Mates
- Gender:Male
- Location:North East Of England
Posted 02 June 2008 - 10:44 AM
thats the stuff thats melted on MartinS' car
the heat that comes off the weapon R is crazy, could use the grills as a bbq - i should make a shield that redirects the heat too
#11
techieboy
-
-
- 22,914 posts
Supercharger of Doom
- Gender:Male
- Location:Bedford
Posted 02 June 2008 - 10:45 AM
I'd guess the rubber back on the OEM heatshielding is probably for acoustic purposes, as well. I'd imagine there is probably much more effective (and potentially thinner/lighter) shielding available on the aftermarket as it would be unlike Lotus/GM to have specced the best available whilst also having the manifold heatshield/deflector fitted.
Luna, what type of glue did you use to bond the shielding onto the clam and your new cutout?
#12
luna_s
-
-
- 1,934 posts
Billy No Mates
- Gender:Male
- Location:North East Of England
Posted 02 June 2008 - 10:52 AM
i just used contact adhesive http://www.cbsonline...dhcon-480-p.asp
not that stuff tho, i got some offa ebay
and i used foil tape to seal the edges
not that stuff tho, i got some offa ebay
and i used foil tape to seal the edges
#13
MartinS
-
-
- 5,173 posts
I only bought it for one summer. 14 years ago and now its gone&#
- Gender:Male
- Location:Rustington, West Sussex
-
Interests:Track days
Pubs
Sausages
Posted 02 June 2008 - 11:04 AM
There is heat proof glue in te demon tweeks catalogue.
I may buy some of the rigid heat shield material and mount it slightly off the divide into the boot, so theres some airspace behind. I'll just probably mount it on some alloy spacers with bolts through. Its just very tight in there. The heat shiedling thats gone is only about a foot deep but goes acress the whole width, so will be a pig to replace.
Will have to do it soon , as have a track day coming up and there is effectively no heat protection there at the moment.
Martin
#14
Crimson_Killa
-
-
- 2,962 posts
Posting My Opinion
- Gender:Male
- Location:Wiltshire
Posted 02 June 2008 - 12:19 PM
this may sound a little  but i had the rear clam off to replace the manifold at the weekend and couldnt get the bolts off that hold the heat shield in place (let alone the manifold itself)
any tips?
edit to say i tried WD40 and the freeze release stuff!
but i had the rear clam off to replace the manifold at the weekend and couldnt get the bolts off that hold the heat shield in place (let alone the manifold itself)
any tips?
edit to say i tried WD40 and the freeze release stuff!
but i had the rear clam off to replace the manifold at the weekend and couldnt get the bolts off that hold the heat shield in place (let alone the manifold itself)
any tips?
edit to say i tried WD40 and the freeze release stuff!
Edited by Crimson_Killa, 02 June 2008 - 12:20 PM.
#15
techieboy
-
-
- 22,914 posts
Supercharger of Doom
- Gender:Male
- Location:Bedford
Posted 02 June 2008 - 12:28 PM
this may sound a little
any tips?
edit to say i tried WD40 and the freeze release stuff!
Just took a bit of brute force when we first took it off a few weeks back. It came off really easily on Saturday when we binned the heatshield for the new manifold. The downpipe to manifold nuts where a bit harder though and took a bit of juice on the ratchet and extension bar.
#16
Crimson_Killa
-
-
- 2,962 posts
Posting My Opinion
- Gender:Male
- Location:Wiltshire
Posted 02 June 2008 - 12:42 PM
having just looked at the tis,
are the top 2 bolts on the heat shield realy going into the cilinder head and not nuts on to captive bolts?
if this is so i might give it another go this weekend!
#17
Winstar
-
-
- 4,264 posts
Scary Internerd
- Gender:Male
- Location:Chesterfield
Posted 02 June 2008 - 01:05 PM
having just looked at the tis,
are the top 2 bolts on the heat shield realy going into the cilinder head and not nuts on to captive bolts?
if this is so i might give it another go this weekend!
they are nuts on studs.
#18
MartinS
-
-
- 5,173 posts
I only bought it for one summer. 14 years ago and now its gone&#
- Gender:Male
- Location:Rustington, West Sussex
-
Interests:Track days
Pubs
Sausages
Posted 02 June 2008 - 01:32 PM
Just went two miles in it and its so bad dont think I can really drive it again until its replaced. I think I'm going to bend it so that it also protects the upper lip of the boot thats above the manifold as that is also very hot and I'm amazed the paint hasnt come off etc, theres definitely a strong smeel of hot fibreglass.
I'd post a phot but dont know how, but my standard heat shielding is a total mess. It was on the rolling road a fair bit last week, so guessing that didn t help.
Martin s
#19
techieboy
-
-
- 22,914 posts
Supercharger of Doom
- Gender:Male
- Location:Bedford
Posted 02 June 2008 - 01:46 PM
Oops. Looks like a clam off weekend again this weekend then. Best get ordering some heat shielding as I don't fancy being stuck in traffic on the way to Le Mans with a barbequeing rear clam.
Sign up for a free Photobucket account, upload the picture to your account on that site and then copy the [IMG] link to your post(s) to display the picture. Failing that, email it to me at techieboy99-700@yahoo.co.uk and I'll do it as I'm a very interested party.
Sign up for a free Photobucket account, upload the picture to your account on that site and then copy the [IMG] link to your post(s) to display the picture. Failing that, email it to me at techieboy99-700@yahoo.co.uk and I'll do it as I'm a very interested party.
#20
luna_s
-
-
- 1,934 posts
Billy No Mates
- Gender:Male
- Location:North East Of England
Posted 02 June 2008 - 02:09 PM
my upper lip is still exposed, its been that way for 600 miles but i dont like it as it gets extremely hot.
intending to make a heatshield when i get round to it, maybe a clam off day


1 user(s) are reading this topic
0 members, 1 guests, 0 anonymous users

