Jump to content


Photo

Honda K24 Powered Speedster


  • Please log in to reply
984 replies to this topic

#41 Aerodynamic

Aerodynamic

    Billy No Mates

  • PipPipPipPipPip
  • 1,455 posts

Posted 24 February 2013 - 08:37 AM

fuel:
fuel filter = high pressure fuel to injectors
other = return to tank

charcoal filter:
pipe which goes from charcoal filter to gearbox side = breather, can be shortened
pipe which goes from charcoal filter, to solenoid and then to inlet manifold = fuel tank vent valve breather, can be vented to air
yellow valve which sits high up = breather safety shut off valve, you must retain this.


Many thanks Vocky.
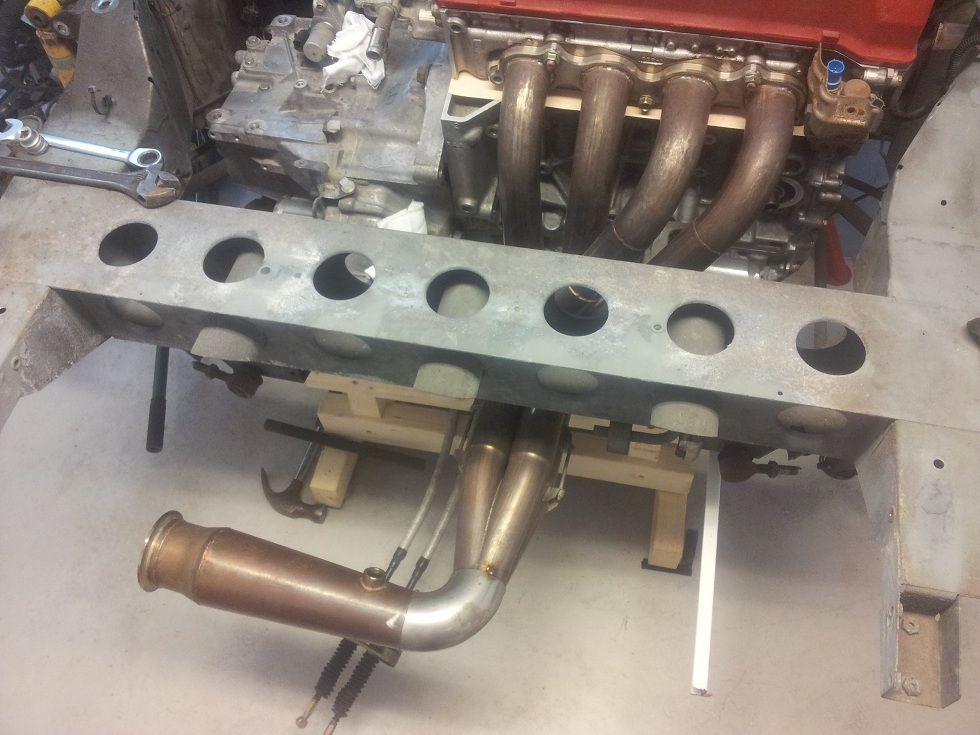
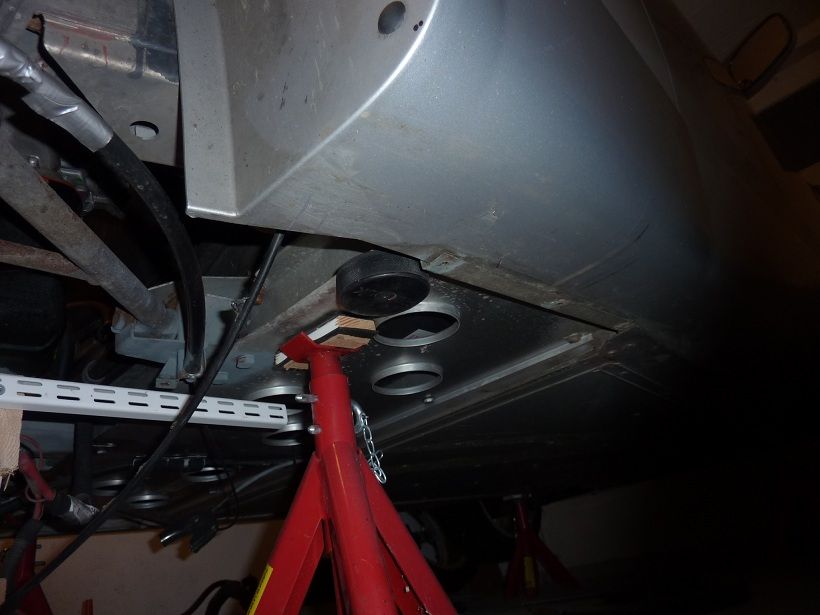
How about this to boxes? What are they doing and which hose is going where?
Posted Image

Where is the ECU located?

Regards, Per

#42 vocky

vocky

    Moderator

  • 11,969 posts
  • Gender:Male
  • Location:Earth

Posted 24 February 2013 - 09:08 AM

the z22se ECU was bolted to the inlet manifold.

The right hand red circle is the charcoal filter, the pipe which goes from charcoal filter to gearbox side breather can be shortened, simply cut the pipe from the plastic fitting on the charcoal filter and then shorten the other end so that the breather sits between the two small pipes coming out of the charcoal filter (rather than going from one side of the car to the other).

The left hand red circle is the manifold, this can be removed and the large pipe sitting next to the fuel filler can be connected to the fuel filler (instead of the large pipe from the manifold) and the 'Y' join is connected to the two small pipes coming out of the fuel tank. The other small pipe on the charcoal filter is removed and left to vent to air, unless the Honda engine has a fuel tank vent valve, then it can be connected to that.

Edited by vocky, 24 February 2013 - 09:12 AM.


#43 vocky

vocky

    Moderator

  • 11,969 posts
  • Gender:Male
  • Location:Earth

Posted 24 February 2013 - 09:14 AM

Posted Image

#44 vocky

vocky

    Moderator

  • 11,969 posts
  • Gender:Male
  • Location:Earth

Posted 24 February 2013 - 09:15 AM

you must leave the yellow safety valve in place, this connects between the charcoal filter and the Y piece - just out of shot in the above picture

Edited by vocky, 24 February 2013 - 09:16 AM.


#45 Arno

Arno

    Need to get Out More

  • PipPipPipPip
  • 1,233 posts
  • Gender:Male
  • Location:Netherlands

Posted 25 February 2013 - 08:15 AM

Where is the ECU located?


You will need to fit the Honda ECU in a dry place, eg. in the luggage compartiment or in the passenger area because it is not a sealed/weatherproof unit.

Bye, Arno.

#46 Aerodynamic

Aerodynamic

    Billy No Mates

  • PipPipPipPipPip
  • 1,455 posts

Posted 03 March 2013 - 07:08 PM

Thank you Vocky, I will need to come back to this hoose thing.

Today I was working with the drive shaft and I installed the óuter joint temporary torquing to
maybe 15Nm and I had this gap of about 3mm, Is is like this even when tighten with right torque?
Posted Image

Need help here.

Thank you.

#47 Aerodynamic

Aerodynamic

    Billy No Mates

  • PipPipPipPipPip
  • 1,455 posts

Posted 05 March 2013 - 07:22 PM

So I used a bit more torque and the clearence disapeard to almost 0. Next question how much play is needed in the inner joint? I have welded a shaft now and it have 11-12mm clearence in worst condition if I would press the shaft inward. BR, Per

#48 vocky

vocky

    Moderator

  • 11,969 posts
  • Gender:Male
  • Location:Earth

Posted 05 March 2013 - 08:14 PM

that sounds about right for driveshaft movement, but it depends how much your engine will move sideways on track

#49 Aerodynamic

Aerodynamic

    Billy No Mates

  • PipPipPipPipPip
  • 1,455 posts

Posted 05 March 2013 - 08:29 PM

I use std engine mouns on each side. The front torque mount will change location slightly. But it will look more or less like standard.

#50 Aerodynamic

Aerodynamic

    Billy No Mates

  • PipPipPipPipPip
  • 1,455 posts

Posted 06 March 2013 - 06:24 PM

Need to decide soon which quick steering rack to buy. VX performance hace one with 2.5 but Im afraid the difference is to little to OEM? Elise parts have one with 2.35 but maybe this could be to heavy when running 215/ 225 in front? Any opinion?

#51 fezzasus

fezzasus

    Whipping Boy

  • PipPipPipPipPipPipPip
  • 7,689 posts
  • Gender:Male
  • Location:Oxford

Posted 09 March 2013 - 08:04 AM

I don't think you'll notice the difference between 2.5 or 2.35

#52 Aerodynamic

Aerodynamic

    Billy No Mates

  • PipPipPipPipPip
  • 1,455 posts

Posted 19 March 2013 - 06:10 PM

Weekends work. Changed my megaphone header a bit, hope it will work fine like this

Posted Image
My friend who I bought the header from cheap will cry when he sees this.

My new jacking point cost me total of 3.5£ and will save me a lot of time in the future.
NHL edition
Posted Image

I´m also celebrating x-mas eve early this year
Posted Image

This weekend I will hopefully get the engine out of the car and I will start modifiing oilpan and the new oilpump.

BR, Per

#53 Aerodynamic

Aerodynamic

    Billy No Mates

  • PipPipPipPipPip
  • 1,455 posts

Posted 20 March 2013 - 06:14 PM

Hi Everyone, I have decided to buy Elise shop quick steering rack and high pressure cooling, anyone have experience with theese?

I´m also planing to remove the knuckles soon to to sand blast them and also machine of some material to be able to increase the camber?
So a few following questions.
Front knuckles:
How much camber is possible in std configuration when removing all schims?
How much material should I machine off to be able to have around -2 deg?
Also how big is tolerance deviation between left and right? Meaning if I remove material and
need to put in some schims to adjust so I have the same camber angle on both side, which (thickness) camber schims should I buy?

And the same questions for rear knucles
looking for 2.3-2,5 degree camber.

Thank you in advance.
, Per Axblom

#54 Nev

Nev

    Nipper's Minion

  • PipPipPipPipPipPipPipPip
  • 11,587 posts
  • Gender:Male
  • Location:Bristol
  • Interests:Rock climbing, skiing, kayaking, surfing, mountaineering, budgies, chess, practical mechanics.

Posted 20 March 2013 - 09:18 PM

Every chassis + wishbone setup will vary to some degree (remember that the chassis is laid up and bonded and wishbones welded by hand etc, so there will be variance). Thus, if you want to be exact you should insert shims/washers to suit any such variations (ie you cant assume 3mm of shim on one side should have 3mm of shim on the other). Really you should set the car up as you would roughly like and then get your local geo alignment shop to let you know how equal the camber is. Then add/subtract shims approriately to equalise the sides.

Edited by Nev, 20 March 2013 - 09:28 PM.


#55 Crabash

Crabash

    Scared

  • PipPipPipPipPip
  • 1,686 posts
  • Gender:Male
  • Location:Durham

Posted 20 March 2013 - 10:43 PM

If I remember right crandal said that mine was about as good as you could hope without machining at -1.5 and -1.6 on the front with all shims out, and -2.5 on rear. I later changed it to -1.2 and -2.2 as I felt braking was compromised and tyre wear a little high considering I was doing 12-13k a year.

Edited by Crabash, 20 March 2013 - 10:46 PM.


#56 Aerodynamic

Aerodynamic

    Billy No Mates

  • PipPipPipPipPip
  • 1,455 posts

Posted 21 March 2013 - 05:03 PM

If I remember right crandal said that mine was about as good as you could hope without machining at -1.5 and -1.6 on the front with all shims out, and -2.5 on rear. I later changed it to -1.2 and -2.2 as I felt braking was compromised and tyre wear a little high considering I was doing 12-13k a year.


Ok so no machining is needed for the rear, but in front some machining is needed to be able to get bit more
camber. so then how much machining or shimming is needed for exampe 0,1 degree?
Anyone (Vocky) could give some hint on how much is needed?
Maybe 1mm is comparable to 0,5degree camber or something similar?
I need this info to know how much to machine off and to know what shim thickness and how many I need?

Thank you in advance, Per

#57 vocky

vocky

    Moderator

  • 11,969 posts
  • Gender:Male
  • Location:Earth

Posted 21 March 2013 - 05:14 PM

I seem to recall it's 1mm camber shim is 0.25 degree front and 0.30 degree on the back

#58 techieboy

techieboy

    Supercharger of Doom

  • 22,914 posts
  • Gender:Male
  • Location:Bedford

Posted 21 March 2013 - 05:15 PM

Buy this kit, job done.

A 1mm shim give about 0.25° of camber on the front but as has already been said, the amount and size will depend on your car.

#59 Aerodynamic

Aerodynamic

    Billy No Mates

  • PipPipPipPipPip
  • 1,455 posts

Posted 21 March 2013 - 06:23 PM

Well Im spending a lot of money this spring on my engine change so a lot of things will be compromised atleast now in the beginnig.

#60 Nev

Nev

    Nipper's Minion

  • PipPipPipPipPipPipPipPip
  • 11,587 posts
  • Gender:Male
  • Location:Bristol
  • Interests:Rock climbing, skiing, kayaking, surfing, mountaineering, budgies, chess, practical mechanics.

Posted 23 March 2013 - 03:48 AM

I would recommend concentrating on getting the engine in and the car up and running first, then deal with "minor" (easier and separate) things like geo. Otherwise you run the risk of trying to do it all in 1 go and making the project too long (and then maybe lose interest). HTH.


0 user(s) are reading this topic

0 members, 0 guests, 0 anonymous users