Project Ginge
#101

Posted 05 October 2013 - 09:05 PM
#102

Posted 06 October 2013 - 07:29 PM
#103

Posted 06 October 2013 - 08:14 PM
Edited by gingerjon, 06 October 2013 - 08:15 PM.
#104

Posted 15 January 2014 - 09:02 PM
So how is progress with this little project??
#105

Posted 17 January 2014 - 12:38 PM
[color=rgb(34,34,34);font-family:Arial, 'sans-serif';font-size:9.5pt;]Well, that’s embarrassing, i had no idea how long it had been since i updated this! ![]() [/color]
[/color]
[color=rgb(34,34,34);font-family:Arial, 'sans-serif';font-size:9.5pt;]
Work has been manic for me over the last few months and to be honest, the slave cylinder issue somewhat crippled my enthusiasm for the car. I haven't really been down to the workshop much and as it stands the car is no further along mechanically. I still can't bring myself to remove all the engine again to look at the slave cylinder and sort our bleeding the system. ![]() [/color]
[/color]
[color=rgb(34,34,34);font-family:Arial, 'sans-serif';font-size:9.5pt;]However, after a few weeks of ignorance, i decided enough was enough and began to stockpile some parts. So far i have collated this little bundle of goodness :[/color]
[color=rgb(34,34,34);font-family:Arial, 'sans-serif';font-size:9.5pt;]JK Composite seat from Jimmy[/color]
[color=rgb(34,34,34);font-family:Arial, 'sans-serif';font-size:9.5pt;]Harness Bars and Luke Harnesses from TurboLuca[/color]
[color=rgb(34,34,34);font-family:Arial, 'sans-serif';font-size:9.5pt;]A selection of Switches, starter button and interior alcantara for the dash[/color]
[color=rgb(34,34,34);font-family:Arial, 'sans-serif';font-size:9.5pt;]Carbon binnacle cover from Sam[/color]
[color=rgb(34,34,34);font-family:Arial, 'sans-serif';font-size:9.5pt;]Louvre’s for the front clam from Sam too[/color]
[color=rgb(34,34,34);font-family:Arial, 'sans-serif';font-size:9.5pt;]Scangauge II for the dash[/color]
[color=rgb(34,34,34);font-family:Arial, 'sans-serif';font-size:9.5pt;]Shift Light[/color]
[color=rgb(34,34,34);font-family:Arial, 'sans-serif';font-size:9.5pt;]And a set of lovely ATS DTC's ![]() from Luke[/color]
from Luke[/color]
[color=rgb(34,34,34);font-family:Arial, 'sans-serif';font-size:9.5pt;]All in all a very expensive few months but with very little actual progress on the car. ![]() [/color]
[/color]
[color=rgb(34,34,34);font-family:Arial, 'sans-serif';font-size:9.5pt;]The plan now is to finish of the interior myself, the dash and switch panels, swap out the seat and install the scangauge. Once the Harness bar and harnesses are in it will be pretty much complete. i'm hoping to have this done by mid Feb. Then i'll start to do a few repairs on the bodywork and try to fit the louvre’s etc before the car goes for its eventual respray.[/color]
[color=rgb(34,34,34);font-family:Arial, 'sans-serif';font-size:9.5pt;]mechanically i know the car works as we had the engine running briefly. So i will get the car trailored up to BOT (Or i may even try and convince Jimmy to take up the challenge!! ![]() ) so i can get the clutch issue sorted, have the car set up and generally checked over after my amateur attempts to refurb it. Once this is sorted, i hope to get the Supercharger done and then finish off with a the respray.......hopefully all in time for the national.
) so i can get the clutch issue sorted, have the car set up and generally checked over after my amateur attempts to refurb it. Once this is sorted, i hope to get the Supercharger done and then finish off with a the respray.......hopefully all in time for the national. ![]() [/color]
[/color]
[color=rgb(34,34,34);font-family:Arial, 'sans-serif';font-size:9.5pt;]A bold plan and it may not all come together in that order or at that speed but i hope to stay on track with times. Trying to move house at the moment so that ensures my VX funds are mostly kept away from me but as you can see from the above.....i find a way! ![]() [/color]
[/color]
[color=rgb(34,34,34);font-family:Arial, 'sans-serif';font-size:9.5pt;]I'll be back down in a couple of weeks and will grab some pictures of the interior parts and some of the bits listed above and hopefully have some progress to share also.[/color]
[color=rgb(34,34,34);font-family:Arial, 'sans-serif';font-size:9.5pt;]Thanks ![]() [/color]
[/color]
[color=rgb(34,34,34);font-family:Arial, 'sans-serif';font-size:9.5pt;]J[/color]
#106

Posted 25 January 2014 - 05:03 PM
Right then, time to get things back on schedule. ![]()
Back down to the workshop today for the first time in what felt like months, a car full of purchases ready to swap and fit. As i said above, i'm concentrating getting the interior sorted out for now, with the dreaded slave cylinder issue still yet to be sorted..
First up was my delightfully large wide new wheels!!
It was amazing to put them next to the OEM wheels, if they don't make a difference to the driving...nothing will!
Rears :
Fronts :
The car looks instantly more aggressive in my opinion, the rears look crazy!!
So thats now a full set of Turbo Wheels, and N/a wheels i have that are seemingly redundant!!! oops!! ![]()
#107

Posted 25 January 2014 - 05:15 PM
Other purchases included :
Louvres : (the dremel is going to get a serious work out on these!!)
Not sure i like the "killer whale" look however!!!
A carbon Binnacle that is a thing of beauty!
JJJ's old seat, composite works :
I went to fit the seat first, removed the old seat and took off the subfame and gave it a little clean.
I tried to used the existing seat bolts but couldnt get hem all to fit and line up.....does anyone know if i need a specific set from somewhere??
My plan is to remove the pads and cover them in Alcantara....but having found out that a new set done professionally is only £60... i'll probably end up going down that route.
Having now sat in it, in the car, im a bit worrid that it sits me too high. I'm not a small chap so although is very comfortable i may have to look at alternatives unfortunatley. But i will fit it to the frame properly first before making any rash decisions.
With my old seat knackered, i thought i would see what the seat under the padding looked like, as it woudl need retrimming regardless so may just save me a couple of quid at the trimmers.
The sponge and glue is all over it, but i think now with the covers off its much easier to cut the harness holes if needed.
We shall see.....
#108

Posted 25 January 2014 - 05:35 PM
Next up was the interior dash top and plates.
I am going to mount my scan gauge II in the dash plate area to the right of the steering wheel, which obviously meant i would need to move the switches from that side.
I originally bought a single DIN stero compartment to try and fix it in place under the dash with the interior light area, but after i had trimmed it down, the routing of the cables down through the dash would have been a pain so a new plan was needed.
I had purchased a while back one of the VXR "Carbon Look" dash plates wiht no stereo cut out, as i was going to cover it anyway i thought it would be fine. I have removed all the stereo, but left the major cables in place in a "just in case" moment!!
So, back to my original dash plates for use here.
I decided to try and swap around the heater control panal and that would then give me a better area to add the switches rather than practically leaning into the passenger side to turn the lights on!!
Heater controls removed
Heater plate removed from the controls.
The plate is the wrong length to just put behind the dash plate a litte further accross
So i thought i would make a new one to match the new switch panel i had in mind
I needed to remove the slight rim on the back of the dash plate where the stereo would be, so out came the dremal and the smell of melting plastic.
Then to mark out the cuts and holes
I was also doing the same process for the switch panel
After a lot of measuring, drilling and cutting, we were starting to look like it might work!
I have moved the start button so that the dash looks a little more plain when re covered.
All finished, now i am not sure about the flight switch covers, they seemed a brilliant idea but may look a little fussy and fake....i'lll see if they grow on me before taking them back off.
Taped cruedly into the car
#109

Posted 25 January 2014 - 05:37 PM
And that was quite enough for today.
I'm going to Alcantara the Dash Board and the Dash plates in the next coupld of days, then begin to takle to wiring.
All back together....I WISH!!!
I think a couple of months of has renewed my enjoyment.....only about a million more things to do!!!!
#110

Posted 25 January 2014 - 08:26 PM
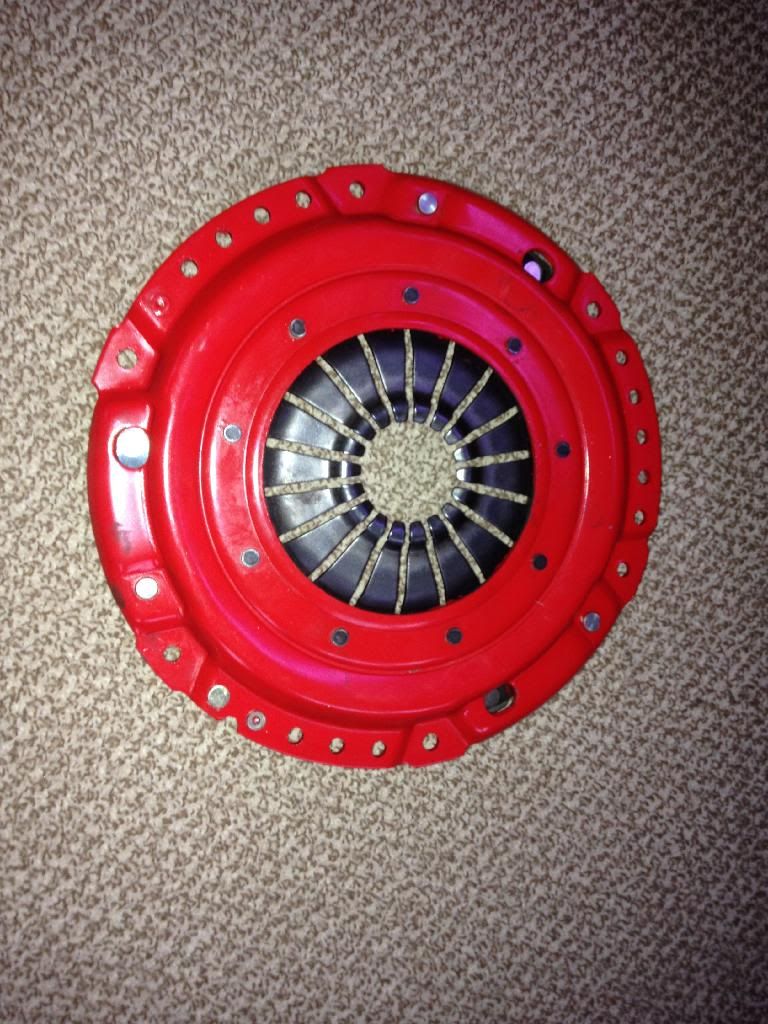
when you remove the gearbox to sort the clutch please replace that red clutch cover and fit a z22se item, I had exactly the same issues with an identical red clutch cover, it went to the tip with less than 2 miles on it
#111

Posted 25 January 2014 - 11:46 PM
#113

Posted 26 January 2014 - 10:26 AM
yes, they are crap ![]()
#114

Posted 26 January 2014 - 10:35 AM
#115

Posted 26 January 2014 - 10:38 AM
#116

Posted 26 January 2014 - 10:42 AM
Cheers vocky that won't be going on,
It cost me at least two gearbox removals, just buy a genuine cover or a LUK
#117

Posted 26 January 2014 - 10:44 AM
#118

Posted 26 January 2014 - 10:58 AM
to remove the gearbox you need to remove the nsr suspension, you leave the upper wishbone in place by removing the two bolts which hold the ball joint bracket to the hub, the lower wishbone is left attached to the hub and comes away with the driveshaft complete. You should remove the disc and caliper first.
the osr can be left attached to the car, just remove the lower ball joint and tiebar connections, this gives enough room to slide out the cv.
the exhaust needs to be disconnected at the joint after the cat.
then leave the os engine mount attached but loose, then remove the other three mounts, lower the gearbox down enough so it clears the subframe.
But as for easier, hmm, probably easier to whip the engine out on your own. With two people the gearbox is probably easier.
#119

Posted 26 January 2014 - 11:24 AM
Where do these dodgy covers come from? That's three of you who've had them now.
#120

Posted 26 January 2014 - 11:36 AM
I do have the name of company but I don't know for sure if it's a dodgy one just looks like it do I won't be using itWhere do these dodgy covers come from? That's three of you who've had them now.
0 user(s) are reading this topic
0 members, 0 guests, 0 anonymous users


